
Contents:
Dialing, Answering, and Hanging Up
Controlling Result Code Displays
Accessing and Configuring the Courier 56K Corporate Modem Remotely
Dial Security
Handshaking, Error Control, Data Compression, and Throughput
Displaying Querying and Help Screens
Dedicated/Lease Line and Synchronous Applications
Appendixes
Courier 56K Corporate Modem Command Reference
Dial Security
This chapter contains information about:
- Setting up Dial Security
- Maintaining Security Accounts
- What The Guest User Needs To Do
- Configuring Dial Security Remotely
- DTMF Security
Overview
Dial Security is designed to protect networks and data centres from unauthorised access.
You should be familiar with these terms before you continue:
|
Local
|
The device that is directly connected to the computer you are using. |
|
Remote
|
The device at the other end of a telephone connection. |
|
Host
|
The Courier 56K Corporate modem that will be accessed and controlled by other devices. |
|
Guest
|
The device that will access and control the host Courier 56K Corporate modem. |
You can configure up to 10 accounts: one administrative account for you and nine accounts for guest users. The account profiles are stored in the host Courier 56K Corporate modem’s nonvolatile random access memory (NVRAM).
There are two forms of Dial Security; each will be explained later in this chapter:
- Autopass
- Password Prompting
![]()
Setting up Dial Security
Here is a summary of the steps for setting up Dial Security:
- Set up an account for yourself
- Identify your account as the Administrative Account
- Set up guest-user accounts
- Enable local (host) security
- Choose a Dial Security method
- Enable Dial Security
- Activate the Dial Security settings
1. Set up an account for yourself
Use any of the 10 available accounts (numbered 0-9) for your account. Use the AT%An command to set up user accounts.
Note: The AT%An command is automatically written to NVRAM. It does not require you to send &W.
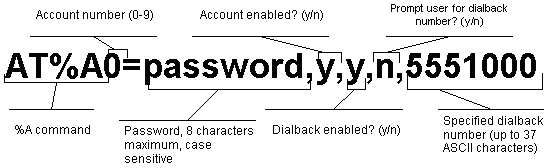
WARNING: Do not insert spaces between commas or between fields and commas. Spaces will invalidate the command.
Dialback options
You can set the Courier 56K Corporate modem to automatically dial back a certain number after a client modem dials in.
Note: Count your commas. There should always be at least four commas in the %A command. Do not insert spaces between commas or between fields and commas. Spaces will invalidate the command.
|
To make the host Courier 56K Corporate modem
|
Command
|
Example
|
| Hang up and then dial back a guest device at a specified
number. Expect a pause of approximately 1.5 minutes before the modem dials back. You cannot alter the duration of the pause. |
AT%A0=password,y,y,n,1 area code and phone number |
AT%A0=wombat,y,y,n,1,8475555555
|
| Prompt you to enter a number at which to dial back a device, and then have the Courier 56K Corporate modem dial back the device at that number | AT%A0=password,y,y,y, |
AT%A0=wombat,y,y,y,
|
| Disable dialback | AT%A0=password,y,n,, |
AT%A0=wombat,y,n,,
|
Note: To enable Dialback, you must enable Dial Security with Prompting. See step 6.
2. Identify your account as the Administrative Account
|
For your modem to
|
Command
|
Example
|
| Identify your account as the Administrative Account |
AT%L
|
AT%L=PW0 This example sets account 0 as the Administrative Account. |
Once you set the administrative password, you cannot view or modify the guest account profiles unless you enter the correct administrative password.
WARNING: Be sure to remember your administrative password. If you enable Dial Security and then forget your administrative password, you will be locked out of the Courier 56K Corporate modem’s dial security features. You will need to restore the factory defaults by setting DIP switch 10 ON. This will erase ALL passwords and you will have to reconfigure all your accounts.
3. Set up guest-user accounts
Use the AT%An command to set up guest-user accounts in the same way you set up your administrative account. You can set up nine guest accounts. Refer to the figure in step 1 regarding information about formatting the AT%An command.
After you have enabled the guest accounts, make sure the guest users know their passwords and the log-in procedure.
4. Modifying Accounts
After you have set up an account, you can modify each field independently. If a field is to remain unchanged from its original setting, just insert a comma as shown:
AT%A1=,,,Y,
The command above allows the guest user to supply a dialback number that is different from the one stored in the original account record.Enable Local Security.
WARNING: If you do not enable Local Security, the Dial Security settings will not be protected and other users will be able to change or erase them.
|
For your modem to
|
Command
|
| Protect the administrative password (local security enabled) | ATS53.2=1 |
Note: You must use the &W command to save the settings in NVRAM. If you don’t, the next time you reset or power off the Courier 56K Corporate modem, Dial Security will be disabled.
5. Decide which Dial Security option to use
You can choose from the two types of Dial Security: Autopass and Password Prompting.
Autopass Prompting
Autopass is the default form of password protection. Autopass automates the process of logging in to the host modem, but it requires the guest and host devices to be Courier 56K Corporate modems.
When a guest device attempts an Autopass connection, the guest includes the password in its V.42 error-control request. The host modem checks all the enabled passwords in its security accounts for a match.
Password Prompting
Password Prompting allows connections with any guest device, as long as the guest user knows the correct password.
When the host has Password Prompting enabled, it asks guest users for a password. The host modem checks the received password against each of its active Security accounts.
Note: There is no Password Prompting capability in synchronous mode.
The table below is a comparison between Autopass and Password prompting.
|
When using Autopass Prompting
|
When using Password Prompting
|
| Both the host and guest devices are made by USRobotics and have Dial Security enabled. | Guest devices don’t have to support USRobotics Dial Security. |
|
The connection between the Courier 56K Corporate modem or modems is under V.42 error control. (Refer to the Alphabetic Command Summary chapter of the Appendixes section for information about using AT&M4 or AT&M5.) |
V.42 error-control connections aren’t required. |
| If the guest includes an invalid password, the host sends an INVALID PASSWORD message and hangs up. |
If the guest sends an invalid password, the host prompts twice more before disconnecting. If the guest does not send a password after 60 seconds, the host disconnects. |
| If the guest includes a valid password, the host permits a secure connection. | The host will still always respond to a correct Autopass attempt. |
| If the guest did not enable Dial Security, the host
will not accept the call unless prompting is enabled on the host Courier 56K Corporate modem. |
6. Enable Dial Security
WARNING: Before you enable Dial Security, you must set up an administrative account and password. See Steps 1 & 2.
|
For your modem to enable
|
Command
|
| Autopass Dial Security |
ATS53.0=1
|
| Dial Security with Password Prompting (this also enables Autopass) |
ATS53.0=1.1=1
|
| Dialback Security, enable Password Prompting and enable Dialback in each guest account |
AT%An=password,y,y,y,phone number where n is the account number. See the figure in previous section, Setting Up Dial Security for more information. |
Example: Issuing AT%A3=corn,y,y,y,5551234 to your modem will enable Password Prompting and Dialback for account 3, which has the password "wombat."
Note: You must use the &W command to save the settings for Enabling Autopass Dial Security and Dial Security with Password Prompting. If you don’t, the next time you reset or power off the Courier 56K Corporate modem, Dial Security will be disabled.
If you need a reference when setting these command, you can use the ATI10 command. Refer to the Alphabetic Command Summary chapter of the Appendixes section for more information about the ATI10 command.
7. Send ATZ or ATZ! to activate the Dial Security settings.
Note: For all Courier 56K Corporate modems except the PC card version, make sure that DIP switch 10 is OFF, so the modem loads the settings stored in NVRAM. If DIP switch 10 is ON, the settings in ROM (&F0) are loaded, disabling dial security. You can retreive the dial security settings by setting DIP switch 10 OFF and resetting the Courier 56K Corporate modem using ATZ or by toggling the power of the modem.
![]()
Maintaining Security Accounts
Once the administrative password is set and Dial Security is enabled, the administrator is the only one who can access account information.
You can use the AT%S= and AT%E= commands to change and modify account information.
| For your modem to |
Command
|
| Access accounts by disabling local security |
AT%S=administrative password |
|
View account information, once access has been granted. Remote users may only use this command during remote access sessions if local-access security is disabled. |
ATI10
|
| Erase local-access password |
AT%E=1
|
| Erase Autopass password |
AT%E=2
|
| Erase passwords in accounts 0-9 |
AT%E=3
|
| Erase phone numbers in accounts 0-9 |
AT%E=4
|
| Disable Account, Dialback, and New Number fields in accounts 0-9. |
AT%E=5
|
| Edit or overwrite an individual account or an individual account field |
AT%An= where n is the account number. |
Example: Sending AT%E=3 erases passwords for accounts 0-9.
Note: When using the AT%S= command, the device echoes the administrative password, which is case-sensitive. Courier 56K Corporate modems will accept an invalid password entry, but will lock out users from the security commands. For example, if the password is Green, but you enter GREEN, an OK is displayed. However, if you try to type a security command (for example, ATI10 to view accounts), an [ACCESS DENIED] message is displayed.
Remote Configuration
Dial Security accounts may be configured remotely. (Refer to Configuring Dial Security Remotely at the end of this chapter.)
![]()
What The Guest User Needs To Do
When guest users want to call in to the host (assuming you have enabled
Dial Security by entering ATS53.0=1),
- They must know the password.
- If you have enabled Dialback, they must set their device to auto-answer.
- If the host has security enabled, get a password from the host’s
administrator. The password is case-sensitive, so be sure to copy it
correctly.
If the host has prompting enabled and the host operator enables Dialback for your account, skip to Step 3.
- For guest users with Courier 56K Corporate modems (or I-Modems) only:
a) Create a security account using the password the host’s administrator asked you to use. (See Setting Up Dial Security, earlier in this chapter, for instructions.)
b) You need to assign the password as your Autopass password.
For your modem toCommandAssign the password as your Autopass password. AT%V=PWn
where n is the number of the account you set up.
Example: Sending AT%V=PW3 will assign the password as an Autopass password for account 3.
c) Check to see that you set your Autopass password correctly by using the ATI10 command.
Your Autopass password appears beside AUTOPASS PASSWORD, if you have done all the steps correctly.
d) Once the Autopass password is set, enable your Courier 56K Corporate modem’s Dial Security.For your modem toCommandEnable Dial Security ATS53.0=1
CAUTION: If you do not follow an S-Register setting with &W, the setting will be retained only until the next reset or power off.
- If Dialback is enabled at the host Courier 56K Corporate modem’s
site, set your modem to answer the host Courier 56K Corporate modem when
it dials back.
For your modem toCommandTo answer the Dialback call ATS0=1
-
Call the host.
-
After the call ends you can disable Auto Answer.
For your modem toCommandDisable Auto Answer ATS0=0
![]()
Configuring Dial Security Remotely
The host administrator can configure the host’s security settings remotely.
Note: At the host device, you must have previously enabled remote access and assigned a remote-access password that allows view-and-change privileges (Refer to the Accessing and Configuring the Courier 56K Corporate Modem Remotely appendix in this guide). You may want to use your administrative password as your remote-access password.
Dialing In From the Remote Site
- From the remote site, connect to the host using Dial Security. Once a connection is made, follow the instructions for beginning a remote-access session as described in the Accessing and Configuring the Courier 56K Corporate Modem Remotely appendix in this guide.
- When remote access has been granted, use the AT%S= command to access
the Dial Security accounts. Refer to the Maintaining Security Accounts
section in this chapter.
To view the security account information use ATI10. - Make any configuration changes and execute them immediately by entering AT%C2.
- To end the remote session and reactivate Dial Security on the host, reset the host device by issuing ATZ.
WARNING: If you do not use the ATZ command to end a remote-access session, Dial Security will remain disabled at the host, and anyone dialing in to the host for remote access will have access to the ATI10 screen and all Dial Security accounts.
![]()
DTMF Security
DTMF (Dual Tone Multi-Frequency) Security requires a modem to go off hook
when it receives a call but keep silent until it receives the valid DTMF
password. After the modem receives the valid password, it will begin training.
If the DTMF password is invalid, the modem will go on hook, and the DTE
will never know there had been a call coming.
The DTMF security status and password are shown in the ati10 screen.
DTMF security is enabled by setting the S53 bit 3, e.g. S53=8 or S53.3=1.
Using the %D command sets the DTMF security password (AT%D=PWn, n=0--39). Make sure to disable that account so no one can use the DTMF password as the Dial Security account. For example, to set local modem DTMF security password, you may use following command: AT%A0=123456,N,,, then AT%D=PW0. You can change that security account later, if you like.
The DTMF password can be the combination of 0123456789*ABCD; the # is used as the password end sign. The maximum length of the DTMF password is eight characters.
The remote modem dial string should look like this: ATDT2625000@123456#. In this example, “123456” is the DTMF security password.
![]()