
Contents:
About the 802.11g Wireless Gaming Adapter and Ethernet Bridge
Accessing the Web User Interface and Site Survey
Web User Interface and Security Configuration
802.11g Wireless Gaming Adapter and Ethernet Bridge User Guide
Restoring to Default Settings
You may use the reset button to restore your 5430 to factory defaults. To restore your 5430 to factory default settings, insert a pin or paperclip to press the reset button for more than 5 seconds.
Note: To reboot the 5430, simply unplug the AC power adapter from the 12VDC jack.
Using the reset button to enable Configuration Mode
To access the 5430s Web User Interface pages, you will need to have the 5430 supply your computer with an IP address. In order for the 5430 to supply this IP address, you must insert a pin or paperclip to press the reset button momentarily (less than 2 seconds). This allows the 5430 to become a DHCP server capable of serving an IP address of 192.168.1.202 to the device requesting an IP address. The default IP address of the 5430 is 192.168.1.201
Accessing the 5430s Web User Interface pages
You will need to access the Web User Interface pages for a variety of reasons. The most common of these is to change from Client Mode to Ad Hoc Mode, to enable security, and to perform a site survey. Out of the box, the 5430 is configured in Client Mode. Client Mode converts wireless data to Ethernet data which is forwarded onto your computers Ethernet (NIC) connection. The easiest way to access the Web User Interface pages is to put the 5430 in Configuration Mode. In Configuration Mode, the 5430 will supply your computer with an IP address.
Follow the steps below to enable the Configuration Mode:
- Attach the antenna to the back of the 5430.
- Plug the AC power adapter into the 12VDC jack on the back of the 5430.
- Insert a pin or paperclip to press the reset button momentarily (less than 2 seconds). The reset button is located on the back of the 5430.
- Connect one end of the included Ethernet cable to the port on the
back of the 5430. Connect the other end to the Ethernet port on your
computer. Open an Internet browser and enter http://192.168.1.201
Note: If your search for the device times-out or you did not get a dialog box for the username and password, you may need to refresh the IP settings on your computer. Follow the steps below for your operating system to refresh the IP settings on your computer. Once complete, access the 5430 using your browser. - Enter your user name and password. The default username is admin. The default password is admin. Press Enter on your keyboard.
- The Web User Interface will appear. Select Client Mode or Ad Hoc Mode and click Next. Type your wireless network SSID in the SSID field, select the corresponding Data Encryption, Authentication, and Network Key, if applicable. Click Save. A Your 5430 is configured message will appear. Click Continue.
- Once you have configured your 5430, remove the Ethernet cable from your computer and connect to the Ethernet port on your gaming console or your Ethernet-ready device.
Windows 95, 98, or Me Users:
Click Windows Start and then Run. Type winipcfg
and click OK. Check the IP address (default is 192.168.1.202),
Subnet Mask (default is 255.255.255.0), and Default Gateway (default
is 192.168.1.201) to make sure they are correct. If the information
is not correct, click Release All and then click Renew All.
Open an Internet browser and enter http://192.168.1.201
Windows NT, 2000, or XP Users:
Click Windows Start and then Run. Type cmd and
click OK. At the DOS prompt, type ipconfig /all. Check
the IP address (default is 192.168.1.202), Subnet Mask (default is 255.255.255.0),
and Default Gateway (default is 192.168.1.201), to make sure they are
correct. If the information is not correct, type ipconfig /release
and press Enter. Then, type ipconfig /renew and press
Enter. Open an Internet browser and enter http://192.168.1.201
Performing a Site Survey
Site Survey is a powerful tool and should be utilized to ensure your 5430 associates to your wireless network. Performing a Site Survey scans for all wireless routers and access points within range and displays the SSID (the network names) of each. If you are not associating to your wireless network or if you are not associating to any wireless network, performing a Site Survey should be your first course of action. To perform a site survey, follow the steps below:
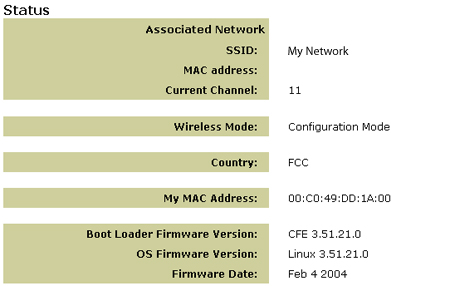
- Access the Web User Interface. It is important to verify the status
of your 5430 before performing a Site Survey. To do so, select the Status
tab as demonstrated below:
- Select the Tools tab. Click Site Survey. A separate window will appear displaying the SSID (the network names) of each wireless router and access point within range. Select your wireless network SSID and click Select.
- Wait about 15 seconds in order for the device to reboot and click Continue. The Status page will appear. Your 5430 should now be associated to your wireless network. If your 5430 is not associated to your wireless network, refer to the Troubleshooting section in this User Guide.
![]()