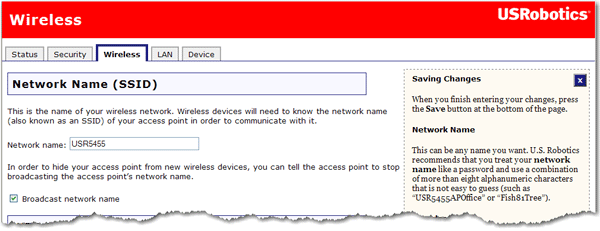
In this section you can change the wireless network settings of the access point.
Wireless devices use the Network name (SSID) to connect to your access point.
The default Network name of the access point is USR. If you have more than one and want to use each independently, you must configure a unique Network name for each access point.
Select Broadcast network name if you want wireless devices to be able to detect your access point when they perform a site scan.
If you deselect Broadcast network name, wireless devices will not be able to detect your wireless network during a site scan. Devices will have to manually enter the Network Name (SSID) of your access point to connect.
WDS lets access points and wireless routers communicate with one another wirelessly, effectively creating a bridge between multiple networks. By connecting an access point or wireless router to each network and enabling the WDS feature, you enable wireless clients to roam throughout the range of both networks.
The access point and the other wireless networking device must have the same channel, network name (SSID), and wireless security settings. Each device must have the MAC address of the other device in its WDS Restrictions table.
With this type of wireless network, throughput may be reduced across the bridge. Therefore, bridged routers or access points that also allow wireless devicess to connect to the network should not be used for high-volume traffic. Examples in which bridging may be useful include providing network access to parts of a building that cannot be connected using wires, or providing short-term network access to a conference area.
You can set restrictions for devices that connect through WDS (Wireless Distribution System). These restrictions apply only to devices that connect through WDS, not to all wireless devices that connect to the access point.
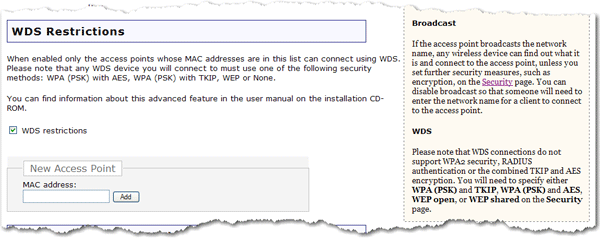
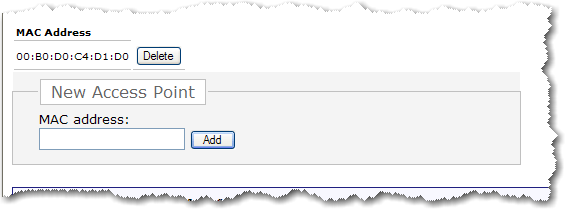
If you select WDS restrictions, you must enter the MAC addresses of the wireless routers or access points that will connect to this access point and click the Add button.
To delete an existing WDS mapping, click the Delete button next to the MAC Address:
The access point’s WDS connections do not support WPA2 (PSK), any of the RADIUS security methods, and TKIP and AES encryption.
It is recommended that all WDS devices connect to the router using WPA (PSK) with TKIP encryption.
The Pass phrase (which is also commonly called a Network key, key, or Personal shared Key) you entered for the wireless security on the access point will also be used as the Personal Shared Key (PSK) for WDS connections. However, all wireless clients connecting to the access point should continue to use the same security method and encryption type that you configured on the access point.
This feature is disabled by default. If you want to enable this feature, select the checkbox next to WMM (Wi-Fi Multimedia). The other devices that you are connecting to in order to use this feature must also support WMM and have it enabled.
This feature enables the Quality of Service (QoS) function that is used for multimedia applications, such as Voice-over-IP (VoIP) and video. This allows the network packets of the multimedia application to have priority over regular data network packets, allowing multimedia applications to run smoother and with fewer errors.
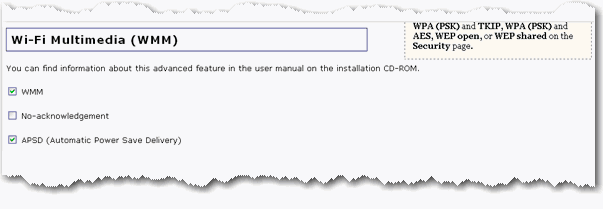
If you enable WMM, you can then select No-acknowledgement. No-Acknowledgement refers to the acknowledge policy used at the MAC level. Enabling no-acknowledgement can result in more efficient throughput but higher error rates in a noisy Radio Frequency (RF) environment.
With WMM enabled, you can also select Enable APSD (Automatic Power Save Delivery). APSD manages radio usage for battery-powered devices to allow longer battery life in certain conditions. APSD allows a longer beacon interval until an application requiring a short packet exchange interval starts. Voice Over Internet Protocol (VoIP) is an example of application requiring a short packet exchange interval. APSD affects radio usage and battery life only if the wireless client also supports APSD.
Note: The Acceleration option MAXg (125 Mbps) is incompatible with WMM. To enable WMM, you must set the Acceleration option to 54g+ (Xpress™).
The fields in this area are for more advanced wireless features that most people do not need to change. If you do want to change any of these settings, write down the default settings before you make any changes in case you experience any problems and need to change these settings back.
![]()
Multicast rate: Specify the rate at which multicast packets are transmitted and received on your wireless network. Multicast packets are used to send a single message to a set of recipients in a defined group. Teleconferencing, videoconferencing and group email are some examples of multicast applications. Specifying a high multicast rate may improve performance of multicast features. The rates are in Mbps. You can select Automatic, 1, 2, 5.5, 6, 9, 11, 12, 18, 24, 36, 48, 54.
To prevent the access point from transmitting multicast packets, clear the checkbox.
Power level: Select 100%, 50%, or 25% from the drop-down menu. The Power level sets the strength of the wireless signal that the access point transmits. You would want a lower setting if you live in an area where your wireless signal could be overlapping with other wireless networks and want to reduce the interference you encounter.
Channel: Sets the channel on which the access point is to operate. If you are experiencing interference or wireless network problems, changing the channel may solve the problem.
54g mode: Select Automatic, 802.11g Performance, or 802.11b Only. If you are using all 802.11g equipment, 802.11g Performance will provide the fastest performance. If you select 802.11b Only, all clients that are capable of 802.11b will connect to the at 802.11b data rates.
Automatic 54g protection: If you select this option, the access point will use Request to Send/Clear to Send (RTS/CTS) to improve the performance in 802.11 mixed environments. If this is not selected, the 802.11n performance will be maximised under most conditions while the other 802.11 modes (802.11b, etc.) will be secondary.
Supported rate: Select the wireless link rate at which you want information transmitted and received on your wireless network. You can select Auto, 1, 2, 5.5, 6, 9, 11, 12, 18, 24, 36, 48, 54.
Basic rate set: Select the basic rate that wireless clients must support: Default, All, or 1 & 2 Mbps.
Acceleration: Select None, 54g+ (Xpress™), or MAXg (125 Mbps). These features determine either normal speed rates or accelerated rates. Set the mode to 54g+ (Xpress™) for the widest compatibility. The Wi-Fi Multimedia (WMM) feature is not available if you select MAXg (125 Mbps). 125 Mbps can only be achieved if all wireless clients are MAXg wireless clients and your wireless environment does not have interference from other radio devices.
Beacon Interval: The amount of time between beacon transmissions. A beacon is basically a heartbeat for a wireless device or access point, sending out a signal informing the network that it is still active. This should be set between 1 and 1000 milliseconds. The default beacon interval is 100 ms.
RTS threshold: The minimum size in bytes for which the Request to Send/Clear to Send (RTS/CTS) channel contention mechanism is used. In a network with significant radio interference or large number of wireless devices on the same channel, reducing the RTS Threshold might help in reducing frame loss. The RTS threshold is 2347 bytes by default, which is the maximum value.
Fragmentation threshold: The maximum level that the access point will reach when sending information in packets before the packets are broken into fragments. Typically, if you are experiencing problems sending information, it is because there is other traffic on the network and the data being transmitted is colliding. This might be corrected by the information being broken into fragments. The lower the fragmentation threshold value, the smaller a packet has to be before it is broken into fragments. If the maximum is set (2346), fragmentation is essentially disabled. You should only change this level if you are an advanced user.
DTIM Interval: The amount of time after which buffered broadcast and multicast frames will be delivered to the wireless clients. This allows mobile stations to conserve power. If you are using applications that use broadcast or multicast frames for delivering data, you should use a Delivery Traffic Indication Message (DTIM) Interval of 1 to minimise delay for real-time traffic, such as multicast audio and video streams.
Preamble: Defines the length of the Cyclic Redundancy Check (CRC) block for communication between the access point and wireless clients. The preamble consists of the Synchronization and Start Frame Delimiter (SFD) fields. The sync field is used to indicate the delivery of a frame to wireless stations, to measure frequency of the radio signal, to perform corrections if needed. The SFD at the end of the Preamble is used to mark the start of the frame.
If you are not using any 802.11b devices in your network, you can configure the Preamble type to Short for optimum performance. The Long Preamble type should be used when both 802.11g and 802.11b devices exist on your network.
Note: Click Save to apply all your new settings and reboot the access point after you have completed all your changes.