
Contents:
Installing Your Modem >
USRobotics 56K PC Card Modem User Guide
Installing Your Modem
Windows 3.1, DOS, and Linux Information
Installing Your Communications Software
Uninstalling Your Modem
Note: For computers that are running Windows NT 4.0, go to the section entitled Windows NT 4.0 Installation.
Three steps for easy installation!
- Insert the modem.
- Connect the phone cord.
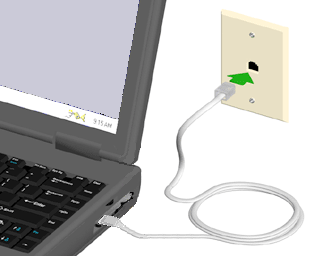
- PC cards with model number USR0756-XJ have an XJACK® connector. Push in on the XJACK connector to pop it out of the PC card. Connect one end of a standard RJ-11 phone cord to the XJACK connector and the other end to an analog telephone wall jack. Refer to this illustration:
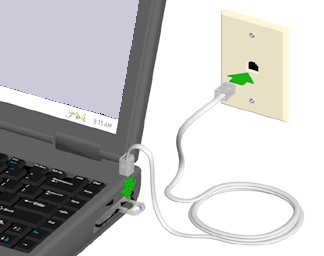
- PC cards with model number USR0756-CB do not have an XJACK®
connector and use an RJ-11 jack-to-PC card connector cable. Connect
the PC card connector to the modem and the RJ-11 connector to an analog
telephone wall jack. Refer to this illustration:
- To connect to a telephone system outside North America, use an adapter
that is appropriate for the country you are in.
- Install the drivers.
- Insert the Installation CD-ROM into your CD-ROM drive. The Installation CD window should automatically appear. If the License Agreement window appears, click Yes.
- Select Support, Registration & Warranty, and then click the URL under Registration. Follow the on-screen instructions to complete the registration of your modem. You may also register online at www.usr.com/productreg
Turn off your computer. Insert the modem in an open PC card slot in your computer. The top of the modem has an arrow indicating which end should be inserted into the computer. Make sure that the modem is firmly seated in the PC card slot.
Note: If at any time during the installation you are prompted to select the location of your installation drivers, select the CD-ROM drive where the Installation CD-ROM resides (D:\ for example).
Note: Windows 2000 and XP users must be logged in using an account with administrative privileges before attempting to install the modem drivers. Windows XP Home Edition users have administrative privileges by default.
Windows XP
Turn on your computer. When the Found New Hardware Wizard detects your
modem, insert the Installation CD-ROM into your CD-ROM drive. Windows
should automatically find the driver for your modem. (If not, select
Install the software automatically (Recommended) and click Next.)
Select your USRobotics modem description and click Next. If
a Hardware Installation message box appears, click Continue Anyway*.
Click Finish to complete the installation.
*USRobotics has thoroughly tested this driver in conjunction with the supported hardware and has verified compatibility with Windows XP.
Windows 2000
Turn on your computer and log in. Insert your Installation CD-ROM into
your CD-ROM drive. If the License Agreement window appears, click No.
After Windows detects your modem, you must update the driver.
Click Windows Start, Settings, and Control Panel. Double-click the System icon and select the Hardware tab. Click Device Manager and double-click Modems to expand the Modems key. Double-click Standard PCMCIA Card Modem from the list. Click the Driver tab and click Update Driver.
When the Upgrade Device Driver Wizard appears, click Next. Select Search for a suitable driver for my device (recommended) and click Next. Select CD-ROM drives and click Next. When the driver is found on your CD-ROM drive, click Next. A Digital Signature Not Found warning may appear. If it does, click Yes**. Click Finish to complete the installation.
**USRobotics has thoroughly tested this driver in conjunction with the supported hardware and has verified compatibility with Windows 2000.
Windows Me
Turn on your computer. When the Add New Hardware Wizard appears, insert
your Installation CD-ROM into your CD-ROM drive. Select Automatically
search for a better driver (Recommended) and click Next.
Click Finish to complete the installation.
Windows 98
Turn on your computer. When the Add New Hardware Wizard appears, insert
your Installation CD-ROM into your CD-ROM drive and click Next.
Select Search for the best driver for your device (Recommended)
and click Next. Select CD-ROM drive and click Next.
Click Finish to complete the installation.
Windows 95
Turn on your computer. When the Update Device Driver Wizard detects
your modem, insert your Installation CD-ROM into your CD-ROM drive and
click Next. Windows will find the installation file on your CD-ROM.
Click Finish to complete the installation.
Windows NT 4.0 Installation
Note: Windows NT 4.0 users must be logged in using an account with administrative privileges before attempting to install the modem drivers.
Note: Do not insert your modem in the PC card slot of your notebook computer until you complete the following installation procedure.
Turn on your computer. After you log in, insert the Installation CD-ROM into your CD-ROM drive. Click Windows Start, Settings, and then Control Panel. Double-click the Ports icon. Click Add. Select the next free COM Port Number (default setting) and click OK. Click Don’t Restart Now. Click Close in the Ports window.
In the Control Panel window, double-click the Modems icon. Select Don't detect my modem. I will select from a list and click Next. Click Have Disk. Type D:\ in the dialog box. (If your CD-ROM drive uses a different letter, type that letter in place of D.) Click OK. Select your USRobotics modem description and click Next. Select the COM port that was added above and click Next. Click Finish to complete the installation. Close any open windows and shut down your computer. Insert the modem into the PC card slot, connect the phone cord, and turn on your computer.
Congratulations! You have completed the installation of your U.S. Robotics 56K PC Card Modem. Now register your modem.
If the Installation CD window does not appear, click Windows Start and then Run. Type D:\setup.exe in the “Run” dialog box. (If your CD-ROM drive uses a different letter, type that letter in place of D.)

Windows 3.1, DOS, and Linux Information
Windows 3.1 and DOS
Note: If Card Services is installed
on your computer, run Setup from Windows. Setup detects how Card Services
will enable each of your PC cards and also determines the resources that
are available on your computer. If you use ENABLE.EXE, in many cases you
must determine which COM port, base I/O addresses, and IRQs to assign
to your PC cards.
To install your modem, use the ENABLE.EXE file. The file can be run from the DOS prompt, by selecting File and then Run in Windows 3.1, or from your AUTOEXEC.BAT or CONFIG.SYS file. ENABLE.EXE uses the default values specified in the ENABLE.INI file, but you may change any or all of the default settings when you run the application by using the following switches:
|
Switch |
Description |
|
/cn |
Indicates the COM port that you want the modem to use. You may use 1 through 4, or you can remove the switch to have ENABLE.EXE choose the first available port. |
|
/dnnnn |
Indicates a delay in milliseconds that the driver waits to initialize the card. It is needed only for machines with a Ricoh PCMCIA controller, such as the IBM 360 and the IBM 755. The value of nnnn is usually 500. |
|
/h or /? |
Displays a help screen. |
|
/imn |
Indicates the modem interrupt (IRQ) you will use, where n indicates the interrupt level. The value of n can be 3, 4, 5, 7, 9, 10, 11, 12, or 15. 3 and 5 are good choices. If you are using COM1 or COM3 for your modem, the default IRQ is 4. If you are using COM2 or COM4, the default IRQ is 3. Your modem can use any IRQ that is available. The configuration of your computer determines which IRQs are available. |
|
/pnnnn |
Indicates the starting memory address for the modem. Values of nnnn can be Ch to EFh in 1h increments. The default is Dh. You must exclude the same memory range on the memory manager line in the CONFIG.SYS file. C8h-C8FFh or Dh-DFFh are good choices. |
|
/sn |
Indicates the PC card slot that the modem is in, where n can indicate slots A through H. The default is A. (There is no standard about which slot is A and which is B when two slots exist. You may need to experiment to find out.) If no slot is specified, ENABLE.EXE will cycle through all of the PC card slots. |
|
/un |
Disables the PC card slot that the modem is in, where n can indicate slots A through H. It removes ENABLE.EXE information from the modem's memory and turns off the power to the modem. If no slot is specified, all slots are disabled. |
|
/v |
Displays verbose status messages. |
For example, to indicate that you want your modem to use COM4 and Slot
B, enter the following at the DOS prompt:
ENABLE /C4 /SB
To add ENABLE.EXE to your CONFIG.SYS or AUTOEXEC.BAT file, follow these steps:
- At the DOS prompt (C:>), type md \usr to create a USR directory on your hard drive.
- Insert the Installation CD-ROM into your CD-ROM drive.
- At the DOS prompt (C:>), type copy d:\enable.* c:\usr. This command copies the ENABLE.EXE and ENABLE.INI files to the USR directory on your hard drive.
- To allow ENABLE.EXE to run every time you reboot your computer, use
a text editor such as Edit to add the following two lines to the end
of your CONFIG.SYS file:
[common]
DEVICE=C:\USR\ENABLE.EXENote: [common] is needed only if you are using DOS 6.0 or later. (To determine which version of DOS you are running, type ver at the DOS prompt.)
- Use a text editor such as Edit to modify the Memory= line in
the ENABLE.INI file that you copied to your hard drive. Memory specifies
the memory location that will be used to enable the modem.
If you are using Card Services, specify the same address that it is using. If you are using ENABLE.EXE, exclude the memory range that you will use with your memory manager. You should exclude a 4K block of memory. For example, if you were using memory location DH, you could exclude the 4K block for EMM386 by specifying the desired value of X=D-DFF to the appropriate line in your CONFIG.SYS. For example:
DEVICE=C:\DOS\EMM386.EXE NOEMS X=D000-D0FF
Your modem is now installed.
Linux
Insert the Installation CD-ROM into the CD-ROM drive. If your CD-ROM does
not automount, run the following mount command:
mount /dev/cdrom /mnt/cdrom
After the CD-ROM is mounted, run the following commands
cd /usr
tar xvfz /mnt/cdrom/Linux/JetSetter.tgz
cd /usr/JetSetter
./install
JetSetter
To use the modem with your Linux system, the PCMCIA Card Services software must be installed on your system. If you are using a standard Linux distribution such as RedHat, Debian, Caldera Open Linux, Suse, etc., they should come with this support already installed or as an option that you can install. See the documentation that came with your Linux distribution for more information.
You can check whether the PCMCIA Card Services are running by typing the command cardctl status. If the cardctl command is not found or if the command complains about not being able to find a PCMCIA driver, then the necessary PCMCIA support software is not properly installed on your system. Consult the PCMCIA HOWTO, which is included in the Linux distribution or is on the Web at www.linux.org.
If you know that the PCMCIA support software is properly enabled on your
system, simply insert your modem and listen for the two tones indicating
that the modem was recognized and activated. To ensure that the modem
was installed correctly, enter the command cardctl ident #, where
# is the slot number where you insert the modem. A line like the
following should appear:
product info: USRobotics, USR0756-XJ/USR0756-CB
where the model number and product description match your modem.
The easiest way to access your USRobotics modem is via the /dev/modem link, which should be created automatically when your card is inserted into your system. Simply check to make sure that the file /etc/pcmcia/serial.opts has the LINK=/dev/modem line uncommented. Once this is done, simply point the communications software package to /dev/modem in order to use the modem.
JetSetter software will also report the Unix device file which has been assigned to your PCMCIA modem (for example, /dev/modem). You may also use the device file reported by the JetSetter software to access the USRobotics modem by using the command JetSetter -d. For more information about the JetSetter software, run the command JetSetter or refer to the Linux information in the Using JetSetter Software section in this guide.
Check the following Web sites for more Linux information:
Note: U.S Robotics does not endorse the purchase or use of any of the information listed in these Web sites. This list is provided only as a service to you.
Installing Your Communications Software
Would you like to install the JetSetter software?
Note: You must install JetSetter software in order to use this modem in countries outside the United States.
JetSetter software allows you to select the country where you plan to use your modem and automatically configures the modem for that country's telephone system to ensure compatibility and high performance.
- Insert the Installation CD-ROM into your CD-ROM drive. The Installation CD window should automatically appear. If the License Agreement window appears, click Yes.
- Select Software, JetSetter, and then Install. Follow the on-screen instructions to complete the installation of the JetSetter software.
If the Installation CD window does not appear, click Windows Start and then Run. Type D:\setup.exe in the “Run” dialog box. (If your CD-ROM drive uses a different letter, type that letter in place of D.)
Note: Additional software may also be included on the Installation CD-ROM. You can install this software in the same manner that is described above.
Uninstalling Your Modem
If you want to completely uninstall your USRobotics 56K PC Card Modem from your computer, follow the instructions for your operating system:
Windows XP (Classic View): Click Windows Start, Control Panel, and then double-click the Phone and Modem Options icon. Click the Modems tab. Select your USRobotics modem description and click Remove. Click Yes. Remove the modem from the PC card slot.
Windows XP (Category View): Click Windows Start, Control Panel, Network and Internet Connections, and then Phone and Modem Options. Click the Modems tab. Select your USRobotics modem description and click Remove. Click Yes. Remove the modem from the PC card slot.
Windows 2000: Click Windows Start, Settings, and then Control Panel. Double-click the Phone and Modem Options icon. Click the Modems tab. Select your USRobotics modem description and click Remove. Click Yes. Remove the modem from the PC card slot.
Windows NT 4.0, Me, 98, and 95: Click Windows Start, Settings, and then Control Panel. Double-click the Modems icon. Select your USRobotics modem description and click Remove. Remove the modem from the PC card slot.