Contents:
USRobotics SureConnect™ ADSL Ethernet/USB Router User Guide
Windows 95, 98, NT 4.0, Me, 2000, XP or later, Mac and Linux
CONFIGURATION EXAMPLE
ĀSetting Up RFC1483 Bridging
Configuration Description
When you use RFC1483 bridging, Ethernet frames bridge over the ATM virtual circuit. This circuit connects the router to the Internet Service Provider (ISP). The router operates in Bridge Mode, and only passes Ethernet packets between the ISP and local network. The ISP may choose to statically or dynamically assign IP addresses to local network nodes. If the ISP employs dynamic assignment, a DHCP server in the ISP’s network assigns addresses.
Setup
- Open the SureConnect Web User Interface (WUI). This example employs the Web User Interface. You can set up the Network Model with any of the router's three interfaces. The other two interfaces are the Terminal User Interface (TUI) and the Command-Line Interface (CLI). In any case, succeeding steps are similar.
- Click the Service Provider Settings tab. This tab is on the top of the screen. The Service Provider Settings Window opens.
- Click ADSL Standard. The ADSL Standard Window opens.
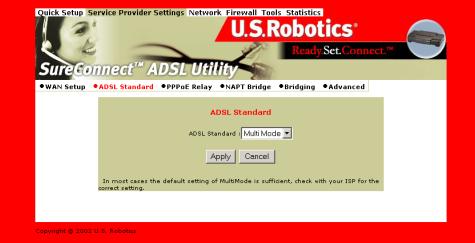
- Select the ADSL protocol that you’ll use. For most users, Multi Mode is the right choice.
- Click Apply.
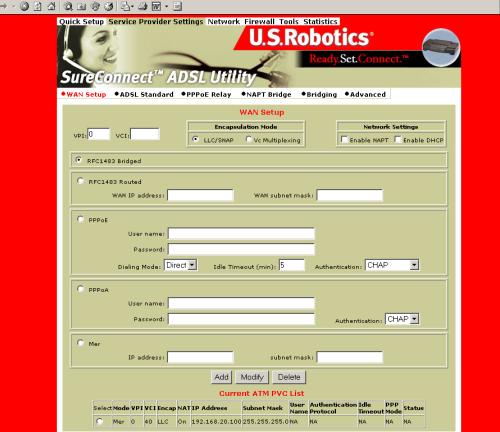
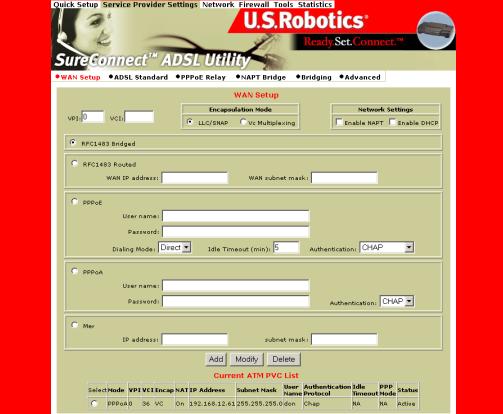
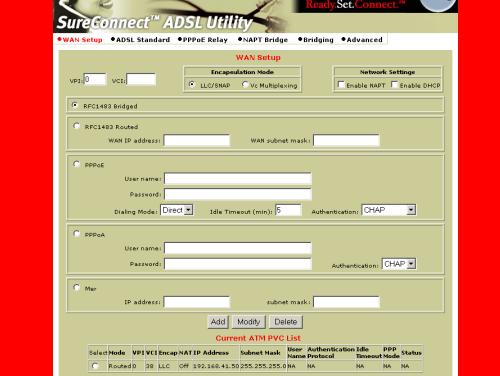
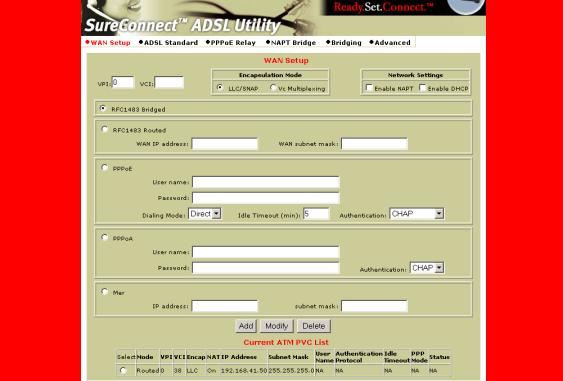
- Click WAN Setup. The WAN Setup Window opens.
-
Below the Add button, notice the Current ATM PVC List. On this list, select any PVC that you don’t need.
-
Click Delete.
-
Click RFC1483 Bridged.
-
Enter VPI and VCI values.
- Select your desired encapsulation mode. Your choices are: LLC/SNAP and VC Multiplexing.
- At Network Settings, be sure that Enable NAPT and Enable DHCP remain unselected.
- Click Add.
- Click the Tools tab at the top of the window.
- Click Save & Restart.
- Click Save.
- Click Restart.
Verify Setup
| 1. Open the SureConnect Web User Interface (WUI). |
Figure 1 |
| 2. Click the Service Provider Settings tab. This tab is on the top of the screen. (See Figure 1.) |
|
| 3. Click ADSL Standard. (See Figure 1.) |
|
| 4. Verify that you’ve selected Multi Mode. (See Figure 2.) |
Figure 2 |
| 5. Click WAN Setup. |
|
| 6. See the Current ATM PVC List at the bottom of the screen (Figure 3). On this list, verify your VPI and VCI settings. |
|
| 7. On the Current ATM PVC List, see “Encap.” Verify your Encapsulation Mode settings. (See Figure 3.) |
Figure 3 |
| 8. See the Current ATM PVC List. Verify that only the RFC Bridged configuration appears there. (See Figure 3.) |
|
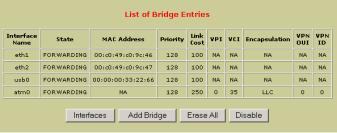
| 9. Click Bridging. |
Figure 4 |
| 10. Verify your bridging entries. (See Figure 4.) |

CONFIGURATION EXAMPLE
ĀSetting Up MER
 Ā
Ā
Configuration Description
When you use MAC Encapsulated Routing (MER), Ethernet frames bridge over the ATM Virtual Circuit. The router can still perform IP routing with Network Address Translation (NAT) for the LAN. To perform this NAT function, the router requires a static IP address for its MER interface. Your ISP must supply the address. The router also supports dynamic assignment of IP addresses to local network nodes. When using dynamic assignment, the router acts as a DHCP server.
Setup
- Open the SureConnect Web User Interface (WUI). This example employs the Web User Interface. You can set up the Network Model with any of the router's three interfaces. The other two interfaces are the Terminal User Interface (TUI) and the Command-Line Interface (CLI). In any case, succeeding steps are similar.
- Click the Service Provider Settings tab. This tab is on the top of the screen. The Service Provider Settings Window opens.
- Click ADSL Standard. The ADSL Standard Window opens.

4. Select the ADSL protocol that you’ll use. For most users, Multi Mode is the right choice.
5. Click Apply.
- Click WAN Setup. The WAN Setup Window opens.
- Below the Add button, notice the Current ATM PVC List. On this list, select any PVC that you don’t need.
- Click Delete.
- Click MER.
- Enter VPI and VCI values.
- Select your desired encapsulation mode. Your choices are: LLC/SNAP and VC Multiplexing.
- At Network Settings, enable NAPT and DHCP by selecting the appropriate boxes.
- In the MER box, enter the static IP address and mask that your ISP supplied.
- Click Add.
- Click the Network tab.
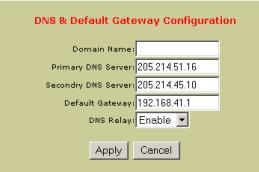
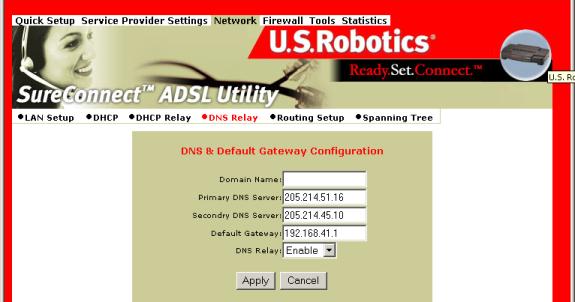
- Click DNS Relay. The DNS & Default Gateway Configuration Window opens. (See the screen shot below.)
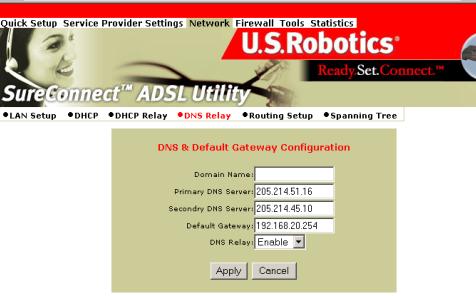
- At the DNS Relay line, select Disable from the dropdown menu..
- Click Apply.
- If your ISP provided a Domain Name, enter the name here. (Domain Name isn’t a required field. The ISP might not provide a domain name.)
- Enter the Primary DNS Server IP address that your ISP provided.
- Enter the Secondary DNS Server IP address that your ISP provided. (Secondary DNS Server isn’t a required field. The ISP might not provide an IP address for a secondary DNS server.)
- Enter the Default Gateway IP address that your ISP provided.
- On the DNS Relay line, select Enable from the dropdown menu.
- Click Apply.
- Click the Tools tab at the top of the window.
- Click Save & Restart.
- Click Save.
- Click Restart.
Verify Setup
| 1. Open the SureConnect Web User Interface (WUI). |
Figure 1 |
| 2. Click the Service Provider Settings tab. This tab is on the top of the screen. (See Figure 1.) |
|
| 3. Click ADSL Standard. (See Figure 1.) |
|
| 4. Verify that you’ve selected Multi Mode. (See Figure 2.) |
Figure 2 |
| 5. Click WAN Setup. |
|
| 6. See the Current ATM PVC List at the bottom of the screen (Figure 3). On this list, verify your settings for VPI and VCI. |
|
| 7. On the Current ATM PVC List, see “Encap.” Verify your Encapsulation Mode settings. (See Figure 3.) |
|
| 8. On the Current ATM PVC List, see “NAT.” Verify that NAT is “On.” (See Figure 3.) |
Figure 3 |
| 9. Verify the IP address for your ATM PVC. (See Figure 3.) |
|
| 10. Verify the mask for your ATM PVC. (See Figure 3.) |
|
| 11. Click DNS Relay. |


|
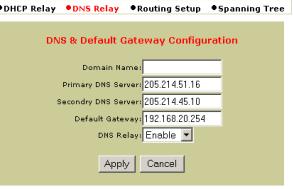
12. Verify your Domain Name Setting. (See Figure 4.) |
Figure 4 |
|
13. Verify your Primary DNS Server IP address setting. (See Figure 4.) |
|
|
14. Verify your Secondary DNS Server IP address setting. (See Figure 4.) |
|
|
15. Verify your Default Gateway IP address setting. (See Figure 4.) |
|
|
16. Verify that you’ve enabled the DNS Relay function. (See Figure 4.) |
|
|
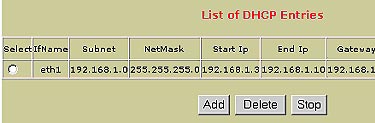
17. Click DHCP. |
Figure 5 |
|
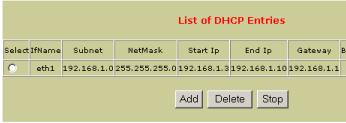
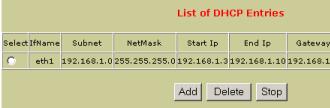
18. Verify your DHCP entries. (See Figure 5.) |
|
|
19. Verify that the server is running. (See Figure 5.) |
CONFIGURATION EXAMPLE
ĀSetting Up PPPoA
Configuration Description
Dial-up Internet connections commonly use Point-to-Point Protocol (PPP). PPPoA is a method for running the PPP protocol over ATM. PPPoA…
Ę Allows ISPs to provide billing and access control similar to what dial up systems offer.
Ę Provides session authentication using either Password Authentication Protocol (PAP) or Challenge Handshake Authentication Protocol (CHAP).
Ę Permits router signals to easily negotiate link and network parameters between the router and ISP.
Setup
1. Open the SureConnect Web User Interface (WUI). This example employs the Web User Interface. You can set up the Network Model with any of the router's three interfaces. The other two interfaces are the Terminal User Interface (TUI) and the Command-Line Interface (CLI). In any case, succeeding steps are similar.
2. Click ADSL Standard. The ADSL Standard Window opens.

3. Select the ADSL protocol that you’ll use. For most users, Multi Mode is the right choice.
4. Click Apply.
- Click WAN Setup. The WAN Setup Window opens.
- Below the Add button, notice the Current ATM PVC List. On this list, select any PVC that you don’t need.
- Click Delete.
- Click PPPoA.
- Enter VPI and VCI values.
- Select your desired encapsulation mode. Your choices are: LLC/SNAP and VC Multiplexing.
- At Network Settings, enable NAPT and DHCP by selecting the appropriate boxes.
- In the PPPoA box, enter your ISP-assigned username.
- In the PPPoA box, enter your ISP-assigned password.
- In the PPPoA box, enter the authentication protocol that your ISP uses.
- Click Add.
- Click the Tools tab at the top of the window.
- Click Save & Restart.
- Click Save.
- ĀClick Restart.
Verify Setup
| 1. Open the SureConnect Web User Interface (WUI). |
Figure 1 |
| 2. Click the Service Provider Settings tab. This tab is on the top of the screen. (See Figure 1.) |
|
| 3. Click ADSL Standard. |
|
| 4. Verify that you’ve selected Multi Mode. (See Figure 2.) |
Figure 2 |
| 5. Click the WAN Setup. |
|
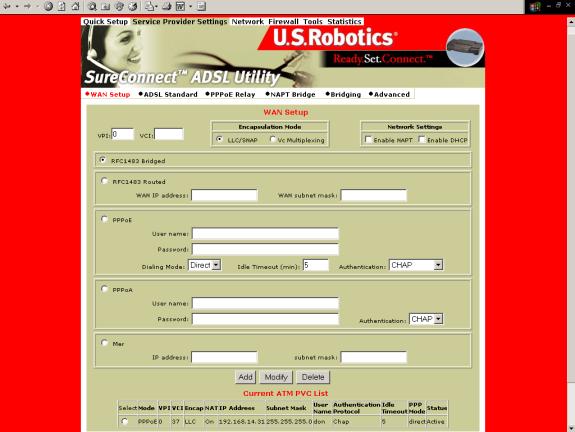
| 6. Verify that only the PPPoA configuration appears on the Current ATM PVC List. (This is the list on the bottom of the screen. See Figure 3.) |
|
| 7. See the Current ATM PVC List at the bottom of the screen. On this list, verify your settings for VPI and VCI. (See Figure 3.) |
Figure 3 |
| 8. On the Current ATM PVC List, see “Encap.” Verify your Encapsulation Mode settings. (See Figure 3.) |
|
| 9. On the Current ATM PVC List, see “NAT.” Verify that NAT is “On.” (See Figure 3.) |
|
| 10. On the Current ATM PVC List, verify your ISP-assigned, PPPoA username. (See Figure 3.) |
|
| 11. See the Current ATM PVC List (Figure 3). Verify the authentication protocol that your ISP uses. This protocol must appear on the list. |
|
| 12. Click the Network tab at the top of the window. |
|
| 13. Click DHCP. |
Figure 4 |
| 14. Verify your DHCP entries. (See Figure 4.) |
|
| 15. Verify that the DHCP server started. (See Figure 4.) |


CONFIGURATION EXAMPLE
ĀSetting Up PPPoE
Configuration Description
Dial-up Internet connections commonly use Point-to-Point Protocol (PPP). PPPoE is a method for running the PPP protocol over Ethernet. PPPoE…
Ę Allows ISPs to provide billing and access control similar to what dial up systems offer.
Ę P
rovides session authentication using either Password Authentication Protocol (PAP) or Challenge Handshake Authentication Protocol (CHAP).
Ę Permits router signals to easily negotiate link and network parameters between the router and ISP.
With PPPoE, the router achieves IP routing with Network Address Translation (NAT) for the LAN. The PPPoE-enabled router also supports dynamic IP address assignment to local network nodes. With dynamic assignment, the router acts as a DHCP server.
Setup
1. Open the SureConnect Web User Interface (WUI). This example employs the Web User Interface. You can set up the Network Model with any of the router's three interfaces. The other two interfaces are the Terminal User Interface (TUI) and the Command-Line Interface (CLI). In any case, succeeding steps are similar.
2. Click ADSL Standard. The ADSL Standard Window opens.

3. Select the ADSL protocol that you’ll use. For most users, Multi Mode is the right choice.
4. Click Apply.
- Click WAN Setup. The WAN Setup Window opens.
- Below the Add button, notice the Current ATM PVC List. On this list, select any PVC that you don’t need.
- Click Delete.
- Click PPPoE.
- Enter VPI and VCI values.
- Click the radio button for your desired encapsulation mode. Your choices are: LLC/SNAP and VC Multiplexing.
- At Network Settings, enable NAPT and DHCP by checking appropriate boxes.
- In the PPPoE box, enter your ISP-assigned username.
- In the PPPoE box, enter your ISP-assigned password.
- In the PPPoE box, use the arrow to select the dialing mode. For most users, Direct is the right choice.
- In the PPPoE box, enter the Idle Timeout value. Idle Timeout determines how long the link remains active during a period without data transfer. Idle Timeout only affects Auto Dialing Mode. The router doesn’t use Idle Timeout for direct dialing mode.
- In the PPPoE box, use the arrow to select the authentication protocol that your ISP uses.
- Click Add.
- Click the Tools tab at the top of the window.
- Click Save & Restart.
- Click Save.
- Click Restart.
Verify Setup
| 1. Open the SureConnect Web User Interface (WUI). |
Figure 1 |
|
2. Click the Service Provider Settings tab. This tab is on the top of the screen. (See Figure 1.) |
|
|
3. Click ADSL Standard. (See Figure 1.) |
|
|
4. Verify that you’ve selected Multi Mode. (See Figure 2.) |
Figure 2 |
| 5. Click WAN Setup. |
|
| 6. Verify that only the PPPoE configuration appears on the Current ATM PVC List. (See Figure 3.) |
|
| 7. See the Current ATM PVC List at the bottom of the screen (Figure 3). On this list, verify your settings for VPI and VCI. |
|
| 8. On the Current ATM PVC List, see “Encap.” Verify your Encapsulation Mode settings. (See Figure 3.) |
Figure 3 |
| 9. On the Current ATM PVC List, see “NAT.” Verify that NAT is “On.” (See Figure 3.) |
|
| 10. On the Current ATM PVC List, verify your ISP-assigned, PPPoE username. (See Figure 3.) |
|
| 11. In the PPPoE box, verify for your dialing mode selection. For most users, direct is the right choice. (See Figure 3.) |
|
| 12. In the PPPoE box, verify your desired Idle Timeout value. (See Figure 3.) |
|
| 13. In the PPPoE box, find the authentication protocol. Verify that your ISP uses this protocol. (See Figure 3.) |
|
| 14. Click the Network tab at the top of the window. |
Figure 4 |
| 15. Click DHCP. |
|
| 16. Verify your DHCP setting. (See Figure 4.) |
|
| 17. Verify that the DHCP server started. (See Figure 4.) |


CONFIGURATION EXAMPLE
ĀSetting Up RFC1483 Routing without NAT
Configuration Description
When you use RFC1483 Routing, the router encapsulates IP packets over the ATM virtual circuit. This circuit connects the router and the Internet service provider (ISP). In this configuration, routers …
Ę Segment LANs to balance traffic within workgroups
Ę Filter traffic for security purposes and policy management
Ę Connect remote offices at the edge of the network
Setup
- Open the SureConnect Web User Interface (WUI). This example employs the Web User Interface. You can set up the Network Model with any of the router's three interfaces. The other two interfaces are the Terminal User Interface (TUI) and the Command-Line Interface (CLI). In any case, succeeding steps are similar.
- Click ADSL Standard. The ADSL Standard Window opens.
- Select the ADSL protocol that you’ll use. For most users, Multi Mode is the right choice.
- Click Apply.
- Click WAN Setup. The WAN Setup Window opens.
- Below the Add button, notice the Current ATM PVC List. On this list, select any PVC that you don’t need.
- Click Delete.
- Click RFC1483 Routed.
- Enter VPI and VCI values.

- Click the radio button for your desired encapsulation mode. Your choices are: LLC/SNAP and VC Multiplexing.
- At Network Settings, be sure that NAPT and DHCP don’t have a checkmark.
- In the RFC1483 Routed box, enter the static IP address and mask that your ISP supplied.
- Click Add.
- Click the Network tab at the top of the window.
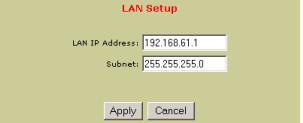
- Click LAN Setup. The LAN Setup Window opens.

- This step changes the LAN IP address that connects to the router’s Web user interface. In the LAN IP Address box, enter the new Ethernet 1 local LAN IP address.
- This step changes the network subnet that connects to the router’s Web user interface. In the Subnet box, enter the new Ethernet 1 local Subnet mask.
- This step locks in your LAN IP address and network subnet changes from the previous steps. Click Apply. This action saves your current configuration and restarts the router.
- Change these items on your PC’s to match the new network that the router is on…
• IP addressĀĀĀĀĀĀĀĀ • Subnet maskĀĀĀĀĀĀĀĀĀĀĀ • Default gatewayĀĀĀĀĀĀĀĀĀĀ • DNS IP Address
If you don’t know how to complete this step, refer to your PC’s manual. Most Windows PCs allow access to network settings though the Start Menu at Settings. Look for a listing such as “Network and Dial-Up Connections.” Also refer to the Quick Installation Guide.
- Open the SureConnect Web User Interface (WUI).
- Click the Network tab at the top of the window.
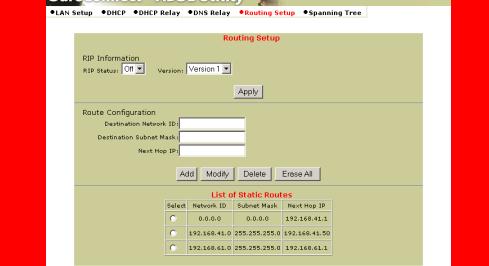
- Click Routing Setup. The Routing Setup Window opens.
- The next few steps add the WAN Default Gateway supplied by your ISP. Select the entry with these specifications…
Ę Destination Network ID: 0.0.0.0
Ę Destination Subnet Mask: 0.0.0.0.
- Click Delete.
- Enter 0.0.0.0 into the Destination Network ID box.
- Enter 0.0.0.0 into the Destination Subnet Mask box.
- At the Next Hop IP box, enter the WAN Default Gateway supplied by your ISP.
- Click Add.
- Click the Tools tab at the top of the window.
- Click Save & Restart.
- Click Save.
- Click Restart.
Verify Setup
|
1. Open the SureConnect Web User Interface (WUI). |
Figure 1 |
|
2. Click the Service Provider Settings tab. This tab is on the top of the screen. (See Figure 1.) |
|
| 3. Click ADSL Standard. (See Figure 1.) |
|
| 4. Verify that you’ve selected Multi Mode. (See Figure 2.) |
Figure 2 |
|
5. Click WAN Setup. |
|
|
6. Verify that only the Routed configuration appears on the Current ATM PVC List. (This is the list on the bottom of the screen. See Figure 3.) |
|
|
7. See the Current ATM PVC List at the bottom of the screen (Figure 3). On this list, verify your settings for VPI and VCI. |
Figure 3 |
|
8. On the Current ATM PVC List, see “Encap.” Verify your Encapsulation Mode settings. (See Figure 3.) |
|
|
9. On the Current ATM PVC List, see “NAT.” Verify that NAT is “Off.” (See Figure 3.) |
|
| 10. Click the Network tab at the top of the window. |
Figure 4 |
| 11. Click LAN Setup. |
|
| 12. Verify your LAN IP address setting. (See Figure 4.) |
|
| 13. Verify your subnet setting. (See Figure 4.) |

 Ā
Ā| 14. Click the Routing Setup tab at the top of the window. |
Figure 5 |
| 15. Verify your Destination Network ID setting. (See Figure 5.) |
|
| 16. Verify your Destination Subnet Mask setting. (See Figure 5.) |
|
| 17. Verify your Next Hop ID setting. (See Figure 5.) |

CONFIGURATION EXAMPLE
ĀSetting Up RFC1483 Routing with NAT & DHCP
Configuration Description
When you use RFC1483 Routing, the router encapsulates IP packets over the ATM virtual circuit. This circuit connects the router and the Internet service provider (ISP). In this configuration, routers …
Ģ Segment LANs to balance traffic within workgroups Ģ Filter traffic for security purposes and policy management Ģ Connect remote offices at the edge of the network Ģ Can route IP with network address translation (NAT) for the LANSetup
- Open the SureConnect Web User Interface (WUI). This example employs the Web User Interface. You can set up the Network Model with any of the router's three interfaces. The other two interfaces are the Terminal User Interface (TUI) and the Command-Line Interface (CLI). In any case, succeeding steps are similar.
- Click ADSL Standard. The ADSL Standard Window opens.

- Select the ADSL protocol that you’ll use. For most users, Multi Mode is the right choice.
- Click Apply.
- Click WAN Setup. The WAN Setup Window opens.
- Below the Add button, notice the Current ATM PVC List. On this list, select any PVC that you don’t need.
- Click Delete.
- Click RFC1483 Routed.
- Enter VPI and VCI values.
- Click the radio button for your desired encapsulation mode. Your choices are: LLC/SNAP and VC Multiplexing.
- At Network Settings, check NAPT.
- At Network Settings, check DHCP.
- In the RFC1483 Routed box, enter the static IP address and mask that your ISP supplied.
- Click Add.
- Click the Network tab at the top of the window.
- Click DNS Relay. The DNS & Default Gateway Configuration Window opens.
- At the DNS Relay box, select Disable from the dropdown menu.
- Click Apply.
- If your ISP provided a Domain Name, enter the name here. (Domain Name isn’t a required field. The ISP might not provide a domain name.)
- Enter the Primary DNS Server IP address that your ISP provided.
- Enter the Secondary DNS Server IP address that your ISP provided. (Secondary DNS Server isn’t a required field. The ISP might not provide an IP address for a secondary DNS server.)
- Enter the Default Gateway IP address that your ISP provided.
- At the DNS Relay box, select Enable from the dropdown menu.
- Click Apply.
- Click the Tools tab at the top of the window.
- Click Save & Restart.
- Click Save.
- Click Restart.
Verify Setup
| 1 . Open the SureConnect Web User Interface (WUI). |
Figure 1 |
| 2. Click the Service Provider Settings tab. This tab is on the top of the screen. (See Figure 1.) |
|
| 3. Click ADSL Standard. (See Figure 1.) |
|
| 4. Verify that you’ve selected Multi Mode. (See Figure 2.) |
Figure 2 |
| 5. Click WAN Setup. |
|
| 6. Verify that only the Routed configuration appears on the Current ATM PVC List. (This is the list on the bottom of the screen. See Figure 3.) |
|
| 7. See the Current ATM PVC List at the bottom of the screen (Figure 3). On this list, verify your VPI and VCI settings. |
Figure 3 |
| 8. On the Current ATM PVC List, see “Encap.” Verify your Encapsulation Mode settings. (See Figure 3.) |
|
| 9. On the Current ATM PVC List, see “NAT.” Verify that NAT is “On.” (See Figure 3.) |
|
| 10. Click the Network tab at the top of the window. |
|
| 11. Click DNS Relay. |
|
| 12. Verify your Domain Name setting. (See Figure 4.) |
Figure 4 |
| 13. Verify your Primary DNS Server setting. (See Figure 4.) |
|
| 14. Verify your setting Secondary DNS Server setting. (See Figure 4.) |
|
| 15. Verify your Default Gateway setting. (See Figure 4.) |
|
| 16. In the DNS Relay Box, verify that you’ve selected “Enable.” (See Figure 4.) |
|
|
17. Click the Network tab at the top of the window. |
|
|
18. Click DHCP. |
Figure 5 |
|
19. Verify your DHCP setting. (See Figure 5.) |
|
|
20. Verify that the DHCP server started. (See Figure 5.) |