Note: It is important that you have your serial number written down for future reference. If you ever need to call our technical support department, you will need this number to receive assistance. You can find your serial number on a bar code sticker located on the bottom of the router and also on the box. You will also need your model number.
This router's EasyConfigurator installation software works with the following operating systems:
You will need to have a computer with an Ethernet Network Interface Card (NIC) installed, as well as a Web browser that works with the HTML 4.01 specification with Javascript enabled.
You will need active ADSL and Internet service from your local telephone company or Internet Service Provider (ISP) before you can go on the Internet. You may also need the following from your ISP:
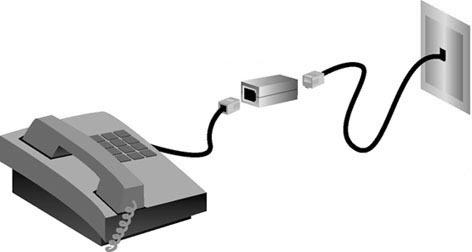
A microfilter removes interference between voice and DSL signals. Your ISP will determine if a microfilter is necessary. If a microfilter was not included with the router, you may want to ask your ISP if you need to purchase one or more of them.
To install a microfilter, plug a device (phone, fax machine, or other telephony device) into the microfilter, and then plug the microfilter into the telephone wall jack. Do not install a microfilter on the cable that connects your ADSL router to the telephone jack unless your microfilter has a connection for both the router and the phone.
Use the supplied Ethernet cable to connect the router to the computer. This diagram shows you how the devices will be connected when the installation is complete:
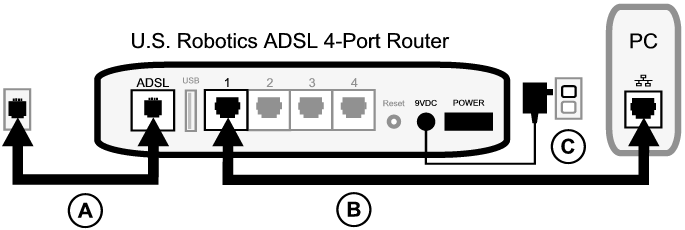
To make the needed connections, follow these steps:
A. Connect one end of the telephone cable to the telephone port on the back of your router (labeled ADSL). Connect the other end to the telephone wall jack.
B. Connect the Ethernet cable. Although you can connect up to four systems this way, you should connect additional devices only after the initial setup is complete. Insert one end of the Ethernet cable into one of the ports on the back of the router (labeled 1, 2, 3, and 4). Connect the other end to the Ethernet port on your computer’s network interface card.
C. Plug the AC power adapter into the 9VDC jack on the back of your router. Then plug the AC power adapter into a standard wall outlet. If the  LED on the front panel is not lit, press the power switch on the back of the router.
Note: This product is intended to be supplied by a UL Listed Direct Plug-in Power Unit marked Class 2 and rated 9V DC, 1200 mA.
The router starts up after you turn on the power. This may take one to two minutes.

E. On the front panel, see if the and any of the  indicators LEDs are lit. If they are not, see the troubleshooting section.
If the installation does not start automatically, you can start it manually, as follows.
Windows Vista users: Click Start, then Computer and browse to your CD-ROM drive. Open the setup.exe file on the CD-ROM.
Windows users: Click Start and then Run, then type D:\setup.exe in the dialogue box and click OK. (If your CD-ROM drive uses a different letter, type that letter in place of D.)
Macintosh users: Open the CD-ROM and double click on either MacOS X Install or MacOS Classic Install (depending on which operating system your computer uses).
Linux users: Open the CD-ROM, browse to \platforms\linux, and double-click on install.bin.
Setup now installs the EasyConfigurator.
If EasyConfigurator does not start up automatically, you can open it yourself with the following steps.
Windows Vista users: Click Windows Start > All Programs > U.S. Robotics EasyConfigurator.
Windows users: Click Start and select Programs and U.S. Robotics EasyConfigurator.
Macintosh and Linux users: Double-click on the EasyConfigurator icon on the desktop.
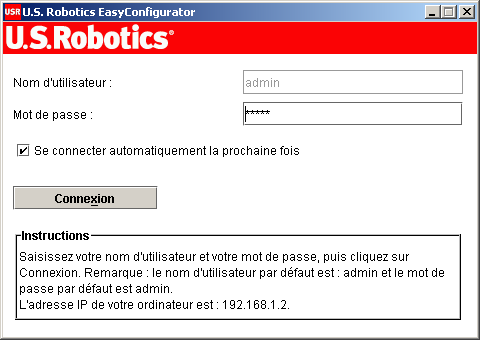
The default user name and password are already entered for you. Click Log In and wait a moment.
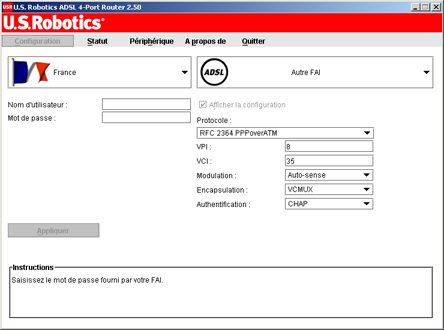
(If this window does not appear, click on Configuration near the top of the window.) Select your country and your Internet Service Provider (ISP) from the drop-down lists. If your country or ISP does not appear in the list, select Other and manually enter the settings provided by your ISP.
You may need to enter your ISP-supplied user name and password after making your selections. Click Apply to continue.
At this point, the system attempts to access the Internet. This may take a few minutes, until the following status page appears.
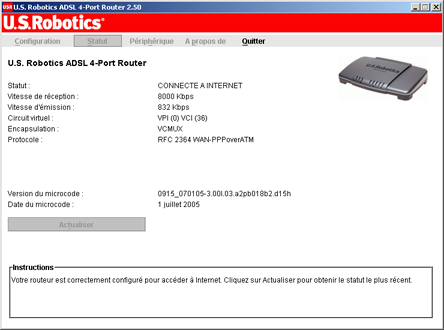
If the status is CONNECTED TO THE INTERNET, you have successfully configured your Internet connection. If the status is not CONNECTED TO THE INTERNET, go to the Troubleshooting section of this installation guide.
You should now be able to access the Internet. We suggest that you test your connection by registering your product on the following Web page:
www.usr.com/productreg
The Web User Interface (WUI) is the main tool you will now use for configuring and working with the router. Click here to find out how to run the WUI.
 |
Click here to learn how to set up the device to share a printer among multiple computers. |