The Video Device Properties window includes tabs for settings, effects, and zoom control. These properties affect Skype video calls, photographs, and recorded video clips. You can see the effects of changes in Skype or in the .
To open the Video Device Properties window:
From Skype—Click the Webcam Settings button in the Skype Webcam Test window.
From the —Select Video > Properties to open the Video Device Properties window.
From the system tray—Right-click and select Open Property Page.
The camera's image must be displayed on your screen for the system tray icon menu to be active. From the system tray icon, you change the size of a still photo, change the picture frame, or access the Video Device Properties window.
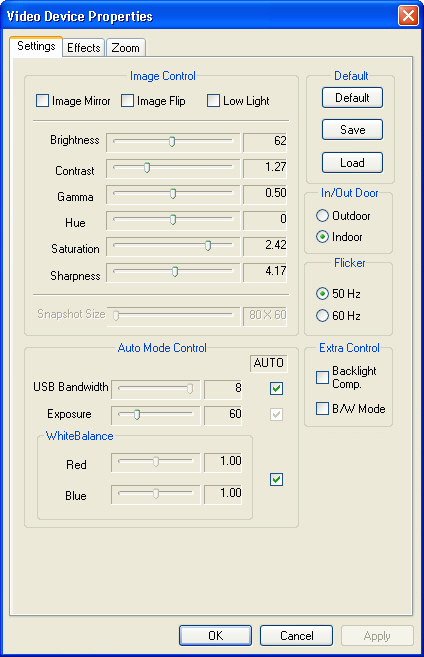
Settings
Changes to video settings stay in effect even after you restart your computer. You can click Save to save the settings for later use and click Load to return to your saved settings. You can click Default to restore the factory default settings. These settings apply to Skype calls, the , and any other application that uses the .
Refer to the table below for information about changes that you can make from the Settings tab.
Setting
Explanation
Image Control
Image Mirror
Select to invert the left-to-right appearance the image.
Image Flip
Select to invert the top-to-bottom appearance of the image.
Low Light
Select if you are using the camera in a dimly illuminated area.
Brightness
Move the slider to make a dark image brighter.
Contrast
Move the slider to adjust the difference between light and dark shades.
Gamma
Move the slider to adjust the intensity and brightness of intermediate colour values.
Hue
Move the slider to shift the overall colour of the image.
Saturation
Move the slider to adjust the intensity of colour in the image.
Sharpness
Move the slider to make distinct edges more noticeable or to soften the appearance of the image.
Snapshot Size
For use only with the snapshot button on the : Move the slider to adjust the size of images captured with the camera.
Auto Mode Control (recommendation: leave these automatic)
USB Bandwidth
Move the slider to adjust the amount of USB bandwidth available for the camera.
Exposure
Move the slider to adjust how long the camera takes to collect light for an image. Exposure will always adapt automatically to lighting conditions, but moving the slider allows to adjust the end result to your preferences and may be needed in extreme conditions such as very dark environments or fast moving images. Adjustments can take several seconds to take effect.
Red
Move the slider to adjust the amount of red in the image.
Blue
Move the slider to adjust the amount of blue in the image.
In/Out Door
Outdoor
Select Outdoor if you are using the camera outside.
Indoor
Select Indoor if you are using the camera inside.
Flicker
50 Hz
Select 50 Hz if you are in a location, such as Europe, where fluorescent lights flicker at 50 Hz.
60 Hz
Select 60 Hz if you are in a location, such as North America, where fluorescent lights flicker at 60 Hz.
Extra Control
Back light Comp.
Select this if there is a bright light, such as a window on a sunny day, behind the subject.
B/W Mode
Select this to make the image from your camera black and white.
Effects
You can customize the camera's view for Skype, still image photographs, and videos. An Effect changes the appearance of an image. A Frame overlaps the image with a fixed decoration, typically around it. In addition to the frames provided, you can use one of your own files. The file must be a 24 bit 640 x 480 pixel .BMP image, using plain blue as the transparency colour in the areas where you want the image to be visible.
Select No effect & frame to turn off all effects and frames. Select Auto Change to cycle through effects with a change approximately every eight seconds.
Zoom
You can use zoom to electronically enlarge a portion of the image to fill the image space. Select Enable Zoom to make the zoom controls active. The Zoom In / Zoom Out slider controls the size of the zoom box, and the arrows move the zoom box around the image.
Enable Face Tracking zooms in on your face and follows your movement within the image area. The camera does not move.
 and select Open Property Page.