Networking for Dummies
 |
|||||||||||||||||||||||||||||||||
|
Chapter 2 Configuring Your Network In This Chapter
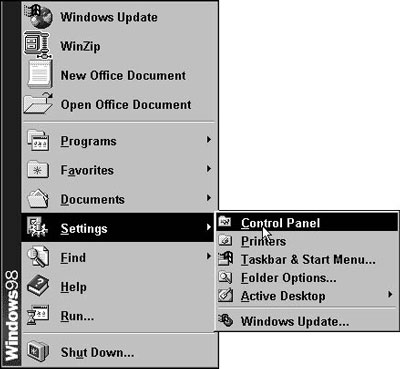
After you have the hardware for your network in place, you’re ready to configure it and install the software components that make it work. Adding File and Printer Sharing ServicesOne of the best things about having a network is that it enables you to share files and devices, such as printers. We discuss how to set up a shared printer in Chapter 4. However, before you can make use of the information in that chapter, you need to add something called File and Printer Sharing Services. The following numbered steps enable this important feature of your network. 1. Click the Start → Settings → Control Panel, as shown in Figure 2-1.
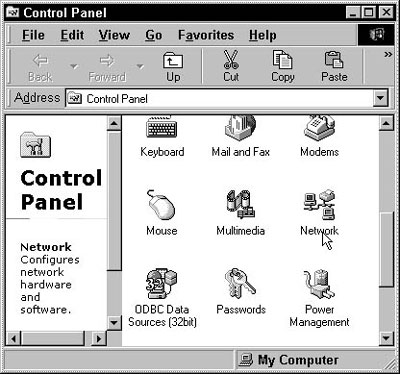
The Control Panel appears, as shown in Figure 2-2.
2. Double-click the Network icon to view the network properties. The Network dialog box appears, as shown in Figure 2-3.
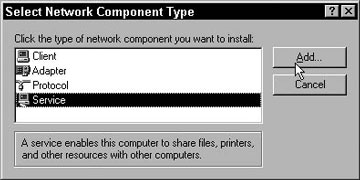
3. Click the Configuration tab. 4. Click the Add... button. The Select Network Component Type dialog box appears, as shown in Figure 2-4.
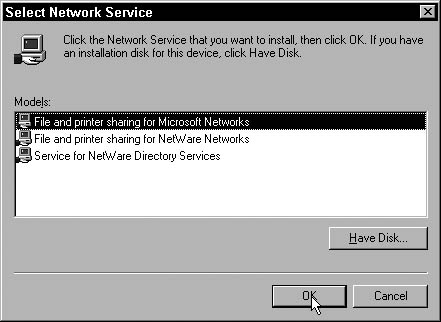
5. Select Service. 6. Click the Add... button. The Select Network Service dialog box appears, as shown in Figure 2-5.
7. Select File and printer sharing for Microsoft Networks. 8. Click OK. Windows may prompt you for additional files that need to be copied in order to update the configuration changes you made. Make sure you have your Windows CD-ROM available to insert as the installation requires. You return to the Network dialog box. 9. Click OK to close the Network dialog box. You are prompted to restart your computer. 10. Click Yes to restart your computer. You’re almost there — just one more set of steps. Naming Your Computer and Putting It in a WorkgroupYou may already have a name for your computer — Fred, Nimby, or maybe *&@$^ depending on how well it’s been behaving. In this section, we show you how to teach your computer its name. Naming each computer in your network is what allows other computers in your network, or more specifically, their users, to identify the location of resources (for example, files, a printer, or a CD-ROM drive) in the network. We explain in Chapter 4 how to share a drive on a computer in your network, thereby giving other computers in the network access to that drive. This concept is much easier if each computer has a name — the computer named Dad can access a shared resource on the computer named Mike and so on. Here’s how to name them: 1. In the Network dialog box (you should still have it open from the previous set of numbered steps in this chapter), click the Identification tab, as shown in Figure 2-6. 2. Enter a name and workgroup for your computer. For instance, you may want to name the computer you’re working on “Mike” and put it in the workgroup called “Home.” That’s it. Remember to perform these steps for all the computers in your network.
Entering Your Network PasswordAfter you restart your computer, Windows prompts you for a Username and a Password. This process is called a login. Your username and password may consist of any combination of letters and/or numbers except for a few of the punctuation symbols — Windows tells you to try a different password if you enter one of the “forbidden” symbols. When entering a password, choose one that you will remember. You’ll be prompted for the password each time you turn on your computer. If this is your first time logging in, Windows asks you to verify the password you entered. Re-type the password in the pop-up window and click OK. Installing Network Protocols and Services for Windows MeNote: The Windows Me Home Networking Wizard will not work to connect a computer running Windows 2000 Professional. If you find yourself in this situation, you need to manually install network protocols and services (similar to the numbered steps earlier in this chapter). Remember to consult the guide that came with your networking products for specific instructions. To launch the wizard, double-click the My Network Places icon on your desktop and then double-click the Home Networking Wizard icon. The first wizard window is a welcoming message that requires no action on your part, except clicking Next to get started on the real work. The Home Networking Wizard may prompt you to enter some information regarding protocols, identifying your network hardware (type of network adapters and so on), and whether to start file and printer sharing services. You can find the information you need to enter in the first part of this chapter or in the installation guide that came with your network hardware. Installing Network Protocols and Services for Windows XP If you’re running Windows XP on any computer, you can set up your home network using the cleverly named Network Setup Wizard. To get to the Wizard, click Start → My Network Places and then double-click the Network Setup Wizard.
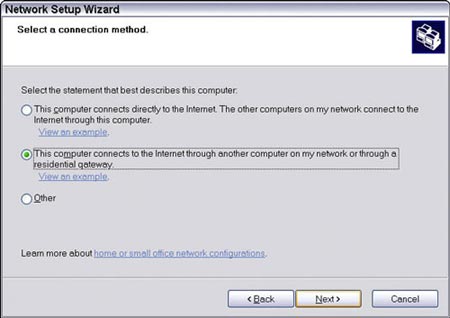
We’ve selected the option to connect via a residential gateway (that’s the Network Setup Wizard’s term for connecting through a router) because we have a DSL modem connected to our USRobotics Broadband router. If you’re using the Windows Internet Connection Sharing feature to connect to the Internet, you need to specify whether you are
As you go through the steps in the Home Networking Wizard, you may need to enter some information regarding protocols, your network hardware (type of network adapters and so on), and whether you want to start file and printer sharing services. You can find this information in the numbered steps in the first part of this chapter or in the installation guide that came with your network hardware. |