Contents:
About the 802.11g Wireless USB Adapter
Network Configuration and Planning
Adapter Installation and Configuration for Windows 98SE/2000/Me/XP
Navigating the Wireless Configuration Utility
Product Specifications for 802.11g Wireless USB Adapter
802.11g Wireless USB Adapter User Guide
Navigating the Wireless Configuration Utility
![]()
Wireless Configuration Utility
The following section describes the various functions of the Wireless Configuration Utility. This utility provides quick access to all adapter settings.
After installation is complete, the Wireless Configuration Utility icon will appear in the taskbar on the right side near the clock. Double-clicking the icon in the task will open the Wireless Configuration Utility main menu, providing quick access to all adapter settings. The Configuration Utility icon will be colored to indicate the status of your wireless network: red for disconnected and green for connected.
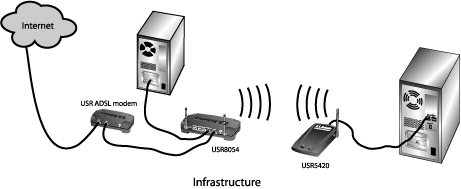
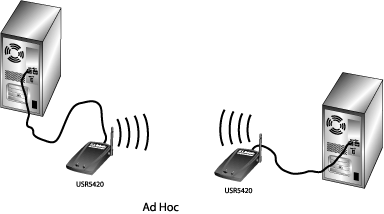
There are two types of network connections you can make with the 802.11g Wireless USB Adapter: Infrastructure and Ad Hoc.
- If you will be connecting to a wireless router or access point, you will need to create an Infrastructure connection.
- If you will be connecting directly to another wireless adapter, you will need to create an Ad Hoc connection.
You must have the following configuration information for your network before you make a wireless connection:
- Network Name (SSID)
- Network Type: Infrastructure or Ad Hoc
- Authentication Mode: Off, Open System, Shared Key, or WPA-PSK
- Encryption: 64bits WEP, 128bits WEP, TKIP, or AES
- Data Encryption Key Type: ASCII (Alphanumeric), HEX (Hexadecimal), or Passphrase
- Encryption Key
There are four sections to the Wireless Configuration Utility:
Link Status, Site
Survey, Profile,
and About.
Link Status:
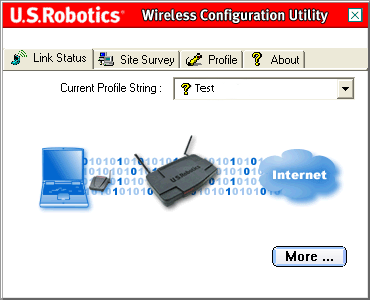
The Link Status area shows a graphical representation of your connection status.
If you see moving 1's and 0's flowing between the computer on the left and the wireless device in the center, you are connected to a wireless network.
If you see moving 1's and 0's flowing between the computer on the left, the wireless device in the center, and the cloud representing the Internet on the right, you are connected to a wireless network and to the Internet.
You can click More to view more information regarding your wireless connection.
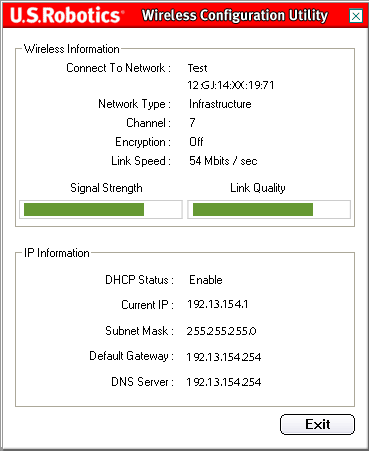
The top section of this screen provides the Wireless Information of your wireless network connection. The first lines tell you the SSID of the wireless network you are connected to and the MAC address of the wireless router or access point that you are connected to. The Network Type line will tell you what type of wireless network you currently connected to: Infrastructure or Ad Hoc. The Channel line tells you what channel you are wirelessly communicating on. The Encryption line tells you whether or not Encryption is enabled, and if it is, at what level (64 bit, 128 bit, etc.). The Link Speed line tells you at what speed you are currently connected. The Signal Strength and Link Quality bars indicate how well you are connecting to a wireless network. The larger that the bars are, the better your connection is. The bottom section provides the IP information of your wireless network connection.
Click Exit to return to the main Link Status screen.
Site Survey:
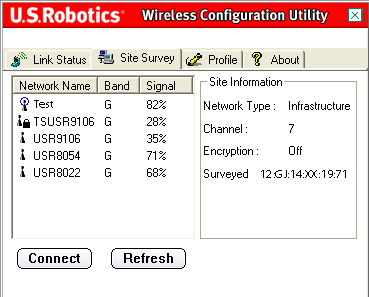
Selecting this tab opens the Site Survey area.
On the left, you will see a list of the available wireless networks to which you can connect. Select the appropriate network name and click Connect. You will only see five or six available wireless networks in the list. If you do not see the desired wireless network, click Refresh.
If you still do not see the desired wireless network when you perform a Site Survey, try creating a profile with the necessary connection information for the appropriate wireless network, selecting this profile, and then clicking Connect in the Profile tab. Refer to the Profile section in this User Guide for more information about creating a profile.
Next to the Network Name list is the Band column. This lets you know what band each wireless network is operating on. The 802.11g Wireless USB Adapter is compatible with both 802.11g products and the earlier 802.11b versions.
Next to this column is the Signal column. This provides a percentage indicator of how strongly you are receiving the signal from each wireless network to which you can connect.
When you select a network, you will see the available information regarding this network in the Site Information section on the right.
If you attempt to connect to a network that has security settings enabled, you will need to create a profile and supply the necessary information. Refer to your wireless router's or access point's documentation for instructions on how to locate the necessary security information. Some examples of security information you may need are the SSID, the Authentication Mode, and the Encryption Level.
Note: If you are connecting to a Wireless Access Point, it must support the Transmit Rate setting. If the Wireless Access Point does not support the Transmit Rate setting, undesired results may occur.
Profile:
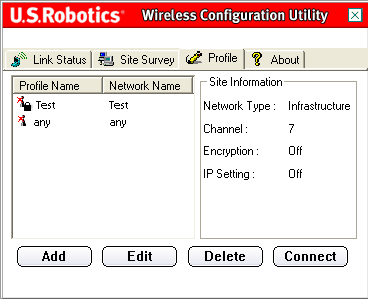
If you will be connecting to different wireless networks in different areas, you can create profiles so that you can easily switch between networks depending on your location or situation.
If you attempt to connect to a network that has security settings enabled, you will need to create a profile and supply the necessary information. Refer to your wireless router's or access point's documentation for instructions on how to locate the necessary security information.
You must have the following configuration information for your network before you make a wireless connection:
- Network Name (SSID)
- Network Type: Infrastructure or Ad Hoc
- Authentication Mode: Off, Open System, Shared Key, or WPA-PSK
- Encryption: 64bits WEP, 128bits WEP, TKIP, or AES
- Data Encryption Key Type: ASCII (Alphanumeric), HEX (Hexadecimal), or Passphrase
- Encryption Key
If you click Add, you will need to go through a series of screens to create a new profile.
Select a profile and click Edit to modify any profiles that you have already created.
If you want to remove a profile, select it in the list and click Delete.
Select a profile from the list and click Connect to establish a connection with that wireless device or network.
There are four main profile scenarios that you can set up. Click the appropriate link below for instructions on setting up the different types of profiles. The type of encryption you choose must match the wireless device or network to which you want to connect.
- If you will be connecting to a wireless router or access point, you will need to create an Infrastructure connection. All forms of encryption can be used for Infrastructure connections.
- If you will be connecting directly to another wireless adapter, you will need to create an Ad Hoc connection. WPA-PSK Encryption is not available for Ad Hoc connections, so you will need to pick one of the other three choices below.
Profile for a Wireless
Network Connection with No Encryption
Profile for a Wireless
Network Connection with Open System Encryption
Profile for a Wireless
Network Connection with Shared Key Encryption
Profile for a Wireless
Network Connection with WPA-PSK Encryption
Profile for a Wireless Network Connection with No Encryption
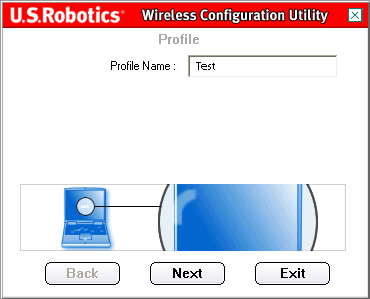
After you click Add, the first screen you see will prompt you for a Profile Name.
Supply a name that will allow you to easily identify the profile in the Profile screen. After you have entered a name, click Next.
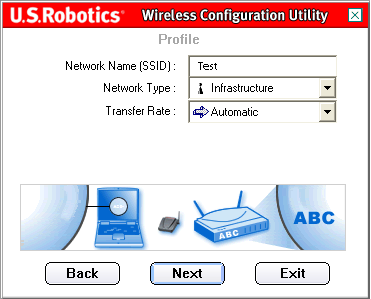
On the next screen, you will need to enter the Network Name. This is the SSID of the wireless device to which you want to connect. This is also the name that will appear in the Site Survey list of available wireless devices. You must have the correct SSID entered or you will not be able to connect to the wireless network. This field is case sensitive.
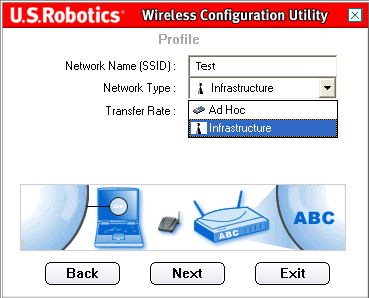
You will then need to select the Network Type: Infrastructure or Ad Hoc.
Infrastructure: Select this mode if you will be connecting to an access point or wireless router. Infrastructure mode provides additional features, such as power saving and extended range.
Ad Hoc: Select this mode if you will be connecting to another wireless device without the use of an access point or wireless router.
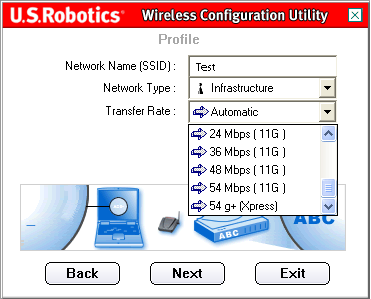
You can then select the Transfer Rate from the choices of Automatic, 6 Mbps (11G), 9 Mbps (11G), 12 Mbps (11G), 18 Mbps (11G), 24 Mbps (11G), 36 Mbps (11G), 48 Mbps (11G), 54 Mbps (11G), or 54 g+ (Xpress).
54g+ (Xpress) is a technology that utilizes standards based on framebursting to achieve higher throughput. With 54g+ enabled, aggregate throughput (the sum of the individual throughput speeds of each client on the network) can improve by up to 25% in 802.11g only networks and up to 75% in mixed networks comprised of 802.11g and 802.11b equipment.
On Automatic, the 802.11g Wireless USB Adapter will match the fastest speed of the wireless network to which you are connected. This means that the 802.11g Wireless USB Adapter will not achieve its maximum speed if the wireless network does not support the same maximum speed.If you selected Infrastructure as the Network type, click Next to proceed to the next screen.
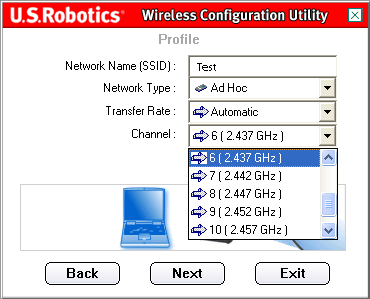
If you selected Ad Hoc as the Network type, you will then need to select the Channel.
North American users can select a channel between 1 and 11. European users can select a channel between 1 and 13. When you are finished, click Next to proceed to the next screen.
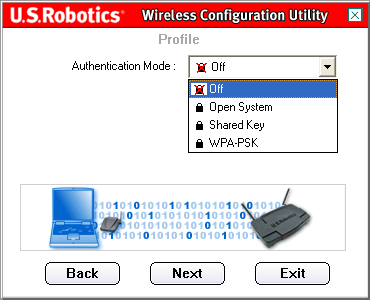
On the next screen, you can select the Authentication Mode. Select Off.
Note: If you select Off, no security settings will be enabled.
Click Next.
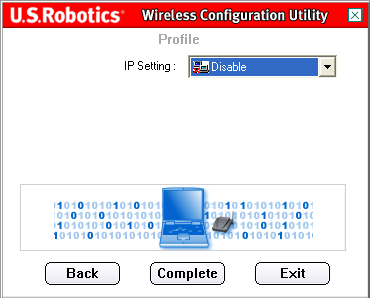
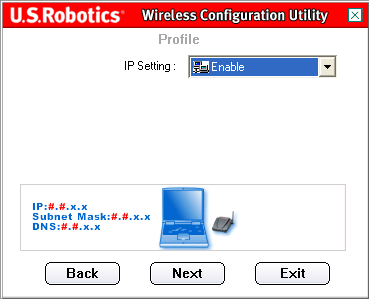
On the next screen, you can select either Enable or Disable for the IP Setting.
Note: If you plan to connect to the Internet, you must select Enable.
Note: If you are setting up an Ad Hoc connection, you must select Enable.
If you select Disable, click Complete to finish the profile setup.
If you select Enable, click Next to proceed to the next screen, where you can select or specify the IP address information.
Note: Most Infrastructure setups require that Enable is selected.
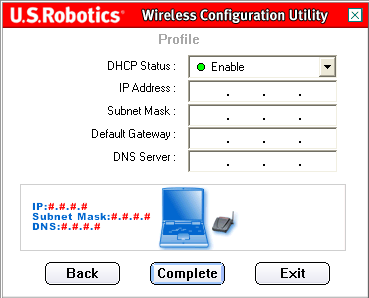
If you select Enable for the DHCP Status, the 802.11g Wireless USB Adapter will automatically obtain an IP address. DHCP should be enabled in most configurations. Click Complete to finish the profile setup.
Note: If you are setting up an Ad Hoc connection, you must select Disable.
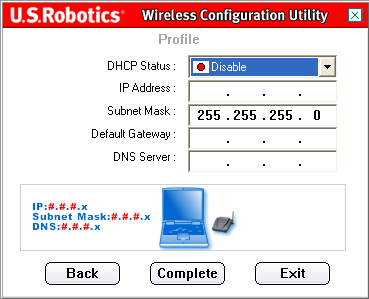
If you select Disable for the DHCP Status, you will need to enter the appropriate IP address information. You will need to do this if your computer cannot automatically obtain an IP address for the 802.11g Wireless USB Adapter.
Ad Hoc mode users: An example of an IP address that can be used is 192.168.123.xxx, where xxx is any number between 1 and 255. Make sure you do not assign the same IP address to any devices on the wireless network. Make sure that each wireless device is on the same Subnet Mask.
Infrastructure mode users: Make sure you do not assign the same IP address to any devices on the wireless network. Make sure that each wireless device has the same Subnet Mask, Default Gateway, and DNS Server.
When you have entered all the information, click Complete to finish the profile setup.
Profile for a Wireless Network Connection with Open System Encryption
After you click Add, the first screen you see will prompt you for a Profile Name.
Supply a name that will allow you to easily identify the profile in the Profile screen. After you have entered a name, click Next.
On the next screen, you will need to enter the name of the network to which you want to connect.
This is the SSID of the wireless device to which you want to connect. This is also the name that will appear in the Site Survey list of available wireless devices. You must have the correct SSID entered or you will not be able to connect to the wireless network. This field is case sensitive.
You will then need to select the Network Type: Infrastructure or Ad Hoc.
Infrastructure: Select this mode if you will be connecting to an access point or wireless router. Infrastructure mode provides additional features, such as power saving and extended range.
Ad Hoc: Select this mode if you will be connecting to another wireless device without the use of an access point or wireless router.
You can then select the Transfer Rate from the choices of Automatic, 6 Mbps (11G), 9 Mbps (11G), 12 Mbps (11G), 18 Mbps (11G), 24 Mbps (11G), 36 Mbps (11G), 48 Mbps (11G), 54 Mbps (11G), or 54 g+ (Xpress).
54g+ (Xpress) is a technology that utilizes standards based on framebursting to achieve higher throughput. With 54g+ enabled, aggregate throughput (the sum of the individual throughput speeds of each client on the network) can improve by up to 25% in 802.11g only networks and up to 75% in mixed networks comprised of 802.11g and 802.11b equipment.
On Automatic, the 802.11g Wireless USB Adapter will match the fastest speed of the wireless network to which you are connected. This means that the 802.11g Wireless USB Adapter will not achieve its maximum speed if the wireless network does not support the same maximum speed.If you selected Infrastructure as the Network type, click Next to proceed to the next screen.
If you selected Ad Hoc as the Network type, you will then need to select the Channel.
North American users can select a channel between 1 and 11. European users can select a channel between 1 and 13. When you are finished, click Next to proceed to the next screen.
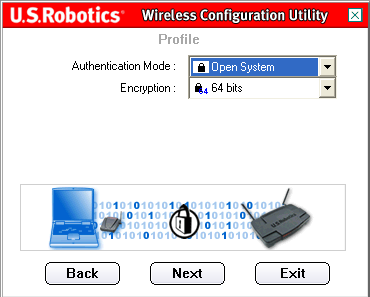
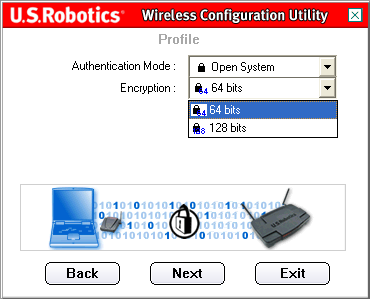
On the next screen, you can select the Authentication Mode. Select Open System.
You will then need to select the level of Encryption. You can select either 64 bit or 128 bit. This encryption is known as WEP.
WEP is an encryption scheme that is used to protect your wireless data communications. WEP uses a combination of 64-bit keys or 128-bit keys to provide access control to your network and encryption security for every data transmission. To decode a data transmission, each wireless client on the network must use an identical 64-bit or 128-bit key.
When you have made your selection, click Next.
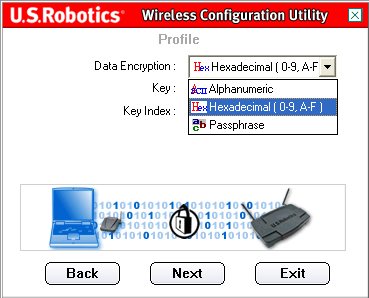
You will then need to select your Data Encryption.
You can select either Alphanumeric, Hexadecimal (0-9, A-F), or Passphrase. The Passphrase is any text string with a maximum of 32 characters. Hexadecimal is a string made up of a combination of numbers between 0 and 9 and letters between A and F. Alphanumeric is a string made up of a combination of any numbers and letters: a-z, A-Z, and 0-9. The following table details the necessary length of characters that must be input if you select Alphanumeric or Hexadecimal (0-9, A-F).
64-bit 128-bit
After selecting a Data Encryption method, enter a key or passphrase in the Key line.
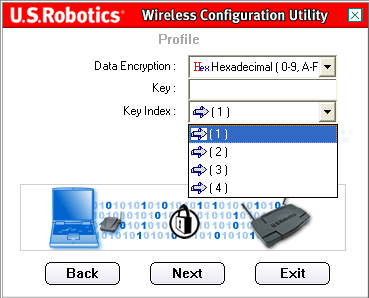
After you enter a Key, you will need to select the Key Index. It is important that you match the Network Keys with those of your wireless routers. If you have multiple Network Keys, you can enter up to four keys.
A key is used for network encryption using the WEP algorithm. Under 802.11, a wireless adapter can be configured with up to four keys, with the key index values being 1, 2, 3, and 4. When an access point or a wireless router transmits an encrypted message using a key that is stored in a specific key index, the transmitted message indicates the key index that was used to encrypt the message body. The receiving access point or wireless station can then retrieve the key that is stored at the key index and use it to decode the encrypted message body.
When you are finished, click Next.
On the next screen, you can select either Enable or Disable for the IP Setting.
Note: If you plan to connect to the Internet, you must select Enable.
Note: If you are setting up an Ad Hoc connection, you must select Enable.
If you select Disable, click Complete to finish the profile setup.
If you select Enable, click Next to proceed to the next screen, where you can select or specify the IP address information.
Note: Most Infrastructure setups require that Enable be selected.
If you select Enable for the DHCP Status, the 802.11g Wireless USB Adapter will automatically obtain an IP address. DHCP should be enabled in most configurations. Click Complete to finish the profile setup.
Note: If you are setting up an Ad Hoc connection, you must select Disable.
If you select Disable for the DHCP Status, you will need to enter the appropriate IP address information. You will need to do this if your computer cannot automatically obtain an IP address for the 802.11g Wireless USB Adapter.
Ad Hoc mode users: An example of an IP address that can be used is 192.168.123.xxx, where xxx is any number between 1 and 255. Make sure you do not assign the same IP address to any devices on the wireless network. Make sure that each wireless device is on the same Subnet Mask.
Infrastructure mode users: Make sure you do not assign the same IP address to any devices on the wireless network. Make sure that each wireless device has the same Subnet Mask, Default Gateway, and DNS Server.
When you have entered all the information, click Complete to finish the profile setup.
Profile for a Wireless Network Connection with Shared Key Encryption
After you click Add, the first screen you see will prompt you for a Profile Name.
Supply a name that will allow you to easily identify the profile in the Profile screen. After you have entered a name, click Next.
On the next screen, you will need to enter the name of the network to which you want to connect.
This is the SSID of the wireless device to which you want to connect. This is also the name that will appear in the Site Survey list of available wireless devices. You must have the correct SSID entered or you will not be able to connect to the wireless network. This field is case sensitive.
You will then need to select the Network Type: Infrastructure or Ad Hoc.
Infrastructure: Select this mode if you will be connecting to an access point or wireless router. Infrastructure mode provides additional features, such as power saving and extended range.
Ad Hoc: Select this mode if you will be connecting to another wireless device without the use of an access point or wireless router.
You can then select the Transfer Rate from the choices of Automatic, 6 Mbps (11G), 9 Mbps (11G), 12 Mbps (11G), 18 Mbps (11G), 24 Mbps (11G), 36 Mbps (11G), 48 Mbps (11G), 54 Mbps (11G), or 54 g+ (Xpress).
54g+ (Xpress) is a technology that utilizes standards based on framebursting to achieve higher throughput. With 54g+ enabled, aggregate throughput (the sum of the individual throughput speeds of each client on the network) can improve by up to 25% in 802.11g only networks and up to 75% in mixed networks comprised of 802.11g and 802.11b equipment.
On Automatic, the 802.11g Wireless USB Adapter will match the fastest speed of the wireless network to which you are connected. This means that the 802.11g Wireless USB Adapter will not achieve its maximum speed if the wireless network does not support the same maximum speed.If you selected Infrastructure as the Network type, click Next to proceed to the next screen.
If you selected Ad Hoc as the Network type, you will then need to select the Channel.
North American users can select a channel between 1 and 11. European users can select a channel between 1 and 13. When you are finished, click Next to proceed to the next screen.
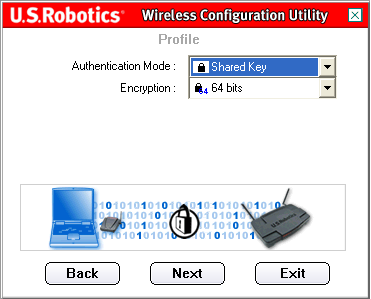
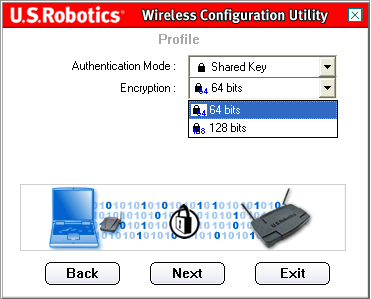
On the next screen, you can select the Authentication Mode. Select Shared Key.
You will then need to select the Encryption level. You can select either 64 bit or 128 bit.
WEP is an encryption scheme that is used to protect your wireless data communications. WEP uses a combination of 64-bit keys or 128-bit keys to provide access control to your network and encryption security for every data transmission. To decode a data transmission, each wireless client on the network must use an identical 64-bit or 128-bit key.
When you have made your selection, click Next.
You will then need to select your Data Encryption.
You can select either Alphanumeric, Hexadecimal (0-9, A-F), or Passphrase. The Passphrase is any text string with a maximum of 32 characters. Hexadecimal is a string made up of a combination of numbers between 0 and 9 and letters between A and F. Alphanumeric is a string made up of a combination of any numbers and letters: a-z, A-Z, and 0-9. The following table details the necessary length of characters that must be input if you select Alphanumeric or Hexadecimal (0-9, A-F).
64-bit 128-bit
After selecting a Data Encryption method, enter a key or passphrase in the Key line.
After you enter a Key, you will need to select the Key Index. It is important that you match the Network Keys with those of your wireless routers. If you have multiple Network Keys, you can enter up to four keys.
A key is used for network encryption using the WEP algorithm. Under 802.11, a wireless adapter can be configured with up to four keys, with the key index values being 1, 2, 3, and 4. When an access point or a wireless router transmits an encrypted message using a key that is stored in a specific key index, the transmitted message indicates the key index that was used to encrypt the message body. The receiving access point or wireless station can then retrieve the key that is stored at the key index and use it to decode the encrypted message body.
When you are finished, click Next.
On the next screen, you can select either Enable or Disable for the IP Setting.
Note: If you plan to connect to the Internet, you must select Enable.
Note: If you are setting up an Ad Hoc connection, you must select Enable.
If you select Disable, click Complete to finish the profile setup.
If you select Enable, click Next to proceed to the next screen, where you can select or specify the IP address information.
Note: Most Infrastructure setups require that Enable be selected.
If you select Enable for the DHCP Status, the 802.11g Wireless USB Adapter will automatically obtain an IP address. DHCP should be enabled in most configurations. Click Complete to finish the profile setup.
Note: If you are setting up an Ad Hoc connection, you must select Disable.
If you select Disable for the DHCP Status, you will need to enter the appropriate IP address information. You will need to do this if your computer cannot automatically obtain an IP address for the 802.11g Wireless USB Adapter.
Ad Hoc mode users: An example of an IP address that can be used is 192.168.123.xxx, where xxx is any number between 1 and 255. Make sure you do not assign the same IP address to any devices on the wireless network. Make sure that each wireless device is on the same Subnet Mask.
Infrastructure mode users: Make sure you do not assign the same IP address to any devices on the wireless network. Make sure that each wireless device has the same Subnet Mask, Default Gateway, and DNS Server.
When you have entered all the information, click Complete to finish the profile setup.
Profile for a Wireless Network Connection with WPA-PSK Encryption
After you click Add, the first screen you see will prompt you for a Profile Name.
Supply a name that will allow you to easily identify the profile in the Profile screen. After you have entered a name, click Next.
On the next screen, you will need to enter the name of the network to which you want to connect.
This is the SSID of the wireless device to which you want to connect. This is also the name that will appear in the Site Survey list of available wireless devices. You must have the correct SSID entered or you will not be able to connect to the wireless network. This field is case sensitive.
You will then need to select the Network Type: Select Infrastructure.
Infrastructure: Select this mode if you will be connecting to an access point or wireless router. Infrastructure mode provides additional features, such as WEP security, power saving, and extended range.
Ad Hoc: If you want this type of connection, the WPA-PSK option is not available. Refer to one of the other profile setting options for instructions.
You can then select the Transfer Rate from the choices of Automatic, 6 Mbps (11G), 9 Mbps (11G), 12 Mbps (11G), 18 Mbps (11G), 24 Mbps (11G), 36 Mbps (11G), 48 Mbps (11G), 54 Mbps (11G), or 54 g+ (Xpress).
54g+ (Xpress) is a technology that utilizes standards based on framebursting to achieve higher throughput. With 54g+ enabled, aggregate throughput (the sum of the individual throughput speeds of each client on the network) can improve by up to 25% in 802.11g only networks and up to 75% in mixed networks comprised of 802.11g and 802.11b equipment.
On Automatic, the 802.11g Wireless USB Adapter will match the fastest speed of the wireless network to which you are connected. This means that the 802.11g Wireless USB Adapter will not achieve its maximum speed if the wireless network does not support the same maximum speed.
When you are finished, click Next.
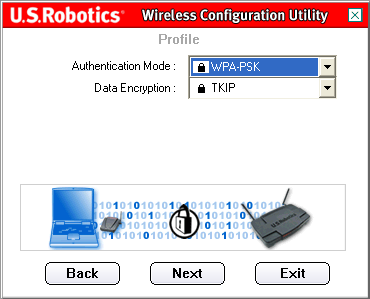
On the next screen, you can select the Authentication Mode. Select WPA-PSK.
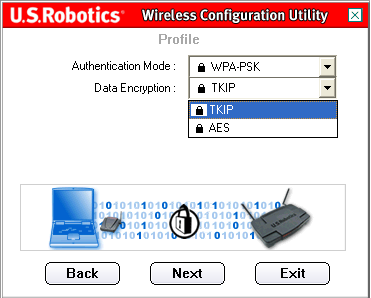
You will then need to select the Data Encryption level. You can select either TKIP or AES.
TKIP stands for Temporal Key Integrity Protocol. TKIP utilizes a stronger encryption method and incorporates Message Integrity Code (MIC) to provide protection against hackers. AES stands for Advanced Encryption System, which utilizes a symmetric 128-bit clock data encryption.
Note: WPA-PSK can only be used if the wireless network you want to connect to is capable of employing WPA-PSK as an authentication mode. Many older wireless devices may not be able to use WPA-PSK, so this should be verified before WPA-PSK is selected. Non-matching authentication modes will keep you from being able to connect to a wireless network.
When you have made your selection, click Next.
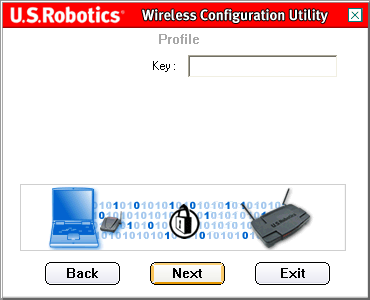
You will then need to enter a Key. The Key should be between 8 and 63 characters long.
WPA’s use of keys is very similar to WEP, but the key is only used once to start the process. Once communication is established, the key will randomly change. It is recommended that you use the most secure mechanism available on your 802.11g Wireless USB Adapter and USRobotics recommends WPA-PSK for its stronger data-hiding capability.
When you are finished, click Next.
On the next screen, you can select either Enable or Disable for the IP Setting.
Note: If you plan to connect to the Internet, you must select Enable.
If you select Disable, click Complete to finish the profile setup.
If you select Enable, click Next to proceed to the next screen, where you can select or specify the IP address information.
Note: Most Infrastructure setups require that Enable be selected.
If you select Enable for the DHCP Status, the 802.11g Wireless USB Adapter will automatically obtain an IP address. DHCP should be enabled in most configurations. Click Complete to finish the profile setup.
If you select Disable for the DHCP Status, you will need to enter the appropriate IP address information. You will need to do this if your computer cannot automatically obtain an IP address for the 802.11g Wireless USB Adapter. When you have entered all the information, click Complete to finish the profile setup.
About:
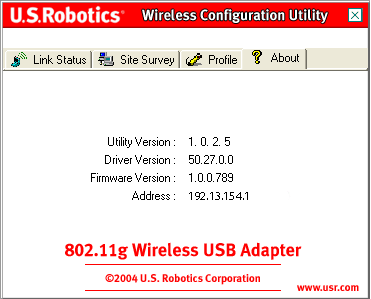
Within this section, you can view the version information for your 802.11g Wireless USB Adapter.
