The BiAdmin Management Utility can be used to configure the settings of the Wireless USB Print Server. This utility is for advanced users or for users on a network with multiple Wireless USB Print Servers. On networks with multiple Wireless USB Print Servers, it is recommended that you use the BiAdmin Management Utility instead of the Web User Interface.
If you configured your client installation as Admin, the BiAdmin Management Utility is already installed on your computer.
You can launch the BiAdmin Management Utility by using the link in the Programs menu. When it is launched, the BiAdmin Management Utility will search your network for all the Wireless USB Print Servers that are attached and running. The Wireless USB Print Servers will then be shown in the device list of the BiAdmin Management Utility.
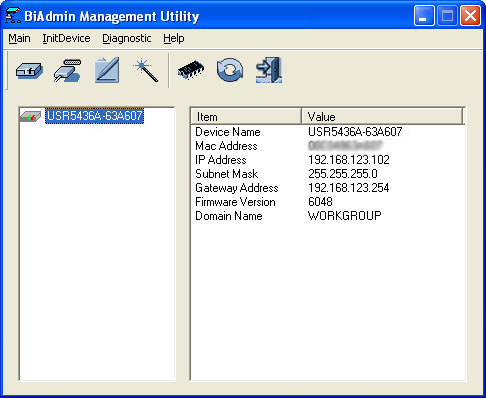
On the left side of the screen, you will see each Wireless USB Print Server that is attached to the network. If you select a Wireless USB Print Server, you will see the settings information on the right side of the screen.
If the desired Wireless USB Print Server is not listed, try performing the following steps:
At the top of the main BiAdmin Management Utility screen, there are status icons and the following menus:
Main: From this menu, you can select the following:
InitDevice: From this menu, you can select and perform the following:
Diagnostic: From this menu, you can select Print Test Page and then select the printer that should print the page. This will print out a test page which contains the configuration settings of the Wireless USB Print Server.
Help: From this menu, you can select Help Topics or the About BiAdmin for more information on the BiAdmin Management utility.
Once a Wireless USB Print Server has been selected, the icons can be used. The icons provide status information as well as access to the selected Wireless USB Print Server settings. If an icon is grayed out, that option or protocol is unavailable.