In this section you can enable the wireless security features. USRobotics strongly recommends that you enable some form of wireless security so that unauthorised clients are not able to access your network.
Note: Depending on your settings, some items may not appear on your access point configuration pages for options that your connection does not support.
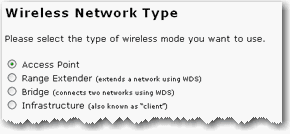
Select the wireless network type for the access point to run.
Access Point: Select this option if you will be using the access point as a traditional access point.
Range Extender: Select this option if you will be using the access point to extend the range of an existing WDS network. Wireless clients can connect to this access point in this mode.
Bridge: Select this option if you will be using the access point to connect two or more wired networks together using WDS. Wireless clients cannot connect to this access point in this mode.
Infrastructure: Select this option if you will be using the access point to connect to a networking device as a wireless client. Wireless clients cannot connect to this access point in this mode.

Select Broadcast network name if you want wireless devices to be able to detect your access point when they perform a site scan.
If you deselect Broadcast network name, wireless devices will not be able to detect your wireless network during a site scan. Devices will have to manually enter the Network Name (SSID) of your access point to connect.
If the access point will be used in a public place where you do not want any wireless clients to be able to share files or printers between themselves, select Access point isolation. With this selected, all of the wireless clients will only be able to access the Internet. An example of a situation where you would want to enable this feature is in a public hotspot, such as a coffee shop or hotel. This feature is disabled by default.

Select the network that the access point should connect to.
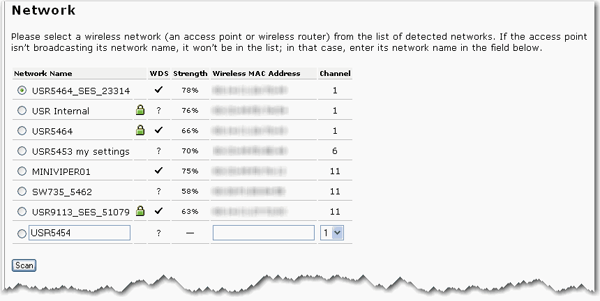
If the appropriate network device does not appear or if that device is not broadcasting its Network Name (SSID), select the last item in the list and manually enter the information for the network device. If you are connecting to a bridge, the Network Name (SSID) will not be listed and you will have to manually enter the information.
In Infrastructure mode, you will need to enter the Network Name.
In Range Extender and Bridge modes, you need to enter the Network Name and Wireless MAC Address and select the Channel of the existing wireless network.
Note: If you used SecureEasySetup to configure your wireless security settings, changing the Network Name or other security settings for your access point will cause your connected wireless clients to loose connectivity with the access point.
Wireless clients use the Network name (SSID) to connect to your access point.

The default Network name of the access point is USR5454. If you want to use multiple s independently, you must configure a unique Network name for each access point.
Note: All the wireless devices you want to connect to the network must have the same wireless security settings including the pass phrase or key that you use to secure your wireless network.
In this section you can enable the wireless security features. USRobotics strongly recommends that you enable some form of wireless security so that unauthorised clients are not able to access your network.
Note: For your wireless security settings, it is recommended that you select the WPA2 and WPA (PSK) or the WPA2 and WPA with 802.1x (RADIUS) (if you have a RADIUS server and are in Access Point mode) wireless security method using TKIP and AES encryption for the most secure wireless network.
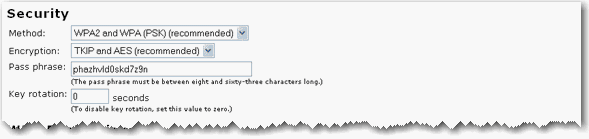
Select the encryption Method that you want the wireless network to use. You can select from WPA2 and WPA (PSK) , WEP, RADIUS, or other options. Depending on the wireless security Method you select, there are different encryption types and pass phrase or key settings.
Note: Depending on your Wireless Network Type, some wireless security options may not be supported.
The WPA2 and WPA options are only available if your Wireless Network Type is set as Access Point, Range Extender or Infrastructure.
Infrastructure only supports WPA2 (PSK) or WPA (PSK), not WPA2 and WPA (PSK).
Select one of the following WPA2 and WPA options:
WPA2 and WPA (PSK)
WPA2 (PSK)
WPA (PSK)
Select your Encryption type: TKIP and AES, AES, or TKIP.
Note: Not all wireless clients support AES encryption when using WPA (PSK) security. TKIP encryption with WPA (PSK) is supported by most wireless clients. You can use TKIP and AES encryption to cover both AES and TKIP clients.
Enter a Pass phrase (which is also commonly called a Network key, WPA key, or WPA Pre-shared key). The pass phrase must be between eight and sixty-three characters in length. This pass phrase must be the same on each computer that is connected to the wireless network.
You can also specify a Key rotation, in seconds, or enter 0 in the field to disable the option. Key rotation specifies how often the access point generates a new group key for broadcast and multicast packets.
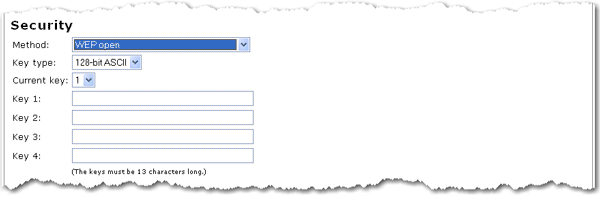
WEP open
WEP shared
Select your Key type as 128-bit ASCII, 128-bit hex, 64-bit ASCII or 64-bit hex.
Enter at least one Key (which is also commonly called a Network key).
Each key must be 13 characters long for a 128-bit ASCII key type, 26 characters long for a 128-bit hex key type, and 5 characters long for a 64-bit ASCII key type or 10 characters long for a 64-bit hex key type.
If you enter multiple keys, select the Current key that should be used for wireless connections.
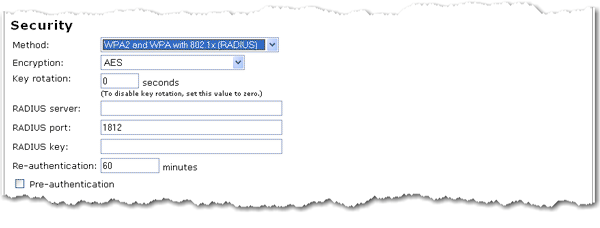
The RADIUS options can only be used if your Wireless Network Type is set as Access Point and you have access to a RADIUS server.
Select one of the following RADIUS options:
WPA2 and WPA with 802.1x (RADIUS)
WPA2 with 802.1x (RADIUS)
WPA with 802.1x (RADIUS)
Select your Encryption type: TKIP and AES, AES, or TKIP.
Note: Not all wireless clients support AES encryption when using WPA (PSK) security. TKIP encryption with WPA (PSK) is supported by most wireless clients. You can use TKIP and AES encryption to cover both AES and TKIP clients.
Enter the RADIUS server IP address and RADIUS Port settings of your RADIUS server.
Enter the RADIUS key of your RADIUS server.
Enter the Re-authentication time, in minutes.
If required for your connection to the RADIUS server, select Pre-authentication. This option is not available with WPA with 802.1x (RADIUS).
Note: The setting of None is not recommended since without any encryption enabled, your network will be vulnerable to outside malicious attacks.
WDS allows you to use multiple access points or wireless routers to connect several separate networks together. By connecting an access points or wireless routers to each network and enabling the WDS feature, the wireless clients in the immediate area will be able to connect to the wireless network while a bridge would also be created to another access point or wireless router that is further away (Access Point and Range Extender modes only). The access point and the wireless product that you will be creating a bridge with will need to have the same channel selected, the same Network Name (SSID), same wireless security settings, as well as the MAC address of the other device entered in the WDS Restrictions table. Enabling the WDS Restrictions option allows you to enter the MAC addresses of the access points or wireless routers that will be capable of connecting to each point of the wireless network that you have created. This will then limit exactly who has access to the wireless network.
One thing to note about this type of wireless network is that the throughput may be reduced for the bridging portion. Therefore, bridged routers or access points that also allow wireless clients to connect to the network should not be used for high-volume traffic. Some examples of the type of situations where you might want this type of network would be for security cameras, to provide network access to certain parts of a building that might not be able to be connected using wires, or to provide short-term network access to a conference area.
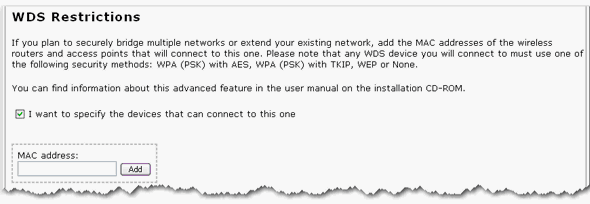
You can set restrictions for devices that connect through WDS (Wireless Distribution System). These restrictions apply only to devices that connect through WDS, not all wireless devices that connect to the access point.
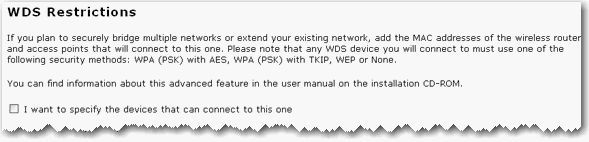
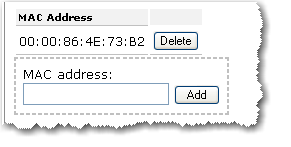
If you select I want to specify the devices that can connect to this one, you will need to enter the MAC addresses of the wireless routers or access points that will connect to this access point and click the Add button.
To delete an existing WDS mapping, click the Delete button next to the MAC Address.
If you enable Bridge mode and WDS Restrictions in the wireless access point, a bridge will be created to another wireless router or access point and no wireless clients will be able to connect to the wireless network. This is generally used when you want to connect two networks that are in different buildings. Each wireless router or access point will have to have the MAC address of the other device entered in the WDS Restrictions table.
The access point’s WDS connections do not support WPA2 (PSK), any of the RADIUS security methods, and TKIP and AES encryption.
If your access point is set with one of the following security methods and encryption types, all WDS connections to the access point should use WPA-PSK (TKIP):
WPA2 (PSK) with TKIP and AES
WPA2 (PSK) with TKIP
WPA (PSK) with TKIP and AES
WPA (PSK) with TKIP
If your access point is set with one of the following security methods and encryption types, all WDS connections to the access point should use WPA (PSK) with AES:
WPA2 (PSK) with AES
WPA (PSK) with AES
In both of these cases, the Pass phrase (which is also commonly called a Network key, key, or Personal shared key) you entered for the wireless security on your access point will be also used as the Personal Shared Key (PSK) for WDS connections. However, all wireless clients connecting to the access point should continue to use the same security method and encryption type that you configured on your access point.
This feature is disabled by default. If you want to enable this feature, select the checkbox next to Enable WMM (Wi-Fi Multimedia). The other devices that you are connecting to in order to use this feature must also support WMM and have it enabled.
This feature enables the Quality of Service (QoS) function that is used for multimedia applications, such as Voice-over-IP (VoIP) and video. This allows the network packets of the multimedia application to have priority over regular data network packets, allowing multimedia applications to run smoother and with fewer errors.

If you enable WMM, you can then select Enable no-acknowledgement. No-Acknowledgement refers to the acknowledge policy used at the MAC level. Enabling no-acknowledgement can result in more efficient throughput but higher error rates in a noisy Radio Frequency (RF) environment.
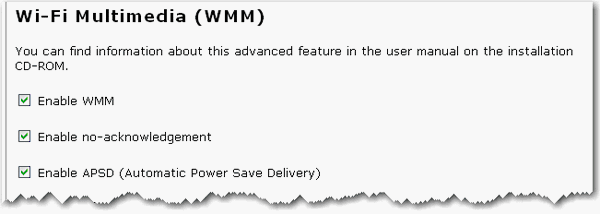
With WMM enabled, you can also select Enable APSD (Automatic Power Save Delivery). APSD manages radio usage for battery-powered devices to allow longer battery life in certain conditions. APSD allows a longer beacon interval until an application requiring a short packet exchange interval starts. Voice Over Internet Protocol (VoIP) is an example of application requiring a short packet exchange interval. APSD affects radio usage and battery life only if the wireless client also supports APSD.
Note: 802.11n mode does not support WMM, and the Acceleration option MAXg (125 Mbps) is incompatible with WMM. To enable WMM, you must change the 802.11n mode to Off and set the Acceleration option to 54g+ (Xpress™).
The fields in this area are for more advanced wireless features that most people do not need to change. If you do want to change any of these settings, write down the default settings before you make any changes in case you experience any problems and need to change these settings back.
Extension channels are only applicable if your access point is operating at 40 MHz bandwidth and the 802.11n mode is configured as Automatic.
For US channels:
Control Channel |
Sideband |
Extension Channel |
|---|---|---|
1 - 7 |
Lower |
Channel number + 4 |
5 - 11 |
Upper |
Channel number - 4 |
For European channels:
Control Channel |
Sideband |
Extension Channel |
|---|---|---|
1 - 9 |
Lower |
Channel number + 4 |
5 - 13 |
Upper |
Channel number - 4 |
Example: If your control channel is set to 1, the extension channel will be transmitted on channel 5. The total bandwidth of the signals on channel 1 and 5 equals 40 MHz.
Example: If your control channel is set to 11, the extension channel will be transmitted on channel 7. The total bandwidth of the signals on channel 11 and 7 equals 40 MHz.
![]()
Multicast rate: Specify the rate at which multicast packets are transmitted and received on your wireless network. Multicast packets are used to send a single message to a set of recipients in a defined group. Teleconferencing, videoconferencing and group email are some examples of multicast applications. Specifying a high multicast rate may improve performance of multicast features. The rates are in Mbps. You can select Automatic, 1, 2, 5.5, 6, 9, 11, 12, 18, 24, 36, 48, 54. To disable this option, clear the checkbox.
Power level: Select either 100%, 50%, or 25% from the drop-down menu. The Power level sets the strength of the wireless signal that the access point transmits. You would want a lower setting if you live in an area where your wireless signal could be overlapping with other wireless networks and want to reduce the interference you encounter.
Control channel: Sets the channel on which the access point operates. If you are experiencing interference or wireless network problems, changing the channel may solve the issue. It is recommended that you keep the control channel set at Automatic to avoid interference with adjacent networks. Do not use Automatic if you are using WDS. For more information, see Control and Extension Channels.
802.11n mode: You can select Automatic or Off. Automatic enables 802.11n support, and Off will disable 802.11n support.
Bandwidth: Specify radio frequency bandwidth, either 20MHz or 40MHz (dual channel), that the access point will use if 802.11n mode is configured as Automatic and the Control Channel is configured as Automatic. If the access point detects other adjacent wireless networks, it will use 20 MHz operation so as to not interfere with the networks. If no other adjacent networks are detected, the access point will use 40MHz operation.
Sideband for control channel: Displays which sideband the access point is using for the control channel, either Upper or Lower. Sideband channels are only applicable if your access point is operating at 40 MHz bandwidth and the 802.11n mode is configured as Automatic.
NPHY rate: Set the Physical Layer (NPHY) rate. These rates are only applicable when the 802.11n mode is configured as Automatic.
Automatic 802.11n protection: If you select this option, the access point will use Request to Send/Clear to Send (RTS/CTS) to improve the performance in 802.11 mixed environments. If this is not selected, the 802.11n performance will be maximized under most conditions while the other 802.11 modes (802.11b, etc.) will be secondary.
54g mode: For 54g mode, you can select Automatic, 802.11g Performance, or 802.11b Only. This option is only visible when 802.11n mode is turned Off.
Legacy rate:Set the Physical Layer rate. This option is only visible when 802.11n mode is turned Off.
Basic rate set: Select the basic rate that wireless clients must support: Default, All, or 1 & 2 Mbps.
Acceleration: Select None, 54g+ (Xpress™), or MAXg (125 Mbps). These features determine either normal speed rates or accelerated rates. Set the mode to 54g+ (Xpress™) for the widest compatibility. Set the mode to None if you are experiencing difficulty with legacy 802.11b/g equipment. MAXg (125 Mbps) will only work with MAXg wireless clients.
Enable VLAN priority mode: When selected, the access point will advertise packet priority using the VLAN tag.
Beacon Interval: The amount of time between beacon transmissions. A beacon is basically a heartbeat for a wireless client or access point, sending out a signal informing the network that it is still active. This should be set between 1 and 1000 milliseconds. The default beacon interval is 100 ms.
RTS threshold: The RTS Threshold is the minimum size in bytes for which the Request to Send/Clear to Send (RTS/CTS) channel contention mechanism is used. In a network with significant radio interference or large number of wireless devices on the same channel, reducing the RTS Threshold might help in reducing frame loss. The RTS threshold is 2347 bytes by default, which is the maximum value.
Fragmentation threshold: The maximum level the access point will reach when sending information in packets before the packets are broken up in fragments. Typically, if you are experiencing problems sending information, it is because there is other traffic on the network and the data being transmitted is colliding. This might be corrected by the information being broken into fragments. The lower the level that the Fragmentation threshold is set to, the smaller a packet has to be before it is broken into fragments. If the maximum is set (2346), fragmentation is essentially disabled. You should only change this level if you are an advanced user.
DTIM Interval: This parameter configures the amount of time after which buffered broadcast and multicast frames will be delivered to the wireless clients. This allows mobile stations to conserve power. If you are using applications which use broadcast or multicast frames for delivering data, you should use a Delivery Traffic Indication Message (DTIM) Interval of 1 to minimize delay for real-time traffic, such as multicast audio and video streams.
Preamble: Defines the length of the Cyclic Redundancy Check (CRC) block for communication between the
access point and wireless clients. The preamble consists of the Synchronization and Start Frame Delimiter (SFD) fields. The sync field is used to indicate the delivery of a frame to wireless stations, to measure frequency of the radio signal, to perform corrections if needed. The SFD at the end of the Preamble is used to mark the start of the frame.
If you are not using any 802.11b devices in your network, you can configure the Preamble type to Short for optimum performance. The Long Preamble type should be used when both 802.11g and 802.11b devices exist on your network.
Note: Click Save to apply all your new settings and reboot the access point after you have completed all your changes.