Installing a USB Printer in a Windows Me or 98SE Environment
A USB printer can be connected to the Wireless MAXg Router and used as a network printer if you are using an operating system that supports printing to an Internet Printing Protocol (IPP)-based printer. Windows Me and Windows 98SE operating systems require that Internet Printing Services be installed in order to use the print server function of the Wireless MAXg router.
Step One: Internet Print Services Installation
Windows Me Users:
- Install the Internet Print Services from the Add-on folder located on the Windows Millennium Edition CD-ROM.
- Follow the instructions provided by Microsoft.
- When the installation is complete, restart your computer.
Windows 98SE Users:
- Download and install the Internet Print Services from Microsoft's Web site. http://www.microsoft.com/windows98/downloads/contents/WUPreviews/IPP/Default.asp
- Follow the instructions provided by Microsoft.
- When the installation is complete, restart your computer.
Step Two: Local Printer Installation
Note: If your printer is already installed and printer software is installed on your computer, skip to Step Three: Print Server Configuration.
Before configuring your printer on the print server, it is important to install it on your computer using the drivers provided by the printer manufacturer.
- Plug your USB printer into one of the USB ports on your computer.
- Install the printer by following the installation instructions included with your printer.
- Print a test page to ensure that the printer is working properly.
Step Three: Print Server Configuration
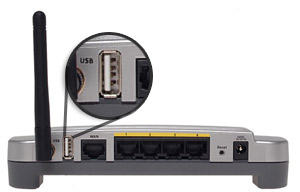
- Plug the thin rectangular end of the USB cable into the USB port on the Wireless MAXg Router.
- Connect the power supply to your printer and turn your printer on.
- Start a Web browser. In the location or address line type 192.168.2.1 and press Enter.
Note: If you have modified your router's IP address, enter the new IP address instead of 192.168.2.1
- When the user name and password window appears, type in the user name and the password you created. Click OK to load the router's setup page.
Note: You will not be prompted to log in the first time you connect to the MAXg Router's Web User Interface. During the Setup Wizard procedure, you will be prompted to create a user name and password to log on to the router. If you create a user name and password, you will need to use these whenever you log on to the Wireless MAXg Router. The user name and password are case-sensitive.
- In the Device section of the Status page, look for the Printer status and Printer location information. Write down the Printer location address. This information will be used in step 10.
Note: Perform the following steps to set up your printer. This procedure must be performed on every computer on the network.
- Click Windows Start, Settings and then Printers.
- Click Add Printer.
- The Add Printer Wizard will start. Click Next.

- Choose the radio button labeled Network printer. Click Next.
- In the Network path or queue name field, enter the Printer location address recorded during step 5. Click Next.
Note: The URL information is case-sensitive and must be entered exactly as it is listed on the Printer location section on the router's Status page.
- Select the manufacturer and model of your printer. Click Next.
Note: If your printer does not appear in the list, please repeat Step Two: Local Printer Installation.
- Select Keep existing driver (recommended). Click Next.
- When prompted, select Yes to set this printer as your default printer. Click Finish.
Step Four: Verify the printer's connectivity
- Click Windows Start, Settings, and then Printers.
- Verify that your printer is listed. Right-click on your printer and select Properties.
- Click Print Test Page.
Note: If the test page fails to print, refer to I cannot print to a network printer attached to my Wireless MAXg router in Windows Me or 98SE in the Troubleshooting section of this guide for additional information.