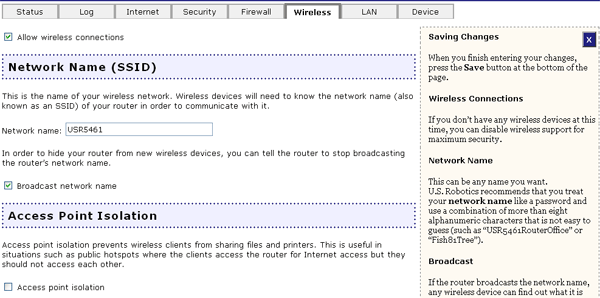
In the Web User Interface, click the Wireless tab. In this section you can configure and change the wireless network settings of the Wireless MAXg Router.

At the top of the section, you can either select or deselect Allow wireless connections. If wireless connections are not allowed, devices can access the network only if they are connected to the router using a network cable. If there are no wireless clients, disabling wireless connections ensures complete wireless security.
Allow wireless connections is selected by default to allow wireless clients to connect to the Wireless MAXg Router. You will need to configure the following wireless settings to support the wireless clients.
Note: Each wireless client in the wireless network must have Infrastructure mode selected in its Configuration Utility, as well as the correct network name (SSID) and security information, in order to connect to the Wireless MAXg Router. Refer to your wireless client documentation to determine how to configure these settings.
By default, the Wireless MAXg Router's wireless network name is USR5461. This is used by wireless clients to identify the Wireless MAXg Router. U.S. Robotics recommends that you change the network name to something unique so that you can easily identify the wireless network you want to connect to, if multiple networks are available. The network name can be up to 32 alphanumeric characters, including underscores (_).
You can also set whether the network name (SSID) will be broadcast by selecting or deselecting the checkbox next to Broadcast network name. If you have this enabled, the network name will be broadcast so that anyone who is in the area and scanning for wireless devices will see your router. If you have this disabled, only wireless clients who know your network name will be able to locate the router. U.S. Robotics recommends that you do not broadcast your network name; this will increase the security of your router.

If your Wireless MAXg Router will be used in a public place where you don't want any wireless clients to be able to share files or printers, select the checkbox for Access point isolation. With this selected, all of the wireless clients will only be able to access the Internet. An example of a situation where you would want to enable this feature is in a public hotspot, such as a coffee shop or hotel. This feature is disabled by default.

Bridge mode is used to connect two isolated networks wirelessly. If this feature is enabled, wireless clients will not be able to connect to the Wireless MAXg Router. Bridging is used if you are trying to connect two networks or two groups of wired clients, each with its own Wireless MAXg Router or wireless access point, that cannot be conveniently connected using Ethernet cabling. An example of this type of situation would be two homes that want to share network resources without running cabling through their yards.
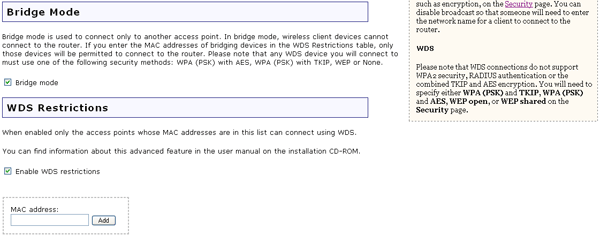
This feature is disabled by default. If you want to enable this feature, select the checkbox for Bridge mode. If you enter the MAC addresses of bridging devices in the WDS Restrictions section, only those devices will be permitted to connect to the router.
The U.S. Robotics Wireless MAXg Routers and Access Points are capable of using a feature known as WDS which allows the wireless router or access point to connect directly to another wireless router or access point, while still allowing wireless clients to connect to the network. WDS stands for Wireless Distribution System. If you have enabled this option, you will need to enter the MAC addresses of the wireless routers or access points to which you want to connect. By default, this feature is disabled.
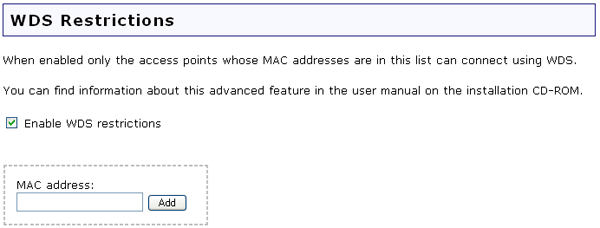
If you enable WDS, you will only be able to use the following forms of encryption methods: WPA2 and WPA, WPA, WEP open, WEP shared, or None. If you select WPA2 and WPA or WPA, you can choose either TKIP or AES, but not TKIP and AES.
WDS allows you to use multiple access points or wireless routers to connect several separate networks together. By connecting an access point or wireless router to each network and enabling the WDS feature, the wireless clients in the immediate area will be able to connect to the wireless network while a bridge would also be created to another access point or wireless router that is further away. The wireless router and the wireless product that you will be creating a bridge with will need to have the same channel selected, the same SSID, same wireless security settings, as well as the MAC address of the other device entered in the WDS Restrictions table. Enabling the WDS Restrictions option allows you to enter the MAC addresses of the access points or wireless routers that will be capable of connecting to each point of the wireless network that you have created. This will then limit exactly who has access to the wireless network.
Example of WDS Restrictions without Bridge Mode
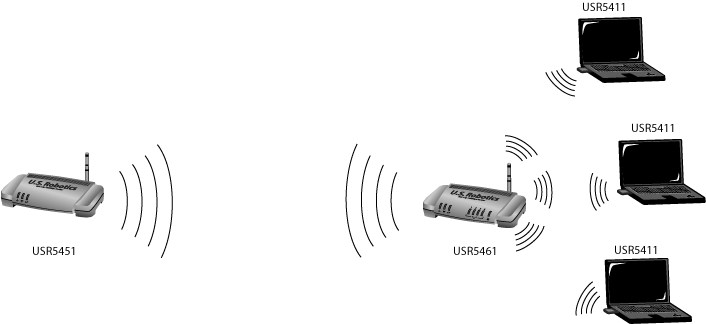
One thing to note about this type of wireless network is that the throughput may be reduced for the bridging portion. Therefore, bridged routers or access points that also allow wireless clients to connect to the network should not be used for high-volume traffic. Some examples of the type of situations where you might want this type of network would be for security cameras, to provide network access to certain parts of a building that might not be able to be connected using wires, or to provide short-term network access to a conference area.
If you enable Bridge mode and WDS Restrictions in the wireless router, a bridge will be created to another wireless router or access point and no wireless clients will be able to connect to the wireless network. This is generally used when you want to connect two networks that are in different buildings. Each wireless router or access point will have to have the MAC address of the other device entered in the WDS Restrictions table.
Example of Bridge Mode with or without WDS Restrictions

This feature is disabled by default. If you want to enable this feature, select the checkbox next to Enable WMM. The other devices that you are connecting to in order to use this feature must also support WMM and have it enabled.
This feature enables the Quality of Service (QoS) function that is used for multimedia applications, such as Voice-over-IP (VoIP) and video. This allows the network packets of the multimedia application to have priority over regular data network packets, allowing multimedia applications to run smoother and with fewer errors.

If you enable WMM, you can then select Enable no-acknowledgement. No-Acknowledgement refers to the acknowledge policy used at the MAC level. Enabling no-acknowledgement can result in more efficient throughput but higher error rates in a noisy Radio Frequency (RF) environment
With WMM enabled, you can also select Enable APSD (Automatic Power Save Delivery). APSD manages radio usage for battery-powered devices to allow longer battery life in certain conditions. APSD allows a longer beacon interval until an application requiring a short packet exchange interval starts. Voice Over Internet Protocol (VOIP) is an example of application requiring a short packet exchange interval. APSD affects radio usage and battery life only if the wireless client also supports APSD.
Note: WMM cannot be used if Acceleration is set to MAXg (125 Mbps). You will need to change the Acceleration to either 54G+ (XPress) or None.
The fields in this area are for more advanced wireless features that most people do not need to change. If you do want to change any of these settings, write down the default settings before you make any changes in case you experience any problems and need to change these settings back.
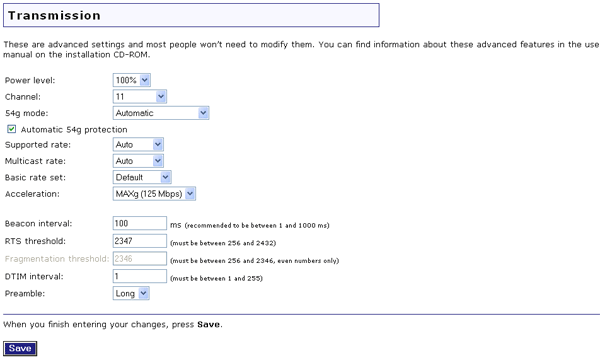
For Power level, you can select either 100%, 50%, or 25% from the drop-down menu. The Power level sets the strength of the wireless signal that the Wireless MAXg Router transmits. You would want a lower setting if you live in an area where your wireless signal could be overlapping with other wireless networks and want to reduce the interference you encounter.
For Channel, you can select a different channel for your wireless network traffic to be transmitted on. If you are experiencing interference or wireless network problems, changing the channel might solve the issue.
For 54g mode, you can select Automatic, 802.11g Performance, or 802.11b Only. If you are using all 802.11g equipment, 802.11g Performance will provide the fastest performance. If you select 802.11b Only, all clients that are capable of 802.11b will connect to the Wireless MAXg Router at 802.11b data rates.
You can either select or deselect the checkbox next to Automatic 54g protection. If you select this option, the Wireless MAXg Router will use RTS/CTS to improve the 802.11g performance in 802.11 mixed environments. If this is not selected, the 802.11g performance will be maximized under most conditions while the other 802.11 modes (802.11b, etc.) will be secondary.
Supported rate is the wireless link rate at which information will be transmitted and received on your wireless network. You can select Auto, 1, 2, 5.5, 6, 9, 11, 12, 18, 24, 36, 48, 54.
Multicast rate specifies the rate at which multicast packets are transmitted and received on your wireless network. Multicast packets are used to send a single message to a set of recipients in a defined group. Teleconferencing, videoconferencing and group email are examples of multicast applications. Specifying a high multicast rate may improve performance of multicast features. However, a high multicast rate may reduce the throughput of non-multicast packets.
For Basic rate set, you can select either Default, All, or 1 & 2 Mbps.
For Acceleration, you can select None, 54g+ (Xpress™), or MAXg (125 Mbps). These features determine either normal speed rates or accelerated rates. The Wi-Fi Multimedia (WMM) feature is not available if you select MAXg (125 Mbps).
Beacon Interval is the amount of time between beacon transmissions. A beacon is basically a heartbeat for a wireless client or router, sending out a signal informing the network that it is still active. This should be set between 1 and 1000 milliseconds.
RTS threshold is how long the router will wait before sending a client an RTS message. RTS stands for Request to Send. An RTS message will tell the target computer, network, or server that the client is trying to send data and wants primary access to the computer or network during the transmission and reception of the information. If a client is experiencing difficulties transmitting data to a computer, network, or server, this threshold should be lowered.
Fragmentation threshold is the maximum level the router will reach when sending information in packets before the packets are broken up in fragments. Typically, if you are experiencing problems sending information, it is because there is other traffic on the network and the data being transmitted is colliding. This might be corrected by the information being broken into fragments. The lower the level that the Fragmentation threshold is set to, the smaller a packet has to be before it is broken into fragments. If the maximum is set (2346), fragmentation is essentially disabled. You should only change this level if you are an advanced user.
DTIM Interval is the time between when DTIMs are sent to clients on the network. DTIM stands for Delivery Traffic Indication Message (DTIM). A DTIM is a message that is sent to clients on the network that are power-managed, informing them that there is information that needs to be sent to them so they can become active again to receive it. A smaller number means the clients will not be able to go into power saving mode for too long. A higher number means they will be able to go into power saving mode, but will have to remain active longer since more information will have accumulated to be sent to them. The default value for the DTIM interval is 3.
Preamble defines the length of the CRC (Cyclic Redundancy Check) block for communication between the Wireless MAXg Router and wireless clients. Networks with a lot of traffic should select Short for the preamble, while networks without a lot of traffic should select Long for the preamble. Short preamble will boost the overall throughput of information on the wireless network. If you have Short selected and any client on the network doesn't support Short, that client will not be able to communicate with the Wireless MAXg Router.
After making any changes to the wireless settings of the Wireless MAXg Router, you must click Save in order for your changes to be saved and implemented.