Installing with an Analogue or ISDN Modem
Before You Begin
To install your Broadband Router with USB Print Server, make sure that you have the following items:
- A PC with an Ethernet adapter (NIC) installed
- A functioning RS-232 analogue or ISDN modem
- Internet Explorer 5.0 or later
OR
Netscape 7.0 or later
You may need additional items at various steps in the installation process, depending on your computer and Internet environments. You can start the installation and get these items only if you need them, or you can have them ready before you begin:
- Your operating system installation CD-ROM
- Your CD-ROM drive letter (for example, D)
- Your Broadband Router with USB Print Server product number and serial number, located on the bottom label of the router. In the event that you need to call our Technical Support department, you will need this number to receive assistance.
| Product Number | Serial Number |
|---|
| 8001 | |
- Information about your Internet connection, which you will later use to configure your router. You will need your dial-up user name and password and the telephone number that you use to connect with your Internet service provider. If you cannot remember the number, use these instructions to find your dial-up telephone number.
Step 1: Connect Your Modem to the Router
- Turn off your PC and your modem.
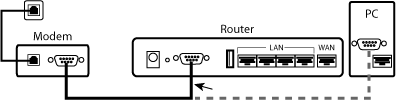 Locate the serial cable that connects your modem to your PC’s serial port, and disconnect it from the PC only. Do not disconnect the cable from your modem.
- Connect the free end of the serial cable to the COM port on the rear of the router.
Step Two: Connect your router to your PC and power supply.

- Connect one end of the supplied Ethernet cable to your PC’s Ethernet adapter.
- Connect the other end to one of the router’s LAN ports.
- Turn on your modem.
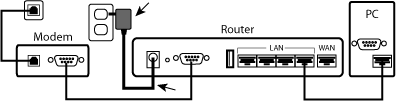 Connect the supplied power cord to the 5.0 VDC port on the router.
Note to UK Users: Replace the plug on power adapter with the UK standard plug that is supplied in your USRobotics package. Apply enough pressure to cause a click and firmly seat the new plug.
- Plug the power cord into a standard power outlet.
- Turn on your PC.
Step Three: Configure the basic connection settings.
Note to Windows Users: If Universal Plug and Play launches, ignore its on-screen instructions.
- Launch a Web browser.
- In the location or address line, type http://192.168.123.254 and press Enter to access the router's Web User Interface.
- Click Log in—there is no default password.
- In the Administrator's Main Menu, click Wizard.
The Setup Wizard will lead you through the steps that establish your basic configuration.
The first step is to select your WAN type. Select Dial-up Network and click Next, and the Setup Wizard prompts you for the following information:

- LAN IP Address—the router's IP address. The default address is 192.168.123.254.
- Dial-up Telephone—the telephone number that you use to connect to your ISP. If you cannot remember the number, use these instructions to find your dial-up telephone number.
- Dial-up Account and Dial-up Password—the account and password that your ISP assigned to you.
After entering the information, click Next to complete your setup. Then click Reboot to make your configuration effective.
- Verify your Internet connection by selecting the Web User Interface's Status page and clicking Connect. This action initiates a dial-up session with your ISP, and the Status page will indicate whether or not the call was successful.
- If the connection fails, select Help > Troubleshooting from the menu at the top of this page.
- If a connection is established, you are finished with the installation procedure and can register your Broadband Router with USB Print Server at www.usr.com/productreg. USRobotics also recommends that you make a backup of your new configuration settings as follows:
- Select the Toolbox menu.
- Click Backup Setting.
- Your operating system prompts you to save or open the file. Click Save.
- Browse to the location at which you want the backup file saved and click Save.
Congratulations! You have completed the installation procedure.