
Contents:
Configuration Guide >
USRobotics ADSL Ethernet Modem User Guide
Configuration Guide
Purpose
This chapter will provide the configuration steps for the ADSL modem.
The ADSL modem automatically trains up to the ideal line speed. By default, the ADSL modem is provisioned with rates of 8 Mbps downstream and 640 Kbps upstream. The maximum operative rate is determined by your DSL service provider. After establishing a connection between your ADSL modem and your DSL service provider, you will have an always-on connection. There are logical connections that should be set up upon initial configuration, which establish the virtual channel for different applications. To configure the logical connections, you must provision ATM virtual connections.
On the ADSL modem, the ADSL physical interface is always ready to send and receive network traffic. You may need to define an ATM virtual connection (VC) when communicating across an ATM network for logical connection setup. The ATM connection is identified by two indicators: virtual path identifiers (VPI) and virtual circuit identifiers (VCI). Each connection must have a unique pair of VPI and VCI settings. Check with your service provider for details.
Log on to the ADSL Modem
In order to configure the ADSL modem, open a Web browser and enter the default IP address of http://192.168.1.1. The default password is 12345. You must use the default password the first time you log in, but you should change the password for your ADSL modem after the first login. Refer to the Change Password section for details.

Select the ADSL Protocol
The USRobotics ADSL Ethernet Modem supports the following four different ADSL protocols:
- Multi-mode (default)
- G.DMT (G.992.1)
- G.Lite (G.992.2)
- ANSI T 1.413 Issue 2

When using the multi-mode setting, the ADSL Ethernet modem will attempt to automatically determine which protocol is being used. In most cases, the default setting of Multi-mode should not be changed. This setting should only be changed if your service provider has specified that a specific protocol should be used. To use a different ADSL Protocol, select the appropriate button and click OK.
Note: After you click OK, you will be prompted to save your settings. Make sure you are finished making all your changes before you save your settings. When you are finished making your changes, click Save.
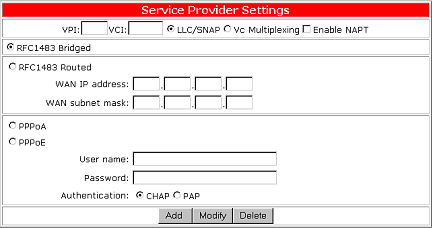
Configuring the Service Provider Settings
The ADSL modem supports four Service Provider WAN services:
- RFC1483 Bridged Mode (To be used as an Ethernet bridge)
- RFC1483 Routed Mode
- PPP over ATM (PPPoA) Mode
- PPP over Ethernet (PPPoE) Mode
A more detailed description of each connection mode follows.
Configure RFC1483 Bridged Mode
Select RFC1483 Bridged to use RFC1483 Bridged mode. Bridging is a standardized layer 2 technology. It is typically used in corporate networks to extend the physical reach of a single LAN segment and increase the number of stations on the common LAN without compromising performance. Bridged data is encapsulated using the RFC1483 protocol to enable data transport.
One important characteristic of bridging is the number of bridge ports. The ADSL modem has eight remote virtual ports on the ADSL interface and one local port (Ethernet) on the user interface.
The ports on the ADSL interface are described as virtual because they are associated with the ATM virtual connections that are configured on the ADSL line. To establish a connection from any of the remote destinations to the bridge port, PVCs must be configured end-to-end through the network. Your DSL service provider will provide you with the VPI/VCI values to use after you subscribe to the service.
The bridged mode comes with the following parameters:
| Parameters | Description |
| VPI | Virtual path identifier. |
| VCI | Virtual circuit identifier. |
| LLC | Logical Link Control allows multiple protocol running over one virtual circuit with a little bit more overhead. |
| VCMUX | Virtual Circuit Multiplexer (null encapsulation) allows only one protocol running per virtual circuit with less overhead. |
| Enable NAPT | This option is only for a routed connection and cannot be used in bridged or PPPoE mode. |
VPI/VCI
The ATM connection is identified by the two following indicators: virtual
path identifiers (VPI) and virtual circuit identifiers (VCI). Each connection
must have a unique pair of <VPI, VCI> settings.
RFC 1483 Bridged Mode Setup
Create a new RFC 1483 Bridged Connection
- Enter the correct numbers in the VPI and VCI fields.
- Select the appropriate encapsulation - LLC or VCMUX.
- Click Add. This will create a new VPI/VCI connection. Up to 8 VPI/VCI connections can be set.
- Click OK to save the settings.*
Modify a RFC 1483 Bridged Connection
- Select one VPI/VCI pair from the Connection List.
- Modify the numbers in the VPI and VCI fields and select the appropriate encapsulation - LLC or VCMUX.
- Click Modify.
- Click OK to save the settings.*
Delete a RFC 1483 Bridged Connection
- Select a VPI/VCI pair from the Connection List.
- Click Delete.
- Click OK to save the settings.*
*Note: After you click OK, you will be prompted to save your settings. Make sure you are finished making all your changes before you save your settings. When you are finished making your changes, click Save.
Configure RFC1483 Routed Mode
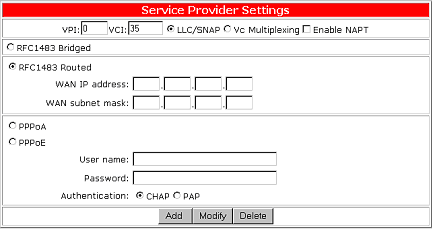
Select RFC1483 Routed to use a RFC1483 Routed connection mode. Routing is the act of moving information across a network from a source to a destination. Along the way, at least one intermediate node is typically encountered. Routing is often contrasted with bridging. The primary difference between the two is that bridging occurs at Layer 2 (the link layer) of the OSI reference model, whereas routing occurs at Layer 3 (the network layer).
The ADSL Modem has eight remote virtual ports on the ADSL interface and one local port (Ethernet) on the user interface.
The ports on the ADSL interface are described as virtual because they are associated with the ATM virtual connections configured on the ADSL line. To establish a connection from any of the remote destinations to the ADSL modem port, PVCs must be configured end-to-end through the network.
RFC 1483 Routed Setup
Your DSL service provider will provide you with the values of VPI/VCI to use after you sign up for the service.
Each PVC comes with the following parameters:
| Parameters | Description |
| VPI | Virtual path identifier. |
| VCI | Virtual circuit identifier. |
| WAN IP Address | Selected PVC's WAN IP address. |
| WAN Subnet Mask | Selected PVC's WAN Subnet Mask. |
| LLC | Logical Link Control allows multiple protocol running over one virtual circuit with a little bit more overhead. |
| VCMUX | Virtual Circuit Multiplexer (null encapsulation) allows only one protocol running per virtual circuit with less overhead. |
| Enable NAPT | Network Address Port Translation allows multiple computers to share a single WAN IP address. |
Check your ISP for the related IP information for the WAN connection including WAN IP, WAN Subnet Mask, and Default Gateway.
To set the VPI/VCI/WAN IP/WAN Subnet Mask parameters, including adding, modifying, and deleting, refer to the "Set up VPI/VCI " section in this manual.
Create a new RFC 1483 Routed Connection
- Enter the correct numbers in the VPI and VCI fields.
- Select the appropriate encapsulation - LLC or VCMUX.
- Select Enable NAPT if an Internet connection will be shared among multiple computers.
- Enter the WAN IP address and the WAN subnet mask.
- Click Add. This will create a new VPI/VCI connection. Up to 8 VPI/VCI connections can be set.
- Click OK to save the settings.*
Note: If you are setting the NAPT inbound server, please refer to the LAN Settings section of this manual for more configuration instructions.
Modify a RFC 1483 Routed Connection
- Select one VPI/VCI pair from the Connection List.
- Modify the numbers in the VPI and VCI fields and select the appropriate encapsulation - LLC or VCMUX.
- Select Enable NAPT if an Internet connection will be shared among multiple computers.
- Enter the WAN IP address and the WAN subnet mask.
- Click Modify.
- Click OK to save the settings.*
Delete a RFC 1483 Routed Connection
- Select a VPI/VCI pair from the Connection List.
- Click Delete.
- Click OK to save the settings.*
*Note: After you click OK, you will be prompted to save your settings. Make sure you are finished making all your changes before you save your settings. When you are finished making your changes, click Save.
Configure PPPoA Mode
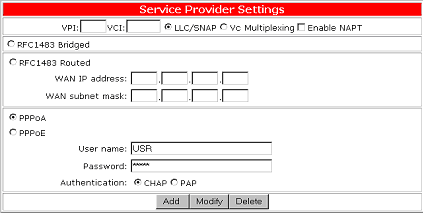
Click the PPPoA button to use PPP over ATM connection mode. PPP is a single link or multi-link interface between two packet switching devices, such as a router or bridge. PPP is an efficient conduit for multiple protocols such as IP and IPX, which are encapsulated across the communications datalink. PPP over ATM is PPP frames that are carried over ATM cells, which are the common transport and backbone used by DSL service providers.
Your service provider, usually the telephone company or the ISP, will tell you the values of VPI/VCI to use after you sign up the service. Your service provider must also provide your User name, Password, and Authentication protocol. To set the VPI/VCI parameters including adding, modifying, and deleting, refer to "Set up VPI/VCI " in this manual.
The following are the required settings for a PPPoA connection:
| Parameters | Description |
| VPI | Virtual path identifier. |
| VCI | Virtual circuit identifier. |
| User name | User name assigned or verified by your service provider. |
| Password | The password that will allow login in conjunction with your user name. |
| LLC | Logical Link Control allows multiple protocol running over one virtual circuit with a little bit more overhead. |
| VCMUX | Virtual Circuit Multiplexer (null encapsulation) allows only one protocol running per virtual circuit with less overhead. |
| Enable NAPT | Network Address Port Translation allows multiple computers to share a single WAN IP address. |
| CHAP | Challenge Handshake Access Protocol encrypts the password through a DES/MD5 algorithm which provides more security. |
| PAP | Use Plain-text As Password format for a lesser security. |
Create a new PPPoA Connection
- Enter the correct numbers in the VPI and VCI fields.
- Select the appropriate encapsulation - LLC or VCMUX.
- Select Enable NAPT if an Internet connection will be shared among multiple computers.
- Enter the User name, Password, and Authentication - CHAP or PAP.
- Click Add. This will create a new VPI/VCI connection. Up to 8 VPI/VCI connections can be set.
- Click OK to save the settings.*
Note: If you are setting the NAPT inbound server, please refer to the LAN Settings section of this manual for more configuration instructions.
Modify a PPPoA Connection
- Select one VPI/VCI pair from the Connection List.
- Modify the numbers in the VPI and VCI fields and select the appropriate encapsulation - LLC or VCMUX.
- Select Enable NAPT if an Internet connection will be shared among multiple computers.
- Enter the User name, Password, and Authentication - CHAP or PAP.
- Click Modify.
- Click OK to save the settings.*
Delete a PPPoA Connection
- Select a VPI/VCI pair from the Connection List.
- Click Delete.
- Click OK to save the settings.*
*Note: After you click OK, you will be prompted to save your settings. Make sure you are finished making all your changes before you save your settings. When you are finished making your changes, click Save.
Configure PPPoE Mode
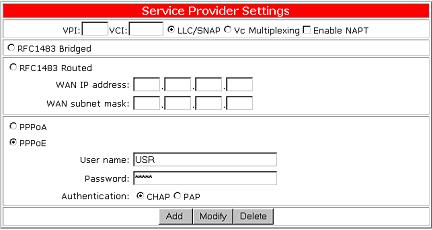
Click the PPPoE button to use PPP over Ethernet connection mode. PPP is a single link or multi-link interface between two packet switching devices, such as a router or bridge. PPP is an efficient conduit for multiple protocols such as IP and IPX, which are encapsulated across the communications datalink. PPP over Ethernet is PPP frames that are carried over standard 802.3 Ethernet frames over ATM.
Your service provider, usually the telephone company or the ISP, will tell you the values of VPI/VCI to use after you sign up the service. Your service provider must also provide your User name, Password, and Authentication protocol. To set the VPI/VCI parameters including adding, modifying, and deleting, refer to "Set up VPI/VCI " in this manual.
The following are the required settings for a PPPoE connection:
| Parameters | Description |
| VPI | Virtual path identifier. |
| VCI | Virtual circuit identifier. |
| User name | User name assigned or verified by your service provider. |
| Password | The password that will allow login in conjunction with your user name. |
| LLC | Logical Link Control allows multiple protocol running over one virtual circuit with a little bit more overhead. |
| VCMUX | Virtual Circuit Multiplexer (null encapsulation) allows only one protocol running per virtual circuit with less overhead. |
| Enable NAPT | Network Address Port Translation allows multiple computers to share a single WAN IP address. |
| CHAP | Challenge Handshake Access Protocol encrypts the password through a DES/MD5 algorithm which provides more security. |
| PAP | Use Plain-text As Password format for a lesser security. |
Create a new PPPoE Connection
- Enter the correct numbers in the VPI and VCI fields.
- Select the appropriate encapsulation - LLC or VCMUX.
- Select Enable NAPT if an Internet connection will be shared among multiple computers.
- Enter the User name, Password, and Authentication - CHAP or PAP.
- Click Add. This will create a new VPI/VCI connection. Up to 8 VPI/VCI connections can be set.
- Click OK to save the settings.*
Note: If you are setting the NAPT inbound server, please refer to the LAN Settings section of this manual for more configuration instructions.
Modify a PPPoE Connection
- Select one VPI/VCI pair from the Connection List.
- Modify the numbers in the VPI and VCI fields and select the appropriate encapsulation - LLC or VCMUX.
- Select Enable NAPT if an Internet connection will be shared among multiple computers.
- Enter the User name, Password, and Authentication - CHAP or PAP.
- Click Modify.
- Click OK to save the settings.*
Delete a PPPoE Connection
- Select a VPI/VCI pair from the Connection List.
- Click Delete.
- Click OK to save the settings.*
*Note: After you click OK, you will be prompted to save your settings. Make sure you are finished making all your changes before you save your settings. When you are finished making your changes, click Save.
LAN Settings
The USRobotics ADSL Ethernet Modem has an integrated network processor, which means it supports network features such as routing, NAPT, DHCP, and DNS services. When configuring the modem for routing, the following settings may need to be configured: Management IP, NAPT, DHCP/DNS, and Routing Table. To access these settings, click LAN Settings. These options will be shown at the bottom of the Setup Menu. The configuration steps for these options are below.
Management IP
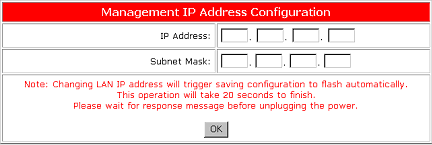
The Management IP address is the address of the inside Local Area Network (LAN). This is a private address that is only accessible to the computers that are connected to the USRobotics ADSL Ethernet Modem. When packets are sent outside the network of the USRobotics ADSL Ethernet Modem, the IP address gets converted to a globally accessible IP address, or a WAN IP. The Subnet Mask is applied to an IP address in order to mask a portion of the address. This will distinguish the network ID from the host ID.
To access the Management IP address configuration, click LAN Settings and then click Management IP. To change the Management IP Address and the Subnet Mask, enter the values that were provided by your service provider and click OK. The default IP address is 192.168.1.1 and the default subnet mask is 255.255.255.0. Usually these settings will not need to be changed.
Configuring NAPT
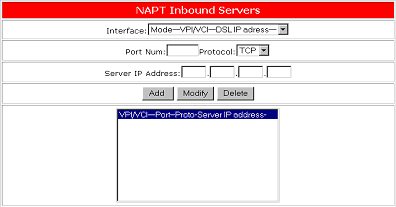
The NAPT feature converts IP addresses on a private network (designated as inside or LAN) to global IP addresses that can forward packets to another registered network (designated as "outside" or "WAN"). It enables multiple PCs on the LAN to access the Internet for the cost of one IP address. NAPT is a special case of NAT, where many IP numbers are hidden behind a number of addresses. In contrast to the original NAT, the number of connections is not limited to that number. With NAPT, an almost arbitrary number of connections is multiplexed using TCP port information. Enabling the NAPT inbound server will allow WAN devices to access your LAN.
To set up the NAPT feature, you must select the appropriate Interface. You must then select the Port number, Protocol (UDPor TCP), and the Server IP Address for each port that you want to enable. Click OK to save the settings.
Configuring DHCP/DNS Service
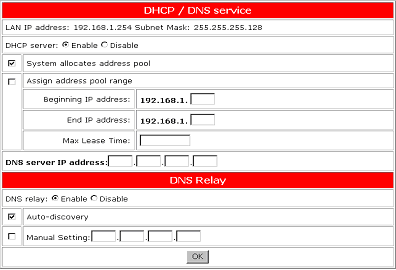
Dynamic Host Configuration Protocol (DHCP) is the protocol that is used to automatically assign an IP address to a client computer. Domain Name Server (DNS) is the Internet protocol for mapping host names, domain names, and aliases to IP addresses.
Setting DHCP Service
When enabling NAPT or using the modem in PPPoA mode, the DHCP server should be enabled. To enable the DHCP server, click the Enable button. When the DHCP server is enabled, IP addresses will automatically be assigned. This can be seen by selecting System allocates address pool. When you have completed the setup, click OK to save the configuration.
If you need to assign the range for the beginning and end IP addresses, select Assign address pool range. You will then need to enter the Beginning IP address, the End IP address, and the Max Lease Time. The Max Lease Time must be entered in increments of seconds. When you have completed the setup, click OK to save the configuration.
Setting DNS Service
Most service providers will automatically assign the DNS Server IP address by using Auto Discovery. Once DNS Relay is enabled, Auto Discovery will be enabled by default. If your service provider requires a static DNS entry to be set, Disable must be selected for DNS Relay. You must then enter the DNS Server IP address in the Manual Setting field. When you have completed the setup, click OK to save the configuration.
Create a Routing Table
Each routing table entry comes with the following parameters:
| Parameters | Description |
| RIP on/off | Checked to enable RIP (Router Information Protocol) function |
| Dest. Network ID | The network ID of the destination IP address |
| Dest. Subnet Mask | The subnet mask of the destination IP address |
| Mask | The subnet mask of the destination subnet |
| Next Hop | The IP address of the neighbor/peer interface for routing purpose |
There are two ways to create a routing table. One is to enable RIP and the system will create a routing table dynamically through the routing information. The other is to disable RIP option and create a static routing table manually. Once RIP is enabled, the routing table entries will disappear. While the RIP is disabled, the user must create a routing table for a specific routing path. RIP is enabled/disabled by selecting/de-selecting RIP on/off.
Monitor Your ADSL Status Using Web UI
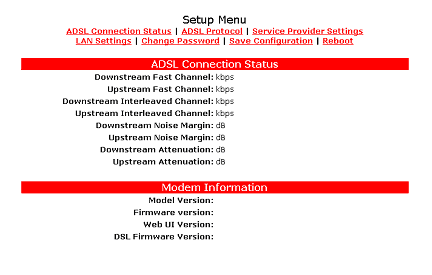
To monitor the ADSL operation status while using Web UI, click the ADSL connection STATUS button on the top of the Setup Menu.
In addition to the following parameters, the status monitor also shows firmware revision, ADSL link status, and the PPP connection status if available.
Downstream Fast Channel shows the ADSL downstream physical rate
in Fast Channel Mode.
Downstream Interleaved Channel shows the ADSL downstream physical
rate in Interleaved channel mode.
Downstream CRC Error shows the number of CRC errors of downstream
traffic.
Downstream Noise Margin shows the noise margin of downstream traffic.
Downstream Attenuation shows the power loss
in the downstream signal.
Upstream Fast Channel shows the ADSL upstream physical rate in
Fast Channel Mode.
Upstream Interleaved Channel shows the ADSL upstream physical rate
in Interleaved channel mode.
Upstream CRC Error shows the number of CRC errors of upstream traffic.
Upstream Noise Margin shows the noise margin of upstream traffic.
Upstream Attenuation shows the power loss
in the upstream signal.
The Web monitor also displays the following modem information: Model Version, Firmware Version, Web UI Version, and DSL Firmware Version.
Test your Configuration
After completing the configuration process, you may test the operation of the ADSL modem by launching a Web browser and accessing a remote Web site, such as http://www.usr.com.
Change the Password
The ADSL modem provides password protection. The default login password for the router is 12345. After logging in the first time, change the password by clicking Change Password.
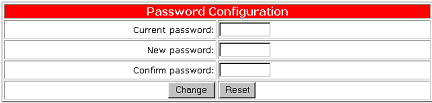
Note: After you have changed your password, write the new password down in a safe place in case you forget it in the future. Click Verify to make sure the settings are correct and then click OK to save the settings.
Upgrade Firmware Using TFTP
The ADSL modem is bundled with one TFTP download utility, which allows you to remotely download the latest version of firmware via LAN connection to the ADSL modem. The utility program tftputil.exe is included with the ADSL modem.
You may run tftputil.exe directly from the CD or copy it to your hard drive and run it from there.
Type your password, the LAN IP address for the ADSL modem, and then Image/Pack File. Click Download to start the firmware download. Make sure the IP address of the ADSL modem is located on the same subnet as the computer that runs the download utility or there is a valid routing path in between. If you need to download more than one file at the same time, click Other File 1 and/or Other File 2 and type the Source File. Click Download to start the firmware download.
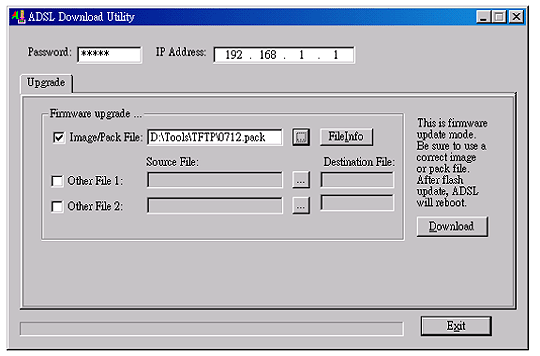
If everything is okay, you will get the following prompt:
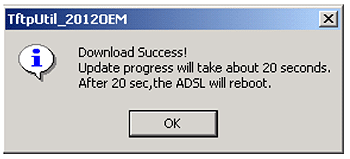
Note: Refer to the "Recover from a crashed flash Image" section in this manual if a power failure occurs during the firmware download.
Configure the CONSOLE Port
If you configure the ADSL modem using the console port, for the best access to the ADSL Router, use the terminal emulation program to set your CONSOLE port to the following settings:
- VT100 terminal emulation
- Baud rate: 9600
- Data bits: 8
- Parity: None
- Stop bits: 1
- Flow Control: None
Recovering from a Crashed Flash Image
When there is a power failure during TFTP software upgrade, the flash image may crash. The ADSL modem provides Flash Crash Recovery mechanism to recover the crashed flash image.
You must contact your service provider to obtain the current, necessary Bin file.
Start a terminal emulation program (such as HyperTerminal) to enter the Console mode. The Console mode prompts as follows:
PP flash boot
SDRAM size = 0x800000, type = 0x5
Flash boot failed.Entered console ...
]
Follow these steps:
- Enable xmodem by entering ]xmodem fast.
- Set the communication port baud rate to 38400.
a. Click Call and then Disconnect.
b. Select File/Properties and the Property window will be on the screen.
c. Click Configure and change bit per second to 38400.
d. Select Transfer/Send File and specify the targeted .bin file. Select Xmodem and click Send.
When the file transfer is complete, you will see the following messages:
]xmodem fast Image relocated - type quit to boot
- Follow step 2 to change the baud rate back to the default setting of 9600.
- Type quit to reboot for the changes to take effect.
]
quit.....................................................................Decode image finish...
Found valid boot information block
No, or invalid,configuration information in EEPROM - trying FLASH
Valid configuration (size 256)NP software version is 0x00000701 (reply took 12us)
Model Number :T60M10411.13
Firmware version :x.x.x
Web UI version :x.x.xx
DSL firmware version :x.x.x
Copyright (c) 2000
Current Modem State (11) : ACTIVATING
- Enter flashfs and update image.
192.168.1.1> flashfs
192.168.1.1 flashfs> update
Updating flash filing system ...
done
192.168.1.1 flashfs>
- Restart the ADSL Router by unplugging and plugging the power adapter back in. The CONSOLE will prompt you with
NBfIs3
PP flash boot
SDRAM size = 0x800000, type = 0x3
N.n........................................................................................................Decode image finish...
No boot information block
No, or invalid, configuration information in EEPROM - trying FLASH
Valid configuration (size 256)
atmos_main::atmos_memsize= 800000NP software version is 0x00000701 (reply took 12us)
Model Number :T60M10411.13
Firmware version :x.x.x
Web UI version :x.x.xx
DSL firmware version :x.x.x
Copyright (c) 2000
Current Modem State (11) : ACTIVATING
- Press Enter. You will see the following:
Please input the PASSWORD:*****
- At the password prompt, type your password and press Enter
to switch to the CONTROL home prompt.
192.168.1.1>
The flash image will be recovered and ready for further configuration
and operation.
![]()