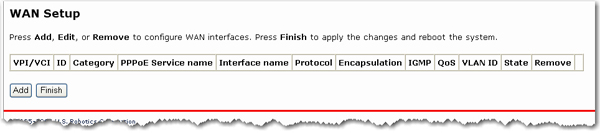
The WAN setup page allows you to edit or remove your ISP configuration that you set up either in EasyConfigurator or the quick setup wizard. Click Edit to modify the existing Internet connection, or Add to define a new one. You will then see a series of pages for entering networking parameters. The last page will have an Apply button to store the changes in your gateway. Click Finish to save.
To remove a Permanent Virtual Circuit (PVC) from this table, click the Remove checkbox for the particular VPI/VCI to delete, then click the Remove button.
The Wireless Ndx ASDL2+ Gateway supports the following five ISP network operating modes over gateway ADSL interface:
The ISP network operating mode depends on the service provider's configuration on the Central Office side and Broadband Access Server (BRAS) for your ADSL line.
Your ISP should be able to provide the following, if needed:
The following configuration considerations apply:
If the service provider provides PPPoE service, then the connection selection depends on whether the LAN-side device (typically a computer) is running a PPPoE client or whether the gateway is to run the PPPoE client. The gateway can support both cases simultaneously. Consult your ISP instructions on the appropriate protocol to use.
NAPT and firewall features are always enabled when PPPoE or PPPoA mode is selected, but they can be enabled or disabled by the user when MER or IPoA mode is selected. NAPT and firewall are always disabled when Bridge mode is selected.
Go to the Internet menu and select WAN Setup.
Click Add to create a new PVC or Edit to modify an existing one.
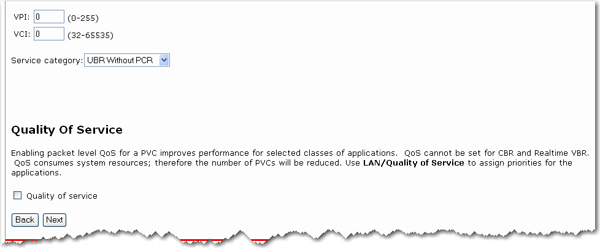
Enter the appropriate VPI, VCI and select the appropriate Service category. The valid VPI range is from 0 to 255. The valid VCI range is from 32 to 65535. If applicable to your service category, you can enter the Peak cell rate, Sustainable cell rate and Maximum burst size for your connection, enable Quality of service (QoS) using the check box. Your QoS options are accessible from the LAN menu. Click Next.
The Connection Type page allows you to select the type of network protocol over the ATM PVC supported by the Internet Service Provider.
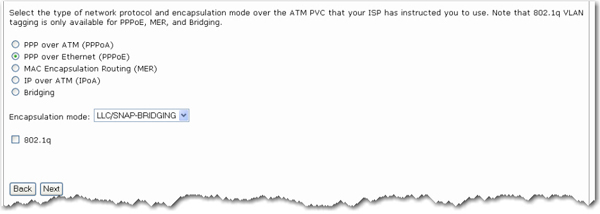
Select the protocol as assigned by your ISP and proceed to the matching sections in this manual for further instructions.
Select the PPP over ATM (PPPoA) or PPP over Ethernet (PPPoE) radio button.
Select the appropriate Encapsulation Mode and click Next.
Enter you connection information:
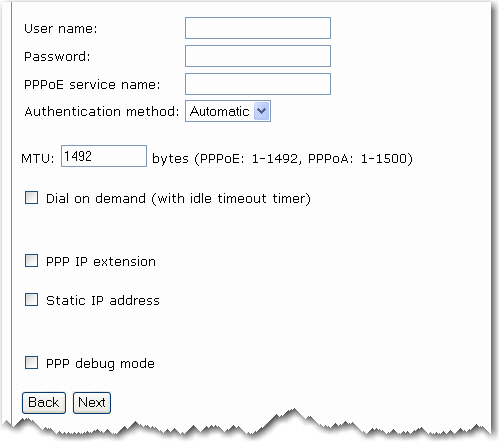
User name and Password: The login information for your ADSL connection. The user interface allows a maximum of 256 characters in the user name and a maximum of 32 characters in the password.
PPPoE service name: This can be blank unless your ISP gives you a value to enter.
Authentication method: The default is Automatic. It is recommended that you leave the Authentication method in Automatic, however, you may select PAP or CHAP if necessary.
MTU: The default value for MTU (Maximum Transmission Unit) is 1500 for PPPoA and 1492 for PPPoE. Do not change these values unless your ISP asks you to.
Dial on demand and Inactivity timeout: The gateway can be configured to disconnect if there is no activity for a specific period of time by selecting the Dial on demand and entering an Inactivity timeout. The entered value must be between 1 minute to 4320 minutes.
PPP IP Extension: This is a special feature deployed by some service providers. Unless your service provider specifically requires this setup, do not select it. If you need to select it, the PPP IP Extension supports the following conditions:
It allows only one computer on the LAN.
The public IP address assigned by the remote using the PPP/IPCP protocol is actually not used on the WAN PPP interface. Instead, it is forwarded to the computer's LAN interface through DHCP. Only one system on the LAN can be connected to the remote, since the DHCP server within the ADSL gateway has only a single IP address to assign to a LAN device.
NAPT and firewall are disabled when this option is selected.
The gateway becomes the default gateway and DNS server to the computer through DHCP using the LAN interface IP address.
The gateway extends the IP subnet at the remote service provider to the LAN computer. That is, the PC becomes a host belonging to the same IP subnet.
The ADSL gateway bridges the IP packets between WAN and LAN ports, unless the packet is addressed to the gateway's LAN IP address.
After entering your settings, click Next.
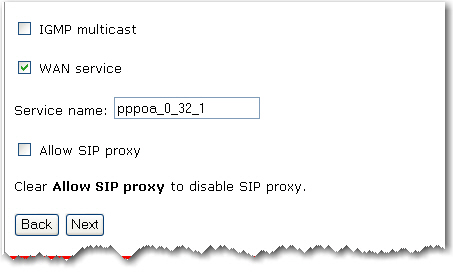
This page allows you to enable IGMP multicast, enable WAN service, specify a service name, and either select Allow SIP Proxy to enable the option or deselect Allow SIP Proxy to disable the option. After verifying and entering your settings, click Next.
The summary page presents the entire configuration summary. Click Apply if the settings are correct.
After clicking Apply, the gateway saves the configuration to the memory and reboots. The WUI will not respond until the system is brought up again.
If you selected PPP IP extension above, you need to release and renew the IP address for computers connected to the gateway before you can browse the Internet.
To configure MER, do the following:
Select the MAC Encapsulation Routing (MER) radio button.
Select the appropriate Encapsulation mode and click Next.
If IP addressing can be obtained automatically through the DHCP client in the gateway, select Obtain an IP address automatically; otherwise, enter the WAN interface IP address and subnet mask.
If you can get a Default Gateway address automatically through the DHCP client, select Obtain default gateway automatically. Otherwise, enter the gateway address provided by your ISP.
If DNS server addresses can be obtained automatically through the DHCP, select Obtain DNS server addresses automatically; otherwise, enter the preferred DNS server address and the optional alternative DNS server address.
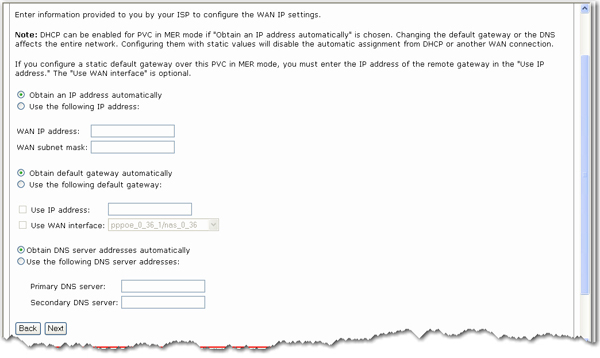
When you are done entering your settings, click Next.
Enter the Network Address Translation (NAT) settings for your network and click Next.
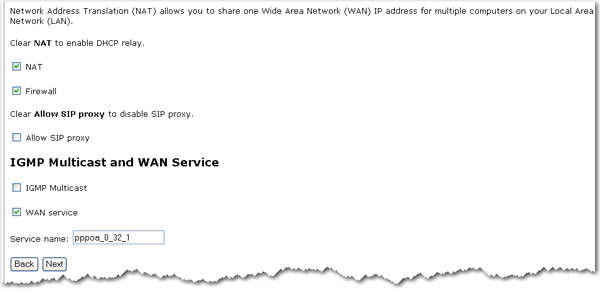
NAT checkbox: If the LAN is configured with a private IP address, select this checkbox. If a private IP address is not used on the LAN side, deselect this checkbox.
Firewall checkbox: If the firewall checkbox is selected, you can configure firewall features after the system comes up from the reboot. If firewall is not used, this checkbox should be de-selected.
Allow SIP Proxy: Select to enable the option or deselect to disable the option.
You can enable IGMP Multicast (mostly used in video streaming), enable WAN service, and set the service name.
The summary page presents the entire configuration summary. Click Apply to complete the configuration (which requires about 1 minute to complete) or Back to change any of the settings.
To configure IP over ATM (IPoA), do the following.
Select the IP over ATM (IPoA) radio button.
Select the appropriate Encapsulation mode and click Next.
Enter the WAN IP address and WAN subnet mask provided by your Internet Service Provider.
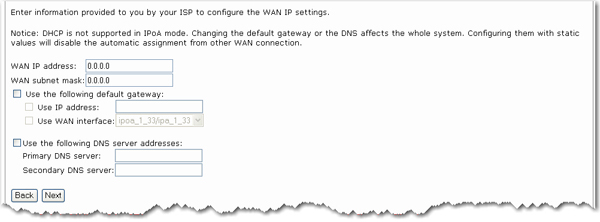
If you want to set the default gateway, enable Use the following default gateway and enter an IP address and/or select an interface.
If you want to set a DNS server address, enable Use the following DNS server addresses and IP addresses for a primary and optional secondary DNS server.
Click Next to continue.
Enter the Network Address Translation (NAT) settings for your network and click Next.
NAT checkbox: If the LAN is configured with a private IP address, you should select this checkbox. If a private IP address is not used on the LAN side, deselect this checkbox to free up system resources for better performance.
Firewall checkbox: If the firewall checkbox is selected, you may configure firewall features after the system comes up from the reboot. If the firewall is not used, de-select this checkbox to free up system resources for better performance.
You can also enable IGMP Multicast (used mostly for video streaming), enable WAN service, and set the service name.
Click Next to continue.
The summary page presents the entire configuration summary. Click Apply if the settings are correct.
Select the bridge operating mode if your ADSL service provider tells you that you should.
To configure bridging, do the following:
Select the Bridging radio button.
Select the appropriate Encapsulation mode and click Next.
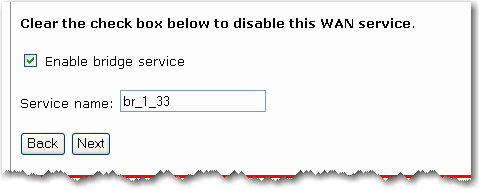
Enable bridge service is checked by default. If you want to disable the service, clear the checkbox. Enter a bridge Service name. Click Next.
The summary page presents the entire configuration summary. Click Apply if the settings are correct or Back to change any of the settings.
After completing the setup process, you need to release and renew the IP address for the computer connected to the gateway. Then you should be able to browse the Internet.
Return to the Internet menu options.