Installation

Important: Do not connect the before installing the software.

Install the

  1. Insert the USRobotics Installation CD-ROM into your computer’s CD or DVD ROM drive.

  2. If the CD does not start automatically, start it manually as follows:

    1. Windows Vista: Click Windows Start > Computer.

    Windows XP: Click Windows Start > My Computer.

    Windows 2000: On the desktop, double-click My Computer.

    1. Double-click the CD or DVD drive.
  3. If the Auto Play window appears, click Run autorun.exe. If prompted by User Account Control, click Continue.

Note: If Skype 2.5 or later is already installed on your computer, skip ahead to Step 4.

  1. On the CD installation screen, click Install Skype and follow the on-screen instructions.

  2. Create a Skype account and add Skype contacts to your contact list. Click Help in Skype for additional information.

  3. On the CD installation screen, click Install . If prompted by User Account Control, click Continue.

  4. Follow the on-screen instructions to install the and . Microsoft® DirectX® 9.0c and .NET Framework 2.0 will be installed if necessary.

  5. If prompted by Windows Security, click Install. USRobotics has thoroughly tested the operation of the software with Windows Vista to ensure its safe operation.

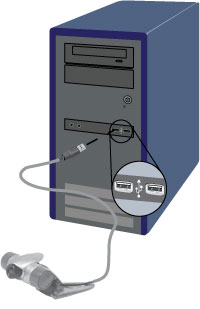
  6. Connect the to your computer.
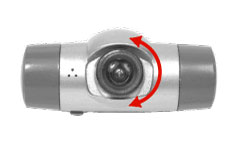
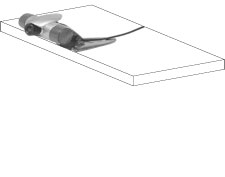
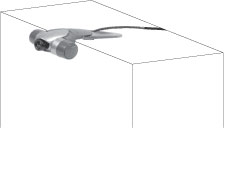
     

  7. Position the .

    For a CRT monitor or flat surface:

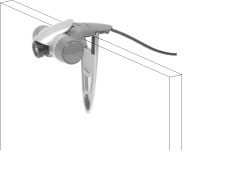
    For an LCD monitor or laptop screen:

  8. Windows Vista only:
    1. Select Locate and install driver software (recommended) in the Found New Hardware window.

    2. If prompted by User Account Control, click Continue.
  9. Windows XP only:
    1. If the Found New Hardware Wizard asks to connect to the Windows update Web site to search for software, select No, not this time and click Next.

    2. With Install the software automatically (Recommended) selected, click Next.

  10. If a window appears warning that the software has not passed Windows testing, continue with the installation. USRobotics has thoroughly tested the operation of the software with Windows to ensure its safe operation.

    Windows Vista: Click Install driver software anyway.

    Windows XP: Click Continue Anyway.

    Windows 2000: Click Yes.

  11. If you are prompted to reboot your computer, reboot it.

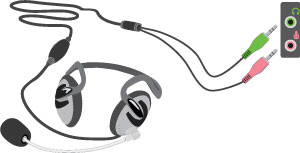
  12. Insert the microphone plug into the microphone jack and the headphone plug into the speaker jack on your computer.

Verify the Installation of

  1. If Skype is not running, start Skype.

  2. In Skype, select Tools > Options.

  3. Click Video.

  4. Make sure that under Select Webcam, is selected for use.

  5. Remove the lens cap from the .

  6. Click Test Webcam. The camera LED lights when the camera is turned on by a video application.

  7. Rotate the focus ring to make the image clear.

  8. Click Sound Devices and make sure the correct sound device is selected. If the Windows default device is selected, check the Windows audio control panel to make sure that the correct source is selected as the Windows default device. To use the headset, the audio device that your headset is connected to must be selected.

  9. Place a call to the Skype Test Call contact (echo123) and follow the spoken instructions. This will test audio only. If you do not hear anything, check your Skype sound devices settings and Windows audio control panel settings to be sure that the correct sound card is being used for Skype audio.

You have successfully completed the installation procedure. Please register your at www.usr.com/productreg/.

Tips