
Contents:
About the 11 Mbps Wireless USB Adapter
Network Configuration and Planning
Adapter Installation and Configuration for Windows 98SE/2000/Me/XP
Navigating the Wireless Configuration Utility
Product Specifications for 11 Mbps Wireless USB Adapter
11 Mbps Wireless USB Adapter User Guide
Navigating the Wireless Configuration Utility
![]()
Wireless Configuration Utility
The following section describes the various functions of the Wireless Configuration Utility. This utility provides quick access to all adapter settings. The configuration settings will be set by default to the correct values. Only advanced users should change any of the following settings.
After installation is complete, the Wireless Configuration Utility icon will appear in the taskbar on the right side near the clock. Double-clicking the icon in the Quick Launch bar will open the Wireless Configuratioin Utility main menu, providing quick access to all adapter settings.
There are six sections to the Wireless Configuration Utility: Status, Configuration, Encryption, Advanced, SiteSurvey, and About.
Status:
The Status area provides information about the current wireless connection.
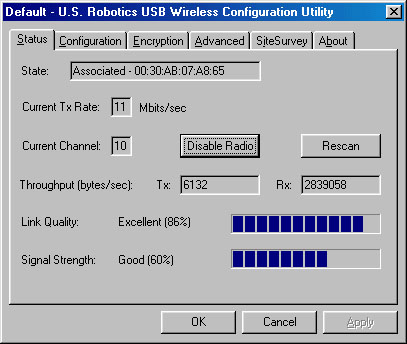
In the State field, you can see if you are connected to a wireless networking product, and what the MAC address is of that wireless entworking product.
The Current Tx Rate area shows your current network speed.
The Current Channel area shows what channel you are presently using.
You can click Disable Radio to turn the Wireless USB Adapter off, or click Enable Radio to turn the Wireless USB Adapter on.
You can also click Rescan to search for a different wireless network to connect to.
There is an area here that shows the Throughput Tx and Rx rates, which are the upload and download speeds you are currently experiencing.
There are also two graphs which indicate the Link Quality and the Signal Strength. If either of these are low, try repositioning the Wireless USB Adapter. This may improve the results.
Configuration:
Selecting this tab opens the Configuration area. This is where you will find options for configuring your Wireless USB Adapter.
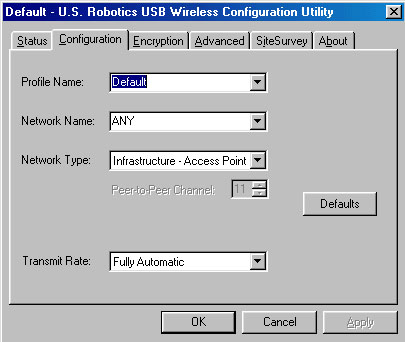
The following are explanations of each adapter setting in the Configuration area
Profile Name: If you customize any of the settings for specific areas, such as one configuration for a wireless network at work and another for a wireless network at home, you can then assign a profile name to these settings. By doing this, your settings for the different areas can be saved and reapplied by selecting the appropriate profile name.
Network Name: If you have set up a wireless network, you can assign a name to it. Any other wireless networking products must then have this network name entered in order to access the wireless network.
Network Type: The Network Type setting determines the architecture of your wireless LAN. Choose AdHoc - Peer to Peer or Infrastructure - Access Point mode, depending on your network type. A brief explanation of each mode follows.
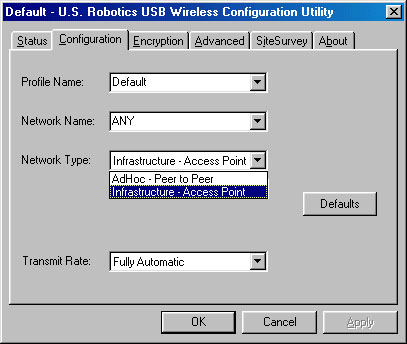
- AdHoc - Peer to Peer: This mode is used for a simple peer-to-peer network. This type of network only allows the sharing of local resources between wireless clients without a Wireless Access Point.
- Infrastructure - Access Point: This mode allows a wireless LAN to be integrated into an existing wired network through an Access Point. Infrastructure type networks also permit roaming between Wireless Access Points while maintaining the connection to all network resources. Infrastructure mode provides additional features, such as WEP security, power saving, and extended range.
Peer-to-Peer Channel: This setting specifies the default 802.11b channel used by the Wireless LAN to communicate. In an Infrastructure type network without an Access Point active on the default channel, clients will scan through all available channels searching for a network with a matching SSID.
- Changing the Channel: Changing the channel is only effective in AdHoc - Peer to Peer networks. Networks that are operating in Infrastructure mode automatically scan for a channel. The following table contains the operational channel frequency for several countries.
|
Regulatory Channel Frequency
|
|||||||
|
Channel
|
Frequency (Mhz)
|
FCC
|
Canada
|
ETSI
|
France
|
Spain
|
Japan
|
|
1
|
2412
|
X
|
X
|
X
|
|
|
|
|
2
|
2417
|
X
|
X
|
X
|
|
|
|
|
3
|
2422
|
X
|
X
|
X
|
|
|
|
|
4
|
2427
|
X
|
X
|
X
|
|
|
|
|
5
|
2432
|
X
|
X
|
X
|
|
|
|
|
6
|
2437
|
X
|
X
|
X
|
|
|
|
|
7
|
2442
|
X
|
X
|
X
|
|
|
|
|
8
|
2447
|
X
|
X
|
X
|
|
|
|
|
9
|
2452
|
X
|
X
|
X
|
|
|
|
|
10
|
2457
|
X
|
X
|
X
|
X
|
X
|
|
|
11
|
2465
|
X
|
X
|
X
|
X
|
X
|
|
|
12
|
2467
|
|
|
X
|
|
X
|
|
|
13
|
2472
|
|
|
X
|
|
X
|
|
|
14
|
2484
|
|
|
|
|
|
X
|
Transmit Rate: Transmit Rate selects the allowable transfer rates of the wireless client. To optimize performance and range, the Transmit Rate should be set to Fully Automatic. This will automatically adjust the transfer speed for the best performance and longest range. The other choices for Transmit Rate are Auto 1 or 2 Mb, 5.5 Mb, or 11 Mb.
![]()
Note: If you are connecting to a Wireless Access Point, it must support the Transmit Rate setting. If the Wireless Access Point does not support the Transmit Rate, undesired results may occur.
You can also click Defaults to restore the factory default settings of the Wireless USB Adapter.
If you modify the configuration settings, you must click Apply for the changes to take effect.
Encryption:
The Encryption area is where you can modify the security settings of the Wireless USB Adapter.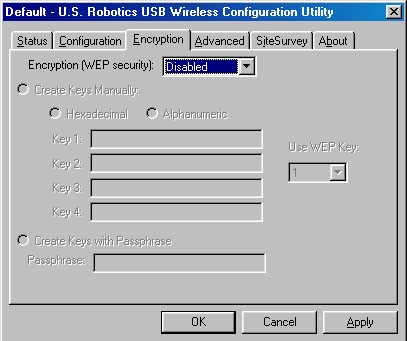
You can select Disabled, 64 bit, or 128 bit for Encryption by selecting from the dropdown menu. WEP is an encryption scheme that is used to protect your wireless data communications. WEP uses a combination of 64-bit keys or 128-bit keys to provide access control to your network and encryption security for every data transmission. To decode a data transmission, each wireless client on the network must use an identical 64-bit or 128-bit key.
If you enable Encryption, you will need to select either Create Keys Manually or Create Keys with Passphrase.
If you select Create Keys Manually, you will need to select either Hexadecimal or Alphanumeric, enter the Keys in lines 1-4, and select the WEP Key from the dropdown menu on the side.
If you select Create Keys with Passphrase, you will need to enter a Passphrase in the space provided. The passphrase is any text string with a maximum of 32 characters.
If you modify the configuration settings, you must click Apply for the changes to take effect.
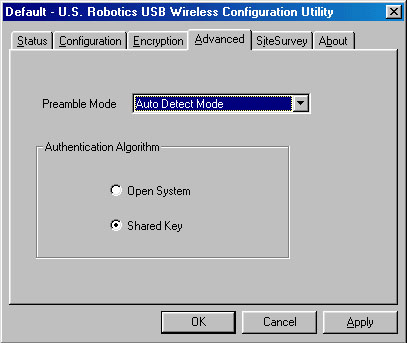
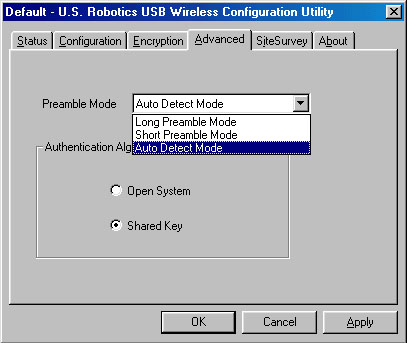
Advanced:
Within the Advanced section, you can set the Preamble Mode. By default, it is set to Auto Detect Mode. You can also choose Long Preamble Mode or Short Preamble Mode. This setting only applies to Infrastructure mode. If you change it from Auto Detect Mode, itmust match the preamble setting of the Wireless Access Point you are connecting to.
You can also select the Authentication Algorithm from either Open System or Shared Key. By default, it is set to Shared Key.
If you modify the configuration settings, you must click Apply for the changes to take effect.
SiteSurvey:
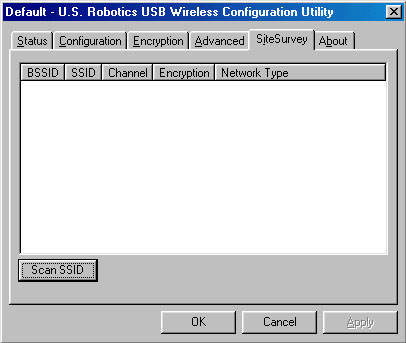
Within this section, you can view the other networking products that you can connect to. Click Scan SSID to search the area for any wireless networking products. When a list appears, double-click a wireless networking product to automatically connect to it.
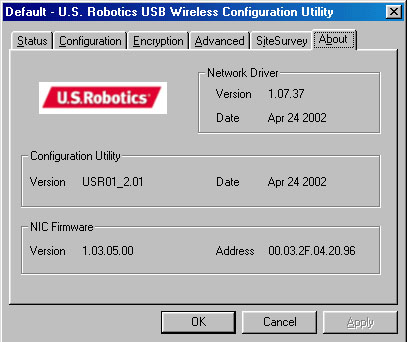
About:
Within this section you can view the version information for your 22 Mbps Wireless PC Card or PCI Adapter.
![]()