IPP (Internet Printing Protocol) is a standards-based system to allow remote printing from a computer to any accessible printer. Normally, the printer will be attached to a computer or other device which functions as an IPP Server.
Client computers need a compatible IPP Client program. Windows 2000 and XP include a suitable IPP client. For other versions of Windows, a client program is supplied on the Wireless USB Print Server's CD-ROM. The Client must also know the IP Address or URL of the IPP Server.
IPP Server Configuration
The Print Server contains the necessary firmware to act as an IPP Server. No additional configuration is necessary. However, the following requirements must be met.
The Print Server must have a valid IP Address.
Any router, gateway, or firewall linking your LAN to the Internet must NOT block the IPP protocol (TCP port 631). Your router, gateway or firewall must open or forward port TCP port 631 to the IP address of the Print Server.
You must advise clients of the correct URL or IP Address of the IPP Server. To use a URL rather than an IP Address, you need to register the domain name for the URL.
Unless clients are using Windows 2000 or XP, you must provide your clients with the supplied IPP Client software. If it is not convenient to provide the CD-ROM, supply the IPP_CLIENT.EXE file, located in the IPP folder.
IPP Client Configuration
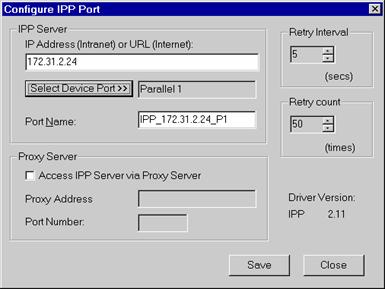
Run the Add IPP Port program entry created by the installation. A screen like the following will be displayed.
If Internet access from your location is via a Proxy Server, select Access IPP Server via Proxy Server and enter the details of your Proxy Server. (This will be the same as your Browser configuration.)
Enter the IP Address or URL of the IPP Server.
Click SelectDevice Port to view the available ports on the IPP Server and select the appropriate port. A connection to the IPP Server will be established at this time.
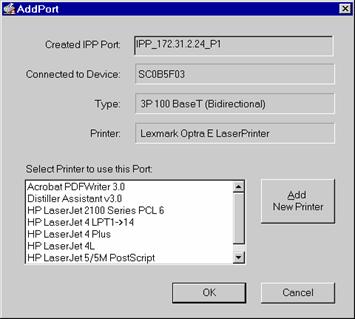
Click Save to create the IPP port on your system. You will see a message confirming that the port has been created, then the following dialog:
Perform one of the following options:
Select an existing printer to use the new port and click OK.
OR
Click Add New Printer to create a new printer to use the IPP port. This will start the Add Printer wizard. Follow the prompts to complete the process. Ensure that the new printer uses the IPP port.
Installation is now complete. To create additional IPP Ports, repeat the entire procedure. The Proxy Server and other options are set individually for each IPP Port.
Changing the IPP Port Settings
After the IPP port is created, perform the following steps:
Click Windows Start, Settings, and then Printers.
Right-click the IPP Printer and select Properties.
Locate and click Port Settings (in the Details or Port tab, depending on your version of Windows).
There are 2 settings - Retry Interval and Retry Count - which can be adjusted if you have problems connecting to the IPP Server.
Retry Interval sets the time interval (in seconds) between connection attempts. Increase this number if you have a poor connection, or the remote server is very busy.
Retry Count sets how many connection attempts will be made. Increase this number if you have a poor connection, or the remote server is very busy.
IPP Client Setup - Windows 2000/XP
Windows 2000 and XP have their own IPP Client, and there is no need to install the supplied IPP Client Software. To use the Windows IPP Client with the Print Server, follow this procedure:
Start the Add Printer wizard.
Select Network Printer and click Next to see the Locate your Printer screen, as shown below.
Select Connect to a printer on the Internet or on your Intranet and enter the URL of the IPP Server as follows, where ip_address represents the IP Address of the IPP Server and 631 is the port number.
Port 1
ip_address:631/ipp/P1
These entries are case sensitive. They must be entered as shown, with ipp in lower case, and P1 in UPPER case.
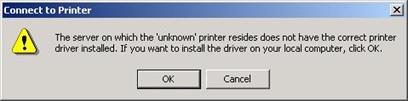
If the connection can be established and the printer on that port is online, the following dialog will be displayed:
Click OK and then select the printer manufacturer and model to match the printer connected to the port on the IPP Server.
Click Next and complete the Wizard. The IPP printer is now ready for use.
Using IPP Printers
The IPP Printer can be selected and used like any other Windows printer. If the IPP Server is not on your network, your Internet connection needs to be active.
If using the supplied IPP Client software, you can use the Query IPP Printer program installed with Add IPP Port to check the availability of the remote IPP Server.
An IPP Server may be unavailable for any of the following reasons:
It is powered off.
A printer problem has caused the IPP Server to cease responding, and a restart (reboot) is required.
The Server's IP Address has changed.
The Internet connection for the IPP Server is down.
Network congestion causes the connection attempt to time out.
If using the supplied IPP Client software, there are 2 settings - Retry Interval and Retry Count - which can be adjusted if you have problems connecting to the IPP Server.