
Wait until the lights on the modem stabilize. This will take about 60 seconds.
Note to UK Users: Attach the correct power plug to the power adapter.

Attention: If you are installing the Wireless MAXg Router and a Wireless MAXg PC Card, PCI Adapter, or USB Adapter at the same time, refer to the Installation Guide for the Wireless MAXg PC Card, PCI Adapter, or USB Adapter for combined installation instructions. Do not perform the installation steps in this guide.
Note to UK Users: Attach the correct power plug to the power adapter.
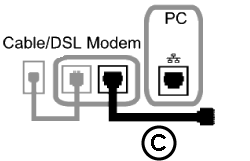
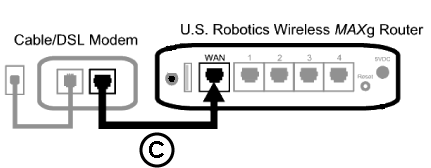
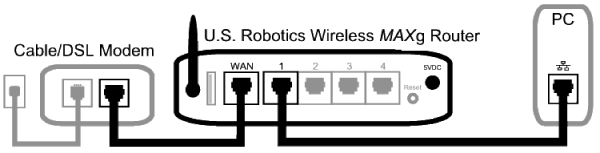
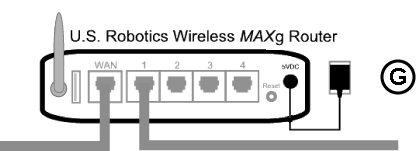
Note: Some cable or DSL modems can be connected using either a USB cable or an Ethernet cable. To connect your cable or DSL modem to the Wireless MAXg Router, you must use an Ethernet cable.
Refer to the Installation Guide for your Wireless MAXg PC Card, PCI Adapter, or USB Adapter for instructions on configuring the Wireless MAXg Router and the Wireless MAXg PC Card, PCI Adapter, or USB Adapter at the same time.
Start a Web browser.
Note: You may receive "Page Not Found," or a similar error, as your browser attempts to locate your home page. This is normal because you are not currently connected to the Internet.
In the location or address line of your Web browser, type http://192.168.2.1 to access the Web User Interface. The Setup Wizard will start. Click Start to begin the Setup Wizard procedure.

When the Setup Wizard begins, your Internet Connection either will be detected or it will not be detected. If it is detected, perform these instructions. If it is not detected, perform these instructions.
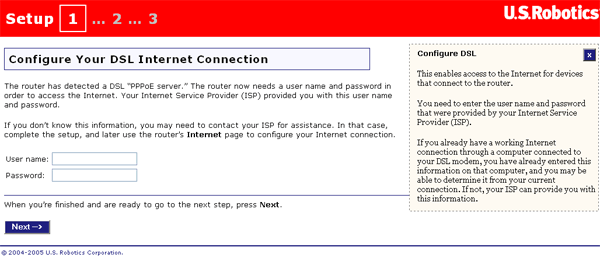
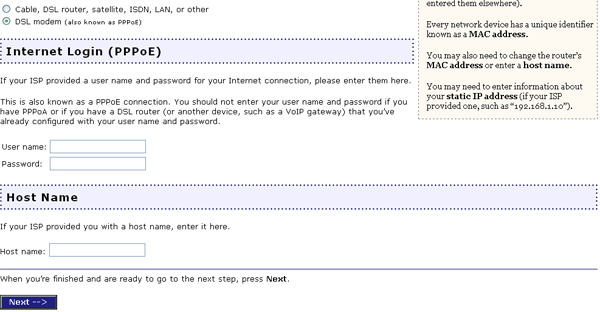
If the router detects a PPP server, you will be prompted to enter your Internet User Name and Password.
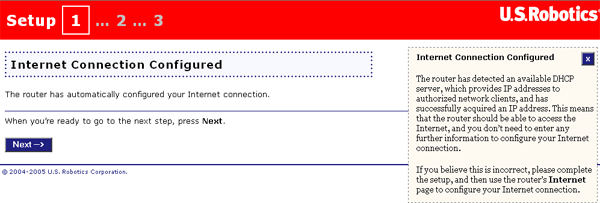
If the router detects a Dynamic Host Configuration Protocol (DHCP) server, click Next.
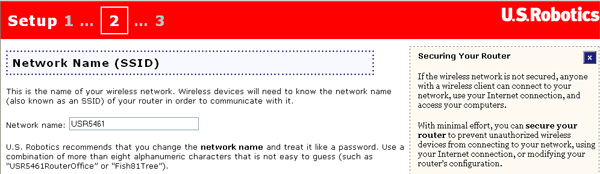
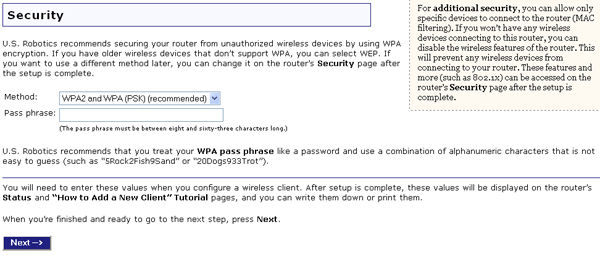
Next you will need to manually enter a Pass phrase for the security encryption. If you manually enter one, it must be between eight and sixty three characters long. When you are finished, click Next.
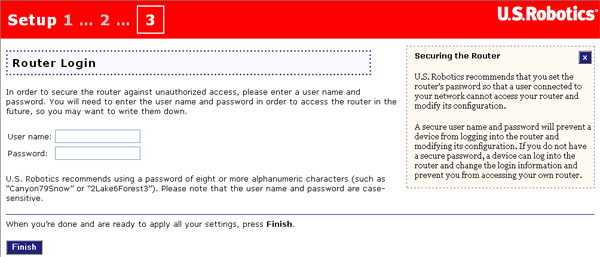
On the last screen, click Continue to complete the Setup Wizard. You will then be prompted for the User name and Password you just created for the router login. After entering the User name and Password, the Web User Interface will open.

You router configuration is now complete. Proceed to Step 3.
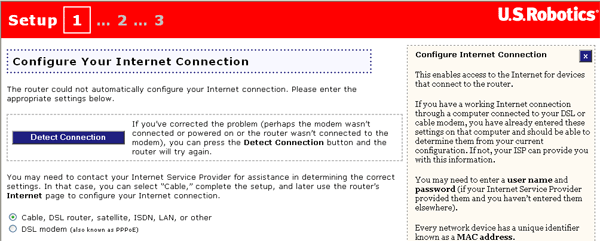
If your connection cannot be established, you can either click Retry to try again or you can click Continue to configure your connection later and go to the next page of the Setup Wizard.
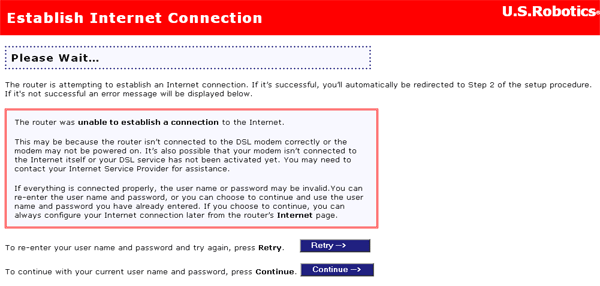
If your connection cannot be established, you can either click Retry to try again or you can click Continue to configure your connection later and go to the next page of the Setup Wizard.
Next you will need to manually enter a Pass phrase for the
security encryption. It must be between eight and thirty-two characters long. When you are
finished, click Next.
On the last screen, click Continue to complete the Setup Wizard. You will then be prompted for the User name and Password you just created for the router login. After entering the User name and Password, the Web User Interface will open.
Your router configuration is now complete. Proceed to Step 3.
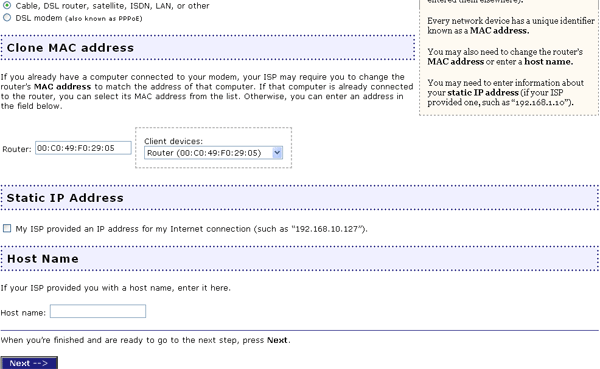
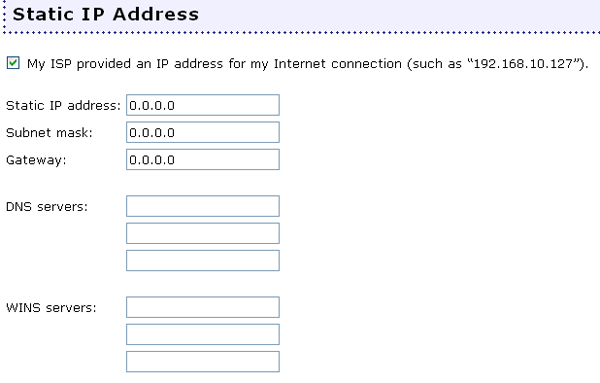
Note: Refer to the Configuration section in this User Guide for more detailed configuration information. Contact your ISP if you have any questions about your Internet connection.
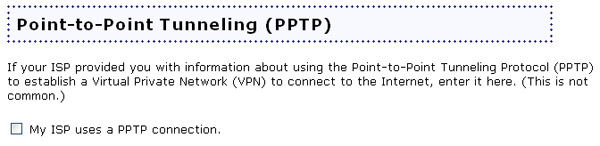
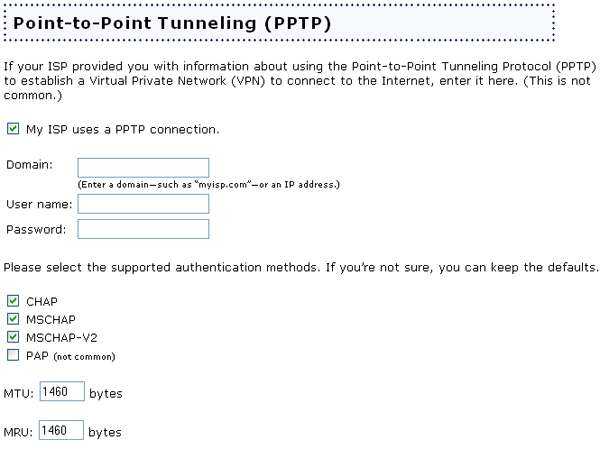
If your Internet Service Provider (ISP) uses a PPTP connection, you will need to perform the following steps to complete your Installation procedure and create an Internet connection. If you have any questions regarding any of the connection settings, contact your ISP.
When you are finished configuring the basic connection settings, you should have Internet access. To confirm your connection, start a Web browser and register your product at www.usr.com/productreg If the page loads, you are finished with the installation procedure. If the page does not load, refer to the Troubleshooting section.
The installation procedure is now complete. You should now have secure and shared Internet access. If you experience any difficulties, refer to the "Troubleshooting" section of this guide for more detailed information.
Note: After you have completed the installation and configuration procedures, you should create a backup file of your settings in case you ever experience some difficulties and want to restore your settings. Perform the following steps: