I want to connect the Wireless MAXg Router to a cable modem or DSL
router that has an IP address of 192.168.2.1; what do I do?
- Disconnect your cable modem or DSL router and perform the installation
procedure for the Wireless MAXg Router.
- When you have finished the installation procedure, start the Web User Interface
of the Wireless MAXg Router by opening a Web browser and typing 192.168.2.1
- Click the LAN tab.
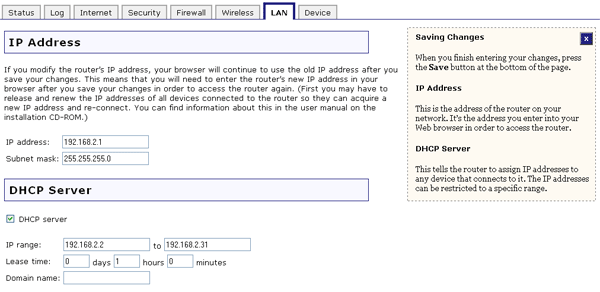
- Under IP Address, change the IP address of the Wireless MAXg
Router to 192.168.3.1 and then click anywhere outside of the IP address field.
- If you have DHCP Server enabled, it will automatically update the IP range
to reflect the change you made to the IP address.
- Click Save at the bottom of the page.
- You will now need to update the IP address of your computer. You will need
to perform this procedure on any computers that were previously connected
to the Wireless MAXg Router.
Windows XP, 2000, or NT Users:
- Click Windows Start and then Run.
- Type cmd and click OK.
- At the DOS prompt, type ipconfig /release and press ENTER.
- Then, type ipconfig /renew and press ENTER.
Windows Me, 98, or 95 Users:
- Click Windows Start and then Run.
- Type winipcfg and click OK.
- Click Release All and then click Renew All.
- After you have updated your IP information, connect your cable modem or
DSL router to the WAN port of the Wireless MAXg Router.
- If you need to do any configuration for your cable modem or DSL router,
refer to your DSL router documentation. You should now be able to access the
Internet and your network resources.
Note: Whenever you need to
access the Web User Interface of the Wireless MAXg Router, enter the
new IP address that you just configured in Step 4.
Return to Tutorials page