
Contents:
Configuring the Broadband Router >
Broadband Router User Guide (Windows 95,
98, 2000, NT, Me, XP, and Macintosh)
Configuring the Broadband Router
The Web-based configuration utility can be used to change the settings
of the broadband router.
A brief description of these settings is provided below.
Startup and Log in
Open an Internet browser and enter the broadband router's IP address.
The following is the
default IP address of the broadband router:
After the connection is established, you will see the Web User Interface
for the Configuration
Utility. There is no default password, so just click Login.
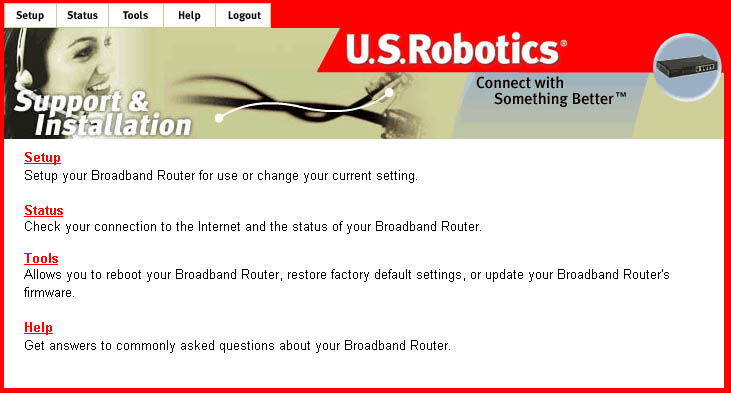
There are four main menus for the Broadband Router: Setup, Status, Tools,
and Help. The Setup
option is used to configure the LAN, WAN, and Advanced settings of the
Broadband Router. The
Status option contains general information about the Broadband Router.
The Tools option allows
you to reset the Broadband Router, restore the factory default settings,
and update the firmware.
The Help option provides support information, some basic Troubleshooting
information, and a
glossary of terms.
Setup
This menu is used to configure the various settings and options of the
Broadband Router. The
first time you access the Configuration Utility, you will be guided through
each settng. During
any subsequent visits to the Configuration Utility, you can access each
individual option through
the navigation bar. Within the Setup menu are the following options:
- Change Password
- Set Time Zone
- LAN
- WAN
- DNS
- Advanced Settings
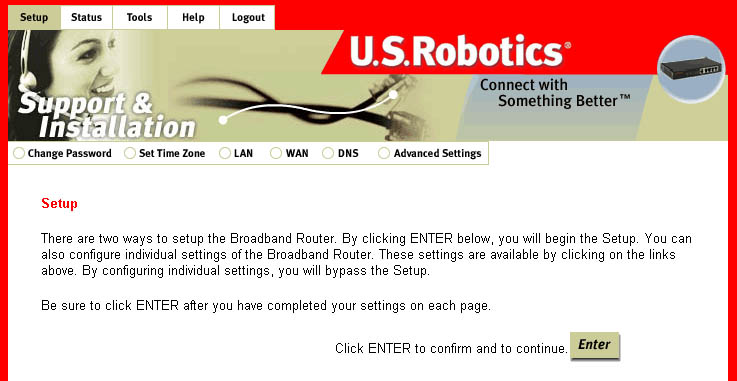
A more detailed description of each option follows.
Note: After making any changes to
the configuration options or security settings of the
Broadband Router, you must click Enter in order for your changes
to be saved and implemented.
-
Change Password
There is no default password for the Broadband Router. When you first log-in to the
Note: If at any time you forget your password, you can press the Reset button on the front
Configuration Utility, you will be prompted to set a password. If you choose not to set
a password at this time, you can set one or change your current one at any time by clicking
Change Password within the Setup option. The password restricts who can access the
configuration options of this utility.
of the Broadband Router for three to five seconds in order to restore the factory default settings.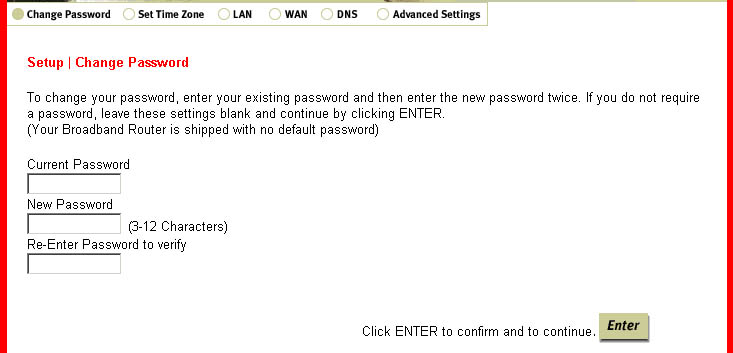
-
Set Time Zone
This option will allow you to set the time zone for the internal clock of the Broadband Router,
which is used for client filtering and for log entries.
-
LAN
Within this option, you can assign the IP address, enable or disable the DHCP server,
set the lease time, and assign a range for the IP address pool.
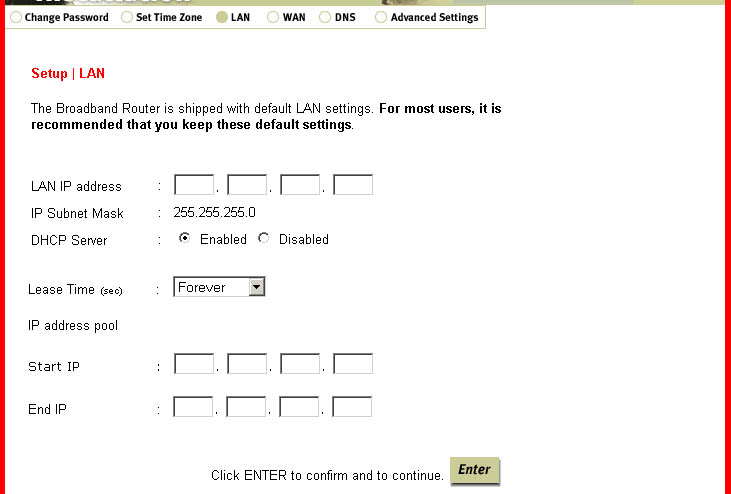
Note: If you assign a range for the IP address pool, be sure not to include the gateway
address of the Broadband Router, which by default is 192.168.123.254. The numbers within
the IP address pool are the addresses that will be assigned to any client PCs that are added
to your LAN.Note: Be sure all the client PCs are set for Dynamic IP adress allocation. To see how to check
this, refer to the Before You Begin section of this User Guide. -
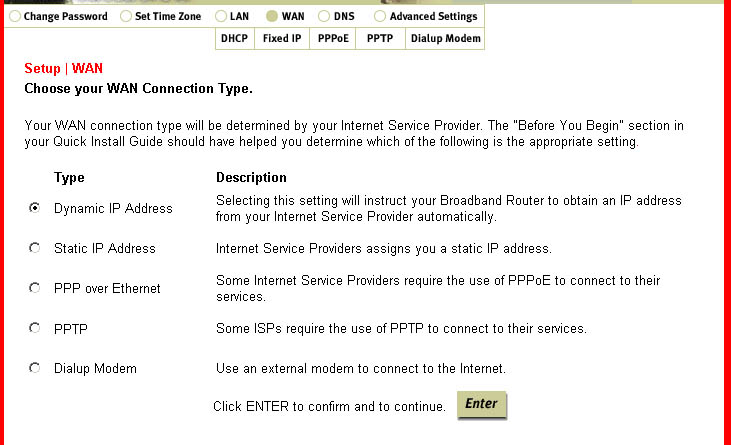
WAN
You will need to set the WAN type setting for your Internet connection. There are five choices
to pick from: Dynamic IP Address, Static IP Address ISP, PPP over Ethernet (PPPoE), PPTP, and
Dialup Modem. Dynamic IP Address is used if you obtain an IP address automatically. Static
IP Address is used if your ISP assigns you a static IP address. Some ISPs require the use of
PPPoE to connect to their services. If you use Dial-Up Networking and a VPN adapter, you are
most likely using a PPTP connection. If you are unsure about what type of connection you are
using, contact your Internet Service Provider. One of these three should be selected if you have Cable or
DSL Internet service. Dialup Modem is used if you have analogue or ISDN Internet service.
Within the WAN section are five subsections: DHCP, Fixed IP, PPPoE, PPTP, and Dialup Modem.
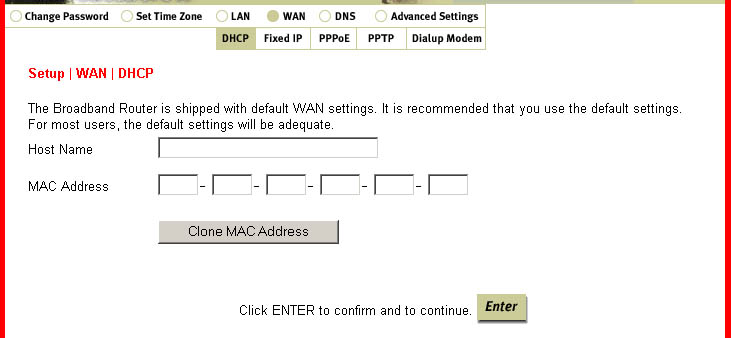
DHCP is used for a Dynamic IP address connection. The Host Name may be required by
some ISPs. The MAC address will be filled in with the default setting. You should only
change this if your ISP requires a different one. The Clone MAC Address button will replace
the default MAC address with that of your Ethernet Adapter (NIC).
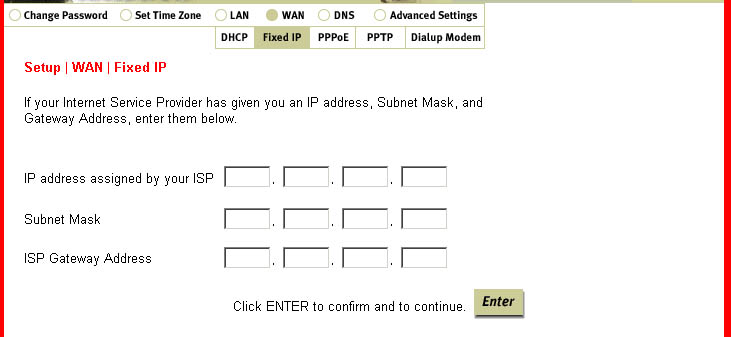
Fixed IP is where you will enter the IP address, Subnet Mask, and Gateway Address that
have been assigned by your Service Provider.
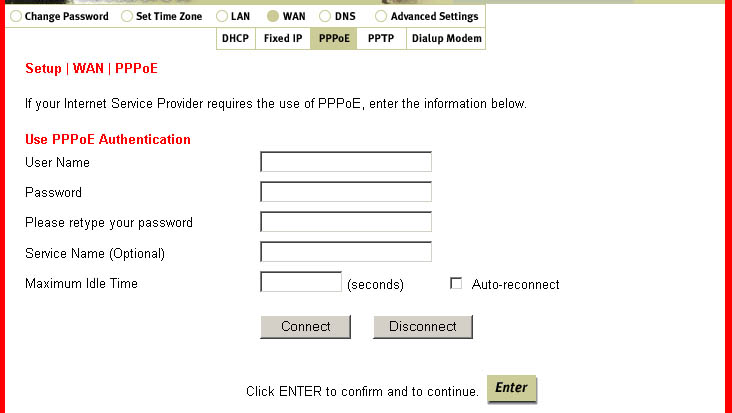
PPPoE is where you will enter the User Name, Password, Service Name, and Maximum Idle
Time for your PPPoE connection. This is also where you will come to connect to the Internet,
rather than using the login application you used in the past.
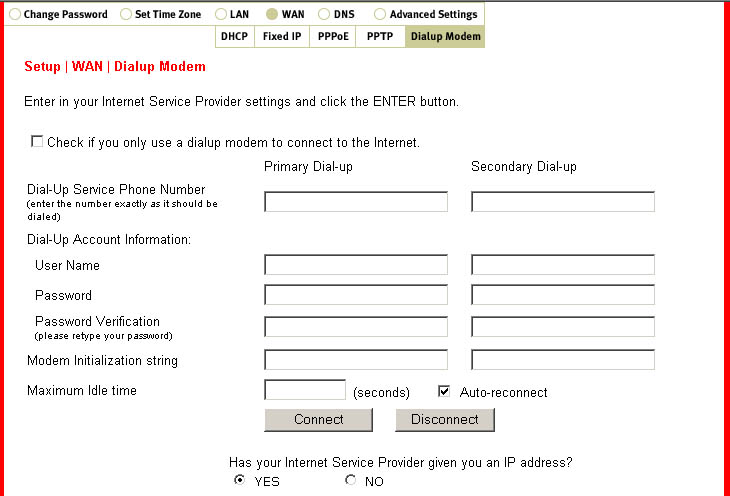
Dialup Modem is where you will enter the account information for your analogue or ISDN
Internet account. You will need to enter the Dial-up Service Number, your User Name, your
Password, your Modem Initialization string, and the Maximum Idle Time. To connect to the Internet,
you can either launch a Web browser or come to this page to connect manually. You will also need
to select either Yes or No depending on whether or not your Service Provider has supplied you with a
Static IP address. If you have any secondary information, you can enter that in the appropriate spaces.
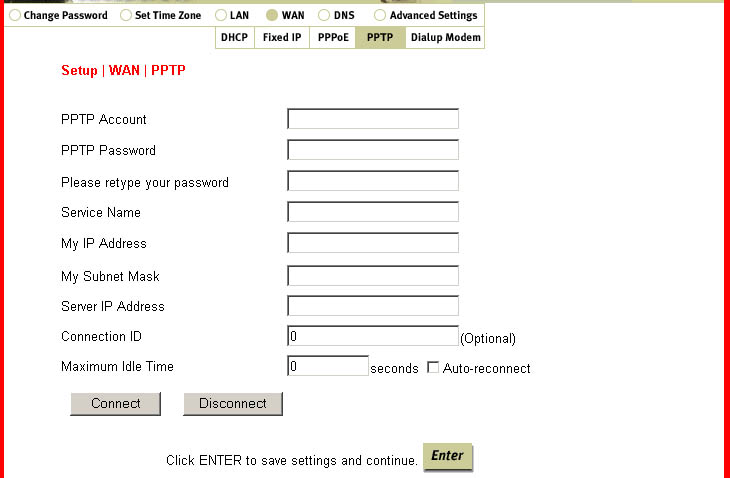
PPTP is where you will enter the Account, Password, Service Name, IP Address, Subnet
Mask, Server IP Address, Connection ID, and Maximum Idle Time for your PPTP connection.
This is also where you will come to connect to the Internet, rather than using the login
application you used in the past.
-
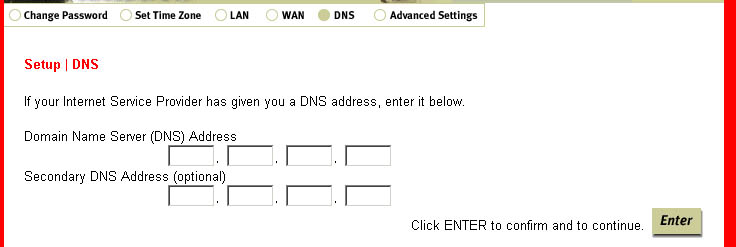
DNS
This option is where you will specify the Domain Name Server (DNS) Address and the
optional Secondary DNS Address. If necessary, the DNS Address should have been among
the information you collected in the Before You Begin section.
-
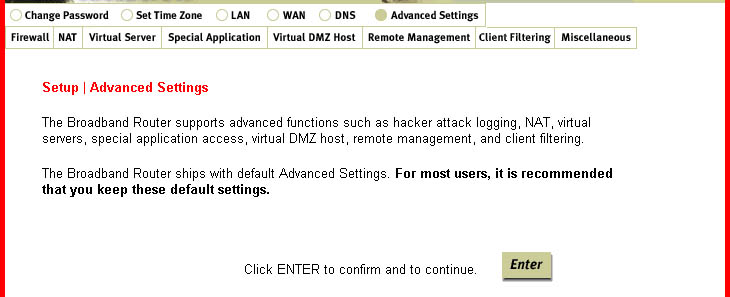
Advanced Settings
Within this option, you can configure the following advanced client services: Firewall, NAT,
Virtual Server, Special Application, Virtual DMZ Host, Remote Management, Client Filtering and Miscellaneous.
Firewall:
This option can protect you from any unwanted, outside attacks. All hosts behind
this firewall are invisible externally. It is recommended that the firewall always be enabled.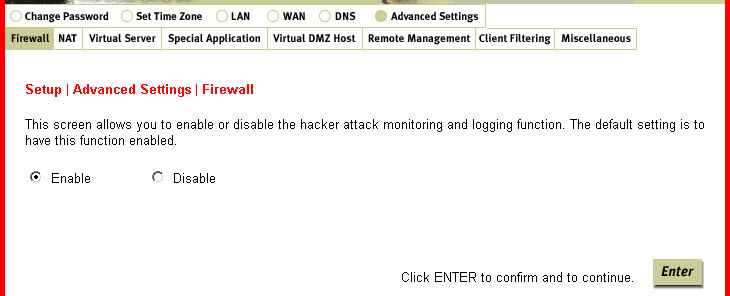
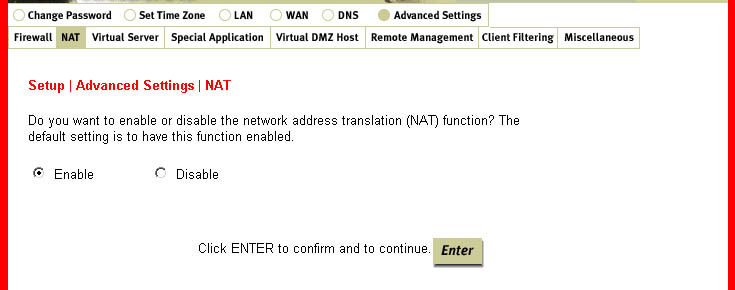
NAT:
This is a feature that goes between the Internet and your network and rewrites IP addresses
and port numbers so that any packets appear to be coming from a single IP address. This
feature allows one IP address to be used for multiple clients on a network.
Virtual Server:
This feature is defined as a Service Port that allows all requests to this port to be redirected
to the PC that is specified in the table.
Port forwarding sets up public services on your network. When Internet users make requests
on your network, the broadband router will forward those requests to the appropriate computer.
Port forwarding is generally used to set up a webserver, ftp server, or e-mail server on your network.
To configure a computer to use Virtual Server, perform the following steps:
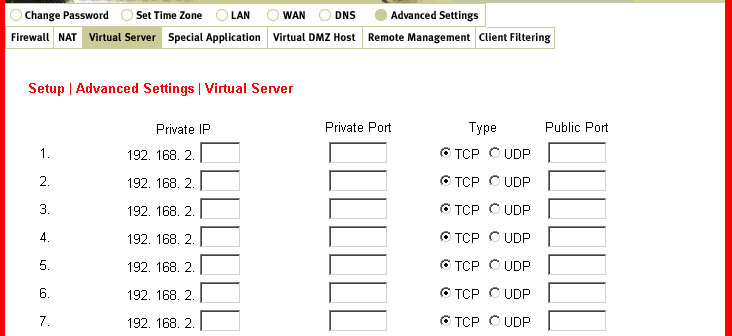
- Enter the IP Address and the port number of the server that you
want to allow Internet
users to access. - Configure as many entries as desired until all the entries are filled in.
- Click Enter in order to save the settings.
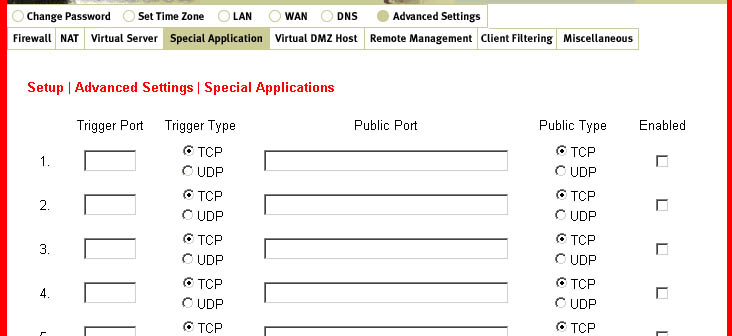
Special Application:
This is a way for certain applications that require multiple connections to open additional
ports and be allowed through the Broadband Router. These applications cannot work with
NAT enabled since all the ports are blocked by default. This is a result of the Broadband
Router's firewall function. A few examples of these types of applications are videoconferencing
and Internet gaming.1. Trigger: This is the outbound port number that the application assigned first.
2. Public Ports: When the trigger packet is detected, the inbound packets to the specified
port number are allowed to pass through the firewall.
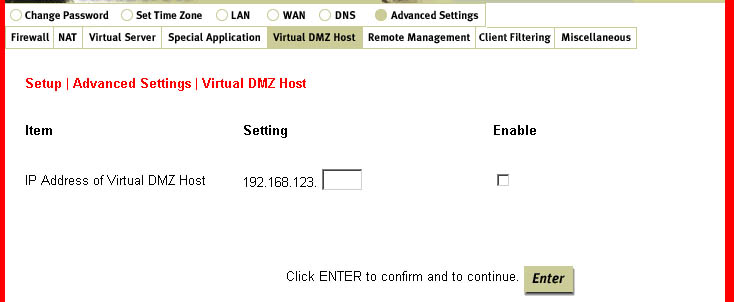
Virtual DMZ (Demilitarized Zone) Host:
This function allows a networked computer to be exposed to unrestricted 2-way communication
for certain gaming, video, and other specific applications. If a certain application cannot get out
past the firewall, this feature can be used. This feature should be used only when necessary,
since it removes the security of the firewall.
Remote Management:
In general, only users on your network can browse the built-in Web pages to perform
administration tasks. This feature enables you to perform administrative tasks from a remote
host. When this feature is enabled, only the specified IP address can perform remote
administration. If the specified IP address is 0.0.0.0, any host can connect to this product
to perform administration tasks.
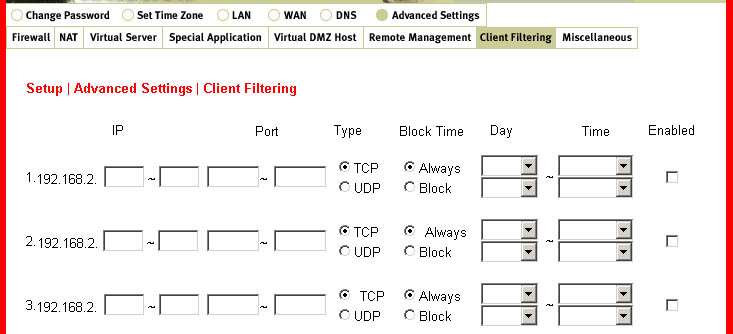
Client Filtering:
This feature allows you to filter Internet access based on the following criteria: the IP address,
the appplication type, and the time of the day. These criteria can be used alone or together to
filter the access.
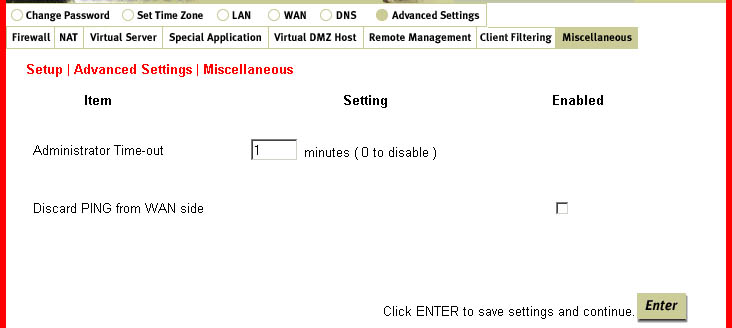
Miscellaneous:
There are two features within this option: Administrator Time-out and discard PING from the WAN side. Administrator Time-out allows you to set a time period of inactivity before an administrator will be automatically logged out. The discard PING from the WAN side option, when enabled, will cause the Broadband Router to automatically drop any ping requests from outside the LAN without replying.

Status
Within this option, you can view all the pertinent information relating
to your Broadband Router
and your network. The specific sections within this area are Internet,
Gateway, Information,
Security Log, and DHCP Client Log.
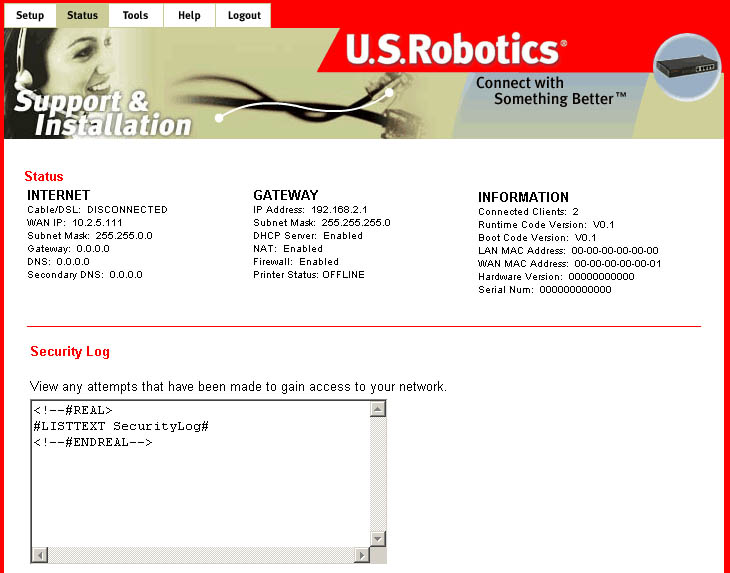
The Internet section displays your WAN status and your current WAN configuration information.
The Gateway section displays your LAN status and your current LAN configuration information.
The Information section displays the number of clients, the LAN and WAN
MAC addresses, and
your current version information.
The Security Log shows any attempts that have been made by illegal parties to access your network.
The DHCP Client Log shows any information about the DHCP clients on your network.
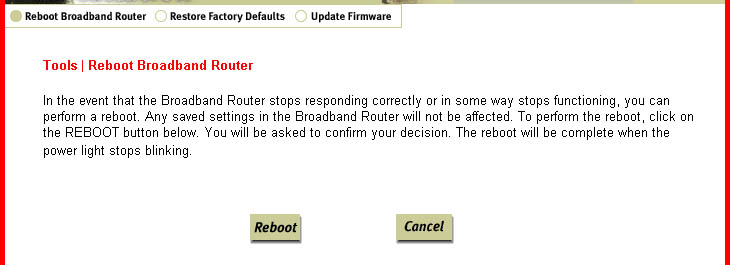
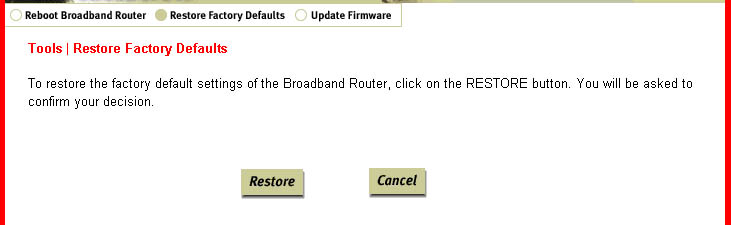
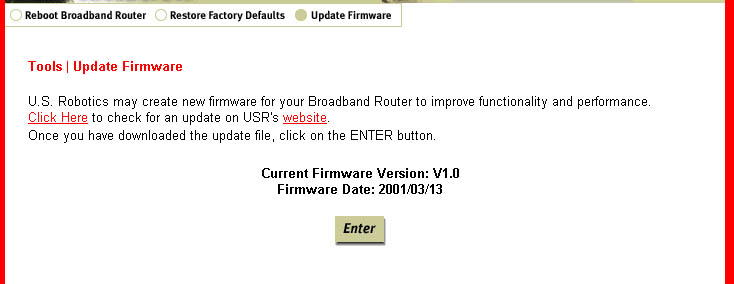
Tools
Within this menu, there are three options: Reboot Broadband Router,
Restore Factory Defaults,
and Update Firmware.

In the event that the Broadband Router stops responding or in some way
stops functioning,
you can perform a reboot. Rebooting the Broadband Router will not change
any of the settings.
The Restore Factory Defaults option should be used to restore the Broadband
Router to the factory
default settings. This will also restore the password to the default blank
setting.
You can also obtain information about updating the firmware version of
the Broadband Router in this
area. Go to http://www.usr.com to look
for any firmware updates for your Broadband Router.
Help
The Help option provides support information, some basic Troubleshooting
information, and a
glossary of terms.
Logout
The Logout option is a secure means of logging out of the Configuration Utility.
