
Contents:
Specialized Internet Connection Instructions
Configuring the Wireless Turbo Access Point & Router
Troubleshooting and Support>
Wireless Turbo Access Point & Router User Guide (Windows 95, 98, 2000, NT, Me, XP, and Macintosh)
Troubleshooting
Support
Troubleshooting
I am no longer able to access the Internet.
Possible Solution:
Make sure that the power cord and all the Ethernet cables are connected
correctly. This includes the cables connecting the Wireless Turbo Access Point & Router, the modem, and all the computers.
Possible Solution:
Make sure that your computer is using an IP address that is within the
default range of 192.168.123.xxx. Make sure the address of the subnet
mask is 255.255.255.0. The Default Gateway should be the IP address of
the Wireless Turbo Access Point & Router, which is 192.168.123.254. To verify
all of these settings, perform the following steps:
Windows 95, 98, or Me Users: Click Windows Start and then Run. Type winipcfg and click OK. Check the IP Address, Subnet Mask, Default Gateway, and DNS server data to make sure they are correct. If the information is not correct, click Release All and then click Renew All.
Windows NT, 2000, or XP Users: Click Windows Start and then Run. Type cmd and click OK. At the DOS prompt, type ipconfig /all. Check the IP Address, Subnet Mask, Default Gateway, and DNS server data to make sure they are correct. If the information is not correct, type
ipconfig /release and press ENTER. Then, type ipconfig /renew and press ENTER.
Possible Solution:
If 256-bit encryption is selected, each wireless card or adapter must
support 256-bit encryption. If you are using a Wireless PC Card or PCI
Adapter that does not support 256-bit encryption, you will not be able
to connect to the Wireless Turbo Access Point & Router.
Possible Solution:
Your DNS server IP address may have been changed and not automatically
updated on the client computer. Log into the HTML Web User Interface.
On the Status page, verify that the Wireless Turbo Access Point &
Router is connected. Click Release and then click Renew.
After doing this, perform the following steps:
Windows 95, 98, or Me Users: Click Windows Start and then Run. Type winipcfg and click OK. Check the IP Address, Subnet Mask, Default Gateway, and DNS server data to make sure they are correct. If the information is not correct, click Release All and then click Renew All.
Windows NT, 2000, or XP Users: Click Windows Start and then Run. Type cmd and click OK. At the DOS prompt, type ipconfig /all. Check the IP Address, Subnet Mask, Default Gateway, and DNS server data to make sure they are correct. If the information is not correct, type
ipconfig /release and press ENTER. Then, type ipconfig /renew and press ENTER.
Possible Solution:
If you have a Static IP address, make sure that you have correctly performed
all of the steps of the “Specialized
Internet Connection Instructions” section in this guide.
If you have a Static IP address and did not configure all of the IP properties
correctly for your computer, you will not be able to connect to the Wireless
Turbo Access Point & Router.
Possible Solution:
You need to verify the connection setting of your Web browser and that
the HTTP Proxy feature of your Web browser is disabled. You need to do
this so that your Web browser can read the configuration pages inside
your Wireless Turbo Access Point & Router. Launch your Web browser.
Internet Explorer users: Click Tools, Internet Options, and then the Connections tab. Select Never dial a connection, click Apply, and then click OK. Click Tools again, then click Internet Options. Click the Connections tab, and click LAN Settings. Clear all the check boxes and click OK. Click OK to close Internet Options.
Netscape Navigator users: Click Edit, Preferences, and then double-click Advanced in the Category window. Click Proxies, select Direct connection to the Internet, and then click OK. Click Edit again, then click Preferences. Under Category, double-click Advanced, then click Proxies. Select Direct connection to the Internet and click OK.
If you are still unable to access the Internet, refer to the "Troubleshooting Ping Procedure" section in this guide and to the documentation for your modem.
I cannot achieve 54 Mbps connections to the Wireless Turbo Access Point & Router.
Possible Solution:
Make sure the wireless products you are using to connect to the Wireless Turbo Access Point & Router support 54 Mbps speeds. 54 Mbps wireless products
must be used in order to connect to the Wireless Turbo Access Point & Router
at a speed of 54 Mbps. Launch the Web User Interface and manually set
the connection speed to 54 Mbps. If you are using non-USRobotics wireless
products, you may need to upgrade the firmware for those products in order
to support 54 Mbps connections.
Possible Solution:
Low connection speed or range can also be caused by environmental interference.
Try to move the product to a different location to improve the link quality.
In addition, keep in mind that other factors such as lead based paint,
concrete walls, and electronic items such as 2.4 Ghz phones may affect
your wireless range.
I do not know if my IP Address from my ISP is Static or Dynamic.
Possible Solution:
If you have cable or DSL service, you most likely have a Dynamic
IP address. You should always check with your service provider to verify
this information, since some providers will assign Static IP addresses.
If you have a Dynamic IP address, select Obtain IP Automatically
in the WAN Setup area of the HTML Web User Interface, and the Wireless
Turbo Access Point & Router will automatically obtain the information
it needs from your service provider. If you have a Static IP address,
select Specify IP in the WAN Setup area of the HTML Web User Interface.
If you are using PPPoE, you must specify PPPoE and select either static
or dynamic IP addressing. You will need to refer to the "Specialized
Internet Connection Instructions" section of this guide
to collect the necessary configuration information.
I can't connect to the Web User Interface of the Wireless Turbo Access Point & Router.
Possible Solution:
Make sure all the Ethernet cables are properly and securely connected
and that the power cord is plugged in.
Possible Solution:
If you have a Static IP address on the WAN side (static from your
ISP), make sure that you have correctly performed all of the steps in
the "Specialized Internet
Connection Instructions" section of this guide. If you
have a Static IP address and did not select the Obtain an IP address
automatically option for your computer, you will not be able to connect
to the Wireless Turbo Access Point & Router.
Possible Solution:
You need to verify the connection setting of your Web browser
and that the HTTP Proxy feature of your Web browser is disabled. You need
to do this so that your Web browser can read the configuration pages inside
your Wireless Turbo Access Point & Router. Launch your Web browser.
Internet Explorer users: Click Tools, Internet Options, and then the Connections tab. Select Never dial a connection, click Apply, and then click OK. Click Tools again, then click Internet Options. Click the Connections tab, and click the LAN Settings button. Clear all the check boxes and click OK. Click OK to close Internet Options.
Netscape Navigator users: Click Edit, Preferences, and then double-click Advanced in the Category window. Click Proxies, select Direct connection to the Internet, and then click OK. Click Edit again, then click Preferences. Under Category, double-click Advanced, then click Proxies. Select Direct connection to the Internet and click OK.
My Web User Interface is not responding, but I can still access the Internet.
Possible Solution:
If your Web User Interface stops responding, unplug and then plug back
in the power supply of the Wireless Turbo Access Point & Router. This
will reboot the Wireless Turbo Access Point & Router. If you are still
unable to communicate with the Web User Interface, press in and hold
the RESET button for between five and ten seconds. This will reset the
Wireless Turbo Access Point & Router to the factory default settings.
If you applied any personal configuration settings, you will need to make
the changes again.
While trying to check my network configuration settings in Windows Me or XP, I can’t find the Network icon.
Possible Solution:
The default setting in Windows Me and XP is to not show all of
the icons within the Control Panel. Click Windows Start, Settings,
and then Control Panel. Within Control Panel, click View all
Control Panel options on the left side of the screen. All the Control
Panel icons should now be visible.
I am unable to connect to the wireless function of the Wireless Turbo Access Point & Router.
Possible Solution:
Be certain that you have each 802.11g Wireless Turbo PC Card or PCI Adapter
set to Infrastructure mode. If your 802.11g Wireless Turbo PC Cards or
PCI Adapters are set to 802.11g Adhoc mode, you will not be able to use
the wireless function.
Note: 802.11g Adhoc mode is used for peer-to-peer network configurations. Infrastructure mode is used to add an 802.11g Wireless Turbo Multi-function Access Point or Wireless Turbo Access Point & Router to the network configuration.
My computer does not recognise the wireless function of the Wireless Turbo Access Point & Router after I changed the settings.
Possible Solution:
Ensure that you are contacting the correct Wireless Turbo Access Point
& Router by verifying the correct MAC address. Ensure that the correct
passphrase and encryption option are being used. If you changed the settings
in the configuration of the Wireless Turbo Access Point & Router,
you must also change the settings of every 802.11g Wireless Turbo PC Card
or PCI Adapter attached to this network. The settings of the 802.11g Wireless
Turbo PC Card or PCI Adapter must match the new settings of the Wireless
Turbo Access Point & Router.
When I use a wireless adapter in Windows XP to connect to the Wireless Turbo Access Point & Router, I cannot enable 256-bit WEP encryption.
Possible Solution:
If you have any USRobotics wireless adapters that you want to connect
to the Wireless Turbo Access Point & Router, those wireless adapters
must use the USRobotics Configuration Utility in order to enable 256-bit
WEP encryption.
After successful installation of any USRobotics wireless product, by default, Windows XP launches its own internal configuration utility (Windows XP Wireless Zero Configuration Service) as demonstrated in the following graphic:
While there is nothing wrong with the installation of your USRobotics wireless product within Windows XP, the Windows XP Wireless Zero Configuration Service does not recognize 256-bit WEP Encryption. To use the built-in and recommended USRobotics Configuration Utility, follow the steps below on each machine that has a wireless adapter installed:
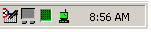
- From the system tray in the lower right corner of your screen, double-click
the USR WLAN icon as demonstrated in the following graphic (Note:
This icon may be red, yellow, or green depending on the current status
of your wireless connection):
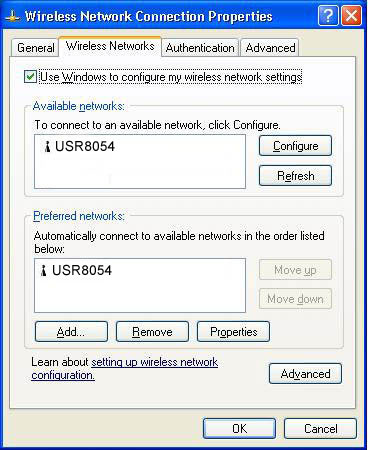
The Windows XP Wireless Zero Configuration Service will appear as demonstrated in the following graphic:
-
Click to clear the Use windows to configure my wireless network settings check box.
-
Select OK and close the Windows XP Wireless Zero Configuration Service screen. Now when you double-click the USR WLAN icon for your wireless adapter, the USRobotics Configuration Utility will launch. You will now be able to connect to the Wireless Turbo Access Point & Router and use 256-bit WEP encryption.
My Wireless Turbo Access Point & Router is not appearing in the list when I wirelessly scan for it.
Possible Solution:
You may be on a computer that is too far away from the Wireless Turbo Access Point & Router. Try moving closer to the Wireless Turbo Access Point & Router and
repeating the scan procedure.
The TCP/IP Protocol is not installed on my computer.
Possible Solution:
You need to install the TCP/IP protocol on your computer. Perform the
following procedures to install the TCP/IP protocol.
In Windows 98 and Me: Click Windows Start, Settings, and then click Control Panel. Double-click the Network icon and select the Configuration tab in the Network window. Click Add to add the network component to your PC. Double-click Protocol to add the TCP/IP protocol. Select Microsoft in the Manufacturers list. Choose TCP/IP in the Network Protocols and click OK to return to the Network window. The TCP/IP protocol will be listed in the Network window. Click OK to complete the installation procedure, then restart your computer.
In Windows 2000: Click Windows Start, Settings, and then click Control Panel. Double-click Network. Double-click Local Area Connection and then click Properties. Click Install, click Protocol, and then click Add. Click TCP/IP, click OK, and then click Close.
In Windows NT: Click Windows Start, Settings, and then click Control Panel. Double-click Network. Click Protocols and click Add. Select Microsoft, select TCP/IP, then click Close. Reapply any service packs, then restart your computer.
In Windows XP: Click Windows Start and then click Control Panel. Click Switch to Classic View and then double-click Network Connections. Double-click Local Area Connection and then click Properties. Click Install, click Protocol, and then click Add. Click TCP/IP, click Add, and then click Close.
After enabling VPN, I am unable to connect to local computers on my network to share files or printing capabilities.
Possible Solution:
Local network resources are not available when connected to some VPN clients.
You may need to disable VPN.
I do not know how to configure the TCP/IP protocol to work with the Wireless Turbo Access Point & Router.
Possible Solution:
You have the TCP/IP protocol installed, but it is not configured to work
with the Wireless Turbo Access Point & Router.
- Click Windows Start, Settings, then click Control Panel.
- Double-click the Network icon. Click the Configuration tab and select the TCP/IP line that has been assigned to your network card.
- Click the Properties button to set the TCP/IP protocol for the Wireless Turbo Access Point & Router.
- There are two setting methods to configure the IP:
- To obtain the IP automatically through the DHCP server, perform the
following step:
Click the IP Address tab, and select Obtain an IP address automatically. This is the preferred method for configuring computers.
- To configure the IP manually, perform the following steps:
- Click the IP Address tab. Click Specify an IP address. Enter values in the IP Address field and in the Subnet Mask field. The default IP address of this product is 192.168.123.254. You should use 192.168.123.xxx (xxx is between 1 and 254) for IP Address field and 255.255.255.0 for Subnet Mask field.
- Click the Gateway tab. Add the IP address of this product (default IP is 192.168.123.254) in the New gateway field and click Add.
Contact your ISP to get the necessary DNS values. Click the DNS Configuration tab. Add the DNS values into the DNS Server Search Order field and click Add.
After installing the TCP/IP communication protocol, you can use the ping command to check if your PC has successfully connected to the Wireless Turbo Access Point & Router.
Troubleshooting Ping Procedure
If at any time during the ping procedure you do not receive a return message for a successful ping, this means that the address you are pinging has been changed and is causing a conflict. Check the address in the Web User Interface and make any necessary corrections using the console mode. After you have made the corrections, continue with the ping procedure.
- Click Windows Start and then click Run. In the Run dialog box, Windows 95, 98, and Me users should type command and click OK. Windows NT, 2000, and XP users should type cmd and click OK.
- Type Ping 127.0.0.1. This is your local host address and this will ensure that the TCP/IP protocol is installed and functioning properly. If you cannot complete this ping, disconnect the Wireless Turbo Access Point & Router and then repeat the installation procedure.
- Type Ping followed by your IP address. This will ensure that your computer is responding to requests. If you cannot complete this ping, make sure all the cables are properly connected and that all the correct drivers are installed.
- Type Ping followed by your gateway address to check the communication with your gateway. The default gateway address is 192.168.123.254. This will ensure that you can connect to other computers and get to the Wireless Turbo Access Point & Router. If you can establish communication with the Wireless Turbo Access Point & Router, you can access the Administration page and configure the settings. If you cannot complete this ping, make sure the power cord of the Wireless Turbo Access Point & Router is plugged in and that it is properly connected to your computer.
- Type Ping followed by the outside Internet address of your Wireless Turbo Access Point & Router. This is the address that is provided either by your ISP or by the outside LAN. This procedure will ensure that your Wireless Turbo Access Point & Router is functioning properly and allowing traffic to pass through.
- Type Ping followed by your known DNS server address. This will allow you to resolve valid Internet host names to IP addresses and to verify that you can access the Internet.

Support
Are You Still Having Problems?
1. Go to the Support section of the USRobotics Web site at www.usr.com/support.
Many of the most common difficulties users experience have been addressed in the FAQ and Troubleshooting Web pages for your specific product. The product number for the Wireless Turbo Access Point & Router is USR8054. You may need to know this to obtain information on the USRobotics Web site.
2. Contact the USRobotics Technical Support department.
NOTE: It is important that you have your serial number written down for future reference. If you ever need to call our Technical Support department, you will need this number, plus your model number, which is 8054, to receive assistance.
| Country | Voice | Online | Support Hours |
| United States | (888) 216-2850 | http://www.usr.com/emailsupport | 9:00 A.M. - 5:00 P.M., Monday - Friday CST |
| Canada | (888) 216-2850 | http://www.usr.com/emailsupport | 9:00 A.M. - 5:00 P.M., Monday - Friday CST |
| Country | Telephone | Online | Hours |
| Austria | 07110 900116 |
7:45 - 16:45 |
|
| Belgium (Flemish) (French) |
+32 (0) 7 023 3545(Flemish)
+32 (0) 7 023 3546(French) |
emea_modemsupport@usr.com | 9:00 - 18:00 Monday - Friday |
| Denmark | +45 70 10 4030 | emea_modemsupport@usr.com | 9:00 - 17:00 Monday - Friday |
| Finland | +358 981710015 | emea_modemsupport@usr.com | 10:00 - 18:00 Monday - Friday |
| France | +33 082 507 0693 | http://www.usr.com/emailsupport/fr | 8:00 - 17:00 Monday - Friday |
| Germany | 0180 567 1548 | http://www.usr.com/emailsupport/de | 7:45 - 16:45 Monday - Friday |
|
Hungary |
0180 567 1548
|
emea_modemsupport@usr.com | 8:00 - 18:00 Monday - Friday |
| Ireland | +44 870 844 4546 | emea_modemsupport@usr.com | 9:00 - 18:00 Monday - Friday |
| Italy | +848 80 9903 | http://www.usr.com/emailsupport/it | 9:00 - 18:00 Monday - Friday |
| Luxembourg | +352 342 080 8318 | emea_modemsupport@usr.com | 9:00 - 18:00 Monday - Friday |
| Middle East/Africa | +44 870 844 4546 | me_modemsupport@usr.com | 9:00 - 18:00 Monday - Friday |
| Netherlands | 0900 202 5857 | emea_modemsupport@usr.com | 9:00 - 18:00 Monday - Friday |
| Norway | +47 23 50 0097 | emea_modemsupport@usr.com | 9:00 - 17:00 Monday - Friday |
| Poland |
---
|
emea_modemsupport@usr.com | 8:00 - 18:00 Monday - Friday |
| Portugal | +351 (0) 21 415 4034 | http://www.usr.com/emailsupport/pt | 9:00 - 17:00 Monday - Friday |
| Russia | 8-800-200- 200-1 |
usrsupport@usrobotics.ru | 10:00 - 18:00 Monday - Friday |
| Spain | 902 11 7964 | http://www.usr.com/emailsupport/es | 9:00 - 17:00 Monday - Friday |
| Switzerland | 0848 840 200 | emea_modemsupport@usr.com | 9:00 - 17:30 Monday - Friday |
| Sweden | +46 (0) 77 128 1020 | emea_modemsupport@usr.com | 8:00 - 17:00 Monday - Friday |
| United Kingdom | 0870 844 4546 | http://www.usr.com/emailsupport/uk | 8:45 - 17:45 Monday - Friday |
For current support contact information, go to the following Web site:
http://www.usr.com/emailsupport