![]()
Contents:
USRobotics SureConnect ADSL USB Modem
Installing the Modem
USRobotics SureConnect ADSL USB Modem User Guide for Linux
Step 1: Compile and Install the USB ADSL Modem Driver
Step 2: Configuring the ADSL USB Modem Parameters
Step 3: Set Up the ADSL USB Modem for Use
System Requirements
- 32 MB system memory or more
- 10 MB free space on your hard drive
- 56 color VGA or higher resolution
- CD-ROM drive
- One available USB port and one USB cable (supplied)
- Telephone cable with RJ-11 connectors
- Linux operating system disks
- Available ADSL service or connection to DSLAM or ADSL service emulator
Linux Installation
Step 1: Compile and Install the Modem Driver
The following installation supports the encapsulations listed below:
- RFC1483 (LAN driver)
- RFC2516 (PPP Over Ethernet)
- RFC2364 (PPP Over ATM)
The package that you have contains the driver source codes and some script files for compiling, installing, and using the USRobotics SureConnect ADSL USB Modem. The driver will be installed as an Ethernet driver and the interface name will be called ADIModem.
NOTE: This driver should work with 2.4.x and 2.5.x kernels with USB and hot plug support installed. For instance, it should work with other distributions of Linux, such as Red Hat 7.x, Mandrake 8.x, Suse 7.x, and Slackware 8.x.
- Log on as root.
- Create a new directory.
- Copy the tarball file 9000_Linux.tgz into the new directory.
- Unzip the tarball file.
The figure below shows how to create the USR_USB directory, and copy the file 9000_Linux.tgz into that directory from the CD-ROM drive and then unzip the file. This is assuming you have already mounted the CD-ROM into /mnt/cdrom directory.
The commands are as follows:
- cd /usr
- mkdir USR_USB
- cd USR_USB
- cp /mnt/cdrom/Linux/9000_Linux.tgz
- tar xvzf 9000_Linux.tgz

5. Run ./inst_mod KernelSrcDirectory. KernelSrcDirectory is the directory where this script can find the kernel source codes. This directory is normally under the /usr/src directory. If the kernel source code is not installed by default with your Linux distribution, you have to install it first. Refer to your distribution manuals for more information.
For instance, under RedHat 7.2, the source directory is /usr/src/linux-2.4.7-10, the install command is then:
USR_USB./inst_mod linux-2.4.7-10
The following figure shows how to compile the driver under RedHat 7.2.

NOTE: DSP firmware files will be located in the /etc/analog directory. Each time you plug in in the USB cable, the kernel will call the application in /etc/hotplug/usb/adiusbadsl to set up your modem.
At this point, you have built the driver that supports RFC1483 (LAN) and also RFC2516 (PPPoE).
Step 2: Configuring the Modem Parameters
/etc/analog/usradslpots.conf
/etc/analog/usradslisdn.conf

There are a number of parameters that the modem needs to have configured in order to initiate a connection when the USB cable is plugged in. These parameters are stored in a configuration file. In order for the modem to be operational, these values must be modified in the file using an editor such as pico, vi, or joe. If you are using ADSL Annex A, which works over a standard telephone line, you need to edit the file usradslpots.conf. If you are using ADSL Annex B, which works over an ISDN line, edit the file usradslisdn.conf.
Setting the VPI/VCI and Encapsulation Type Parameters
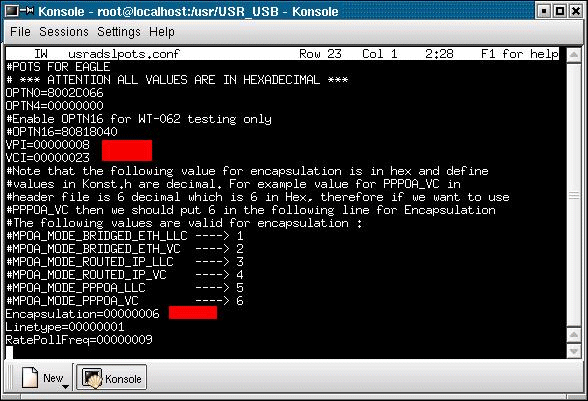
VPI and VCI values are used to identify your Virtual Path Connection (VP) and your Virtual Circuit Connection (VC). Your ISP should have provided you with VPI, VCI, and Encapsulation-type parameters. The VPI/VCI values are in hexadecimal format, an example is below:
- VPI=00000008
- VCI=00000023
NOTE: Whenever you change anything in the adiusbadsl.conf or usradslisdn.conf file, unplug the USB cable from the modem, and then plug it back in. This will reset the modem to use the new values.
Encapsulation Type
Encapsulation is a technique used by layered protocols where the data set is wrapped in a protocol header. This technique helps to bridge different networks. When a protocol data unit (PDU) is sent, a layer will add header information to that unit from the layer above. For example, a packet contains a protocol header from the physical layer. Then the network layer (IP) adds a protocol header. Finally, the transport layer (TCP) adds a protocol header, followed by the application protocol data.
The encapsulation type depends on the type of interface your ISP provides to you. Your ISP should be able to provide you with the appropriate values for their system.
Example: Encapsulation = 00000006 (PPPoA-VC)
Step 3: Set Up the ADSL USB Modem for Use
PPPoE Interface
After completing the first two steps, you will have built the driver that supports RFC1483 (LAN) and also RFC2516 (PPPoE).
NOTE: Since this package supports PPPoE encapsulation, you can use any PPPoE client software that you choose. An example of a PPPoE client is Roaring Penguin, which you can get from http://www.roaring penguin.com. You will not need to change anything in the package to be able to use PPPoE. You will just need to install the LAN driver and the desired PPPoE client software.
As soon as you install the package on your system, you can connect the USRobotics SureConnect ADSL USB Modem to your computer using the included USB cable. Once the modem is connected, the driver and module will be loaded automatically.
When the modem is detected, the PWR LED on the front left panel of the modem, will begin to blink. The driver will create an Ethernet interface called ADIModem. Although the interface is created, it is not yet configured. To confirm the interface has been created, run the following command:
ifconfig -a
A list will display all interfaces on your system. Locate the ADIModem interface. Once the interface is located, you can configure it using either one of the following methods:
- DHCP
- Static IP Address
Configure Interface Using DHCP
- Confirm that your server provides a DHCP server.
- If it does, then run the following script:USR_USB/ADI_PPPOE/./godhcp
- To confirm the interface is operational and it has an IP address assigned, run the following script:ifconfig
Configure Interface Using a Static IP Address
- Run the following script to configure the interface using a Static IP Address:
- USR_USB/ADI_PPPOE/./gostatic ADIModem IPAddress Netmask
- route add default gw ipaddress (this is the gateway provided by your ISP)
- pico /etc/resolv.conf
|
nameserver ipaddress
(insert your DNS Address as provided by your ISP).
|
- Run the following command to confirm the interface is operational and an IP address has been assigned: ifconfig
Once the interface is properly configured, you can start sending and receiving data.
NOTE: Whenever you unplug the USB cable, you need to run one of the above scripts. If you want to bring down the interface and bring it back up, run the USR_USB/ADI_PPOE/./stopip. Use one of the above script files to configure the interface again.
PPPoA Interface
1. After you have built the driver, run the following script: USR_USB/./inst_pppoa
2. The script will compile, build, and install the PPPoA module. Upon completion, the script will copy the needed scripts and configuration files into the /usr/sbin and /etc/ppp directories.

3. If you are using ADSL Annex A, confirm that the VPI/VCI and Encapsulation type parameters located in the /etc/analog/usradslpots.conf are the same as the ones provided to you by your ISP. If you are using ADSL Annex B, which works over an ISDN line, confirm that the VPI/VCI and Encapsulation type parameters located in the /etc/analog/usradslisdn.conf are the same as the ones provided to you by your ISP.
4. Plug the USB cable into the modem and computer.
5. Modify the user name and password in pap-secrets, chap-secrets, and options files in /etc/ppp directory with the values provided by your ISP. For example, the format of the pap_secrets and chap_secrets files:
| * Secrets for authentication using CHAP | |||
| * Client | server | secret | IP addresses |
| ISP username | * | ISP password | * |
In the Options file, you need to change the user ********** with the username provided by your ISP.
6. Go into /usr/sbin directory and run the following script: ADI_PPP_Go
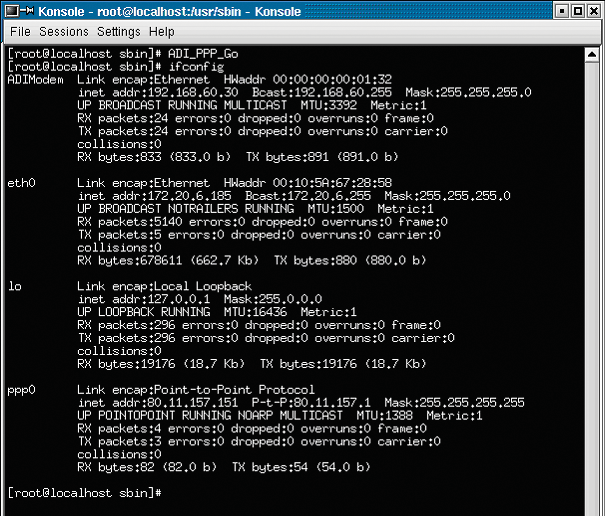
7. Once the script has completed, run ifconfig and confirm that you are connected to your provider. PPP will create an interface called ppp0 whenever it connects to a server.
8. To disconnect from the server, run ADI_PPP_Stop at the same directory and PPP will disconnect from the server.
The graphic on the following page shows the USRobotics SureConnect ADSL USB Modem connected to an ISP. The ADIModem interface is loaded (local IP 192.168.60.30), and the ppp0 interface is up and running with an IP address (80.11.157.151) and a gateway (80.11.157.1).
Modem Status
To view various statistics about the modem and the connection, run the following script:
USR_USB/ADI_PPPOE/./showstat
The statistical information will be available through ADIModem in /proc directory.
| This feature is available as soon as you plug the USB cable in. |

