These are the options available in the Security menu:
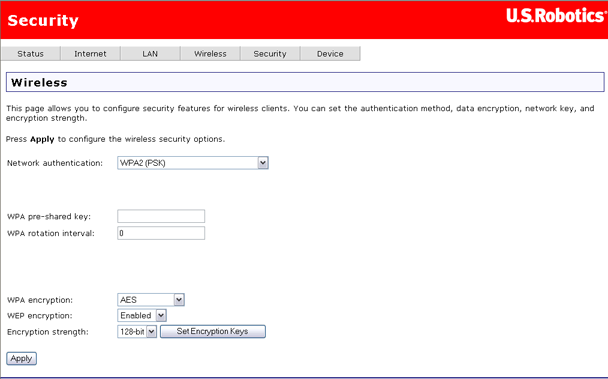
The wireless security page allows you to configure the security features of your wireless network.
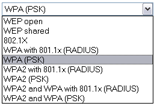
There are several security methods to choose from, depending on your needs and the capabilities of your wireless machines.
After making changes, click Apply to save.
All network interface cards are built with a unique 48-bit MAC address. When MAC address filtering is enabled, you can restrict the wireless devices that are allowed to connect to your gateway by their respective MAC addresses. You could also grant access to any wireless device whose MAC address is on its "allow" list.
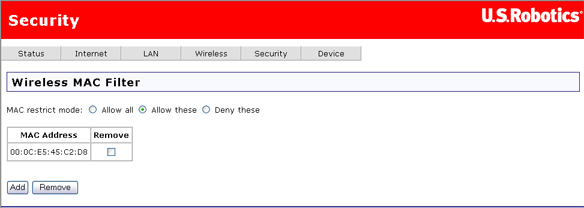
These are the values for the MAC restrict mode:
Below the MAC restrict mode is a table showing all MAC addresses that the restrict mode applies to. You can add up to 60 addresses to the list. For an example of adding MAC addresses to the list and otherwise configuring MAC filtering, please see the Tutorials section of this User Guide.
If you wish to delete an entry from the list, select the appropriate MAC restrict mode, select the Remove checkbox for the entry you want to delete, and click the Remove button.
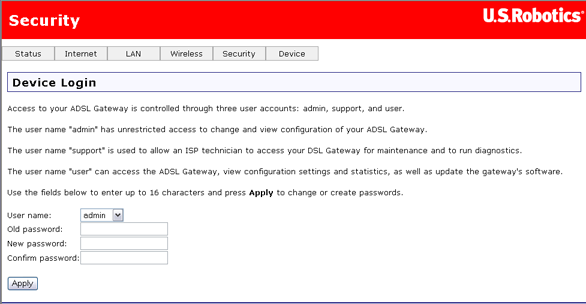
You can use this page to change the password for the admin, support and user accounts. (Their default passwords are admin, support, and user respectively.) Simply select an account in the User name drop-down list, then enter the current and new passwords for the account. Enter the new password a second time to confirm it. Then click Apply to save the new password.
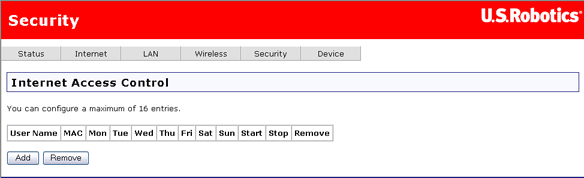
You can use the Internet Access Control page to create a parental control rule that keeps certain network devices off the Internet for specific time periods. The rules can block access for a defined time period on certain days of the week.
Note: If you want to use this feature, you must configure the gateway to synchronise its time with at least one Internet time-of-day server. See Time synchronization for more information.
This is the Internet Access Control page when there are no filters defined:
Click Add to define an Internet access filter, and enter its settings in the following page. In addition to the rule name, each rule you define has the MAC address of the machine to block, the time period to block it for, and a list of days that the time-period block is enforced.
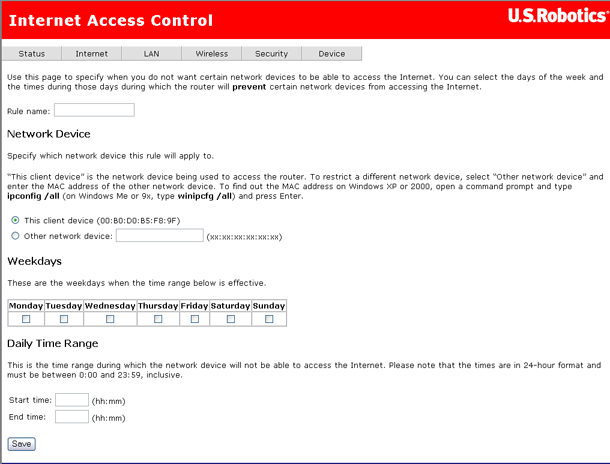
Caution: If you want to set up access control for a machine other than the one you're currently using, select Other network device and enter that device's MAC address.
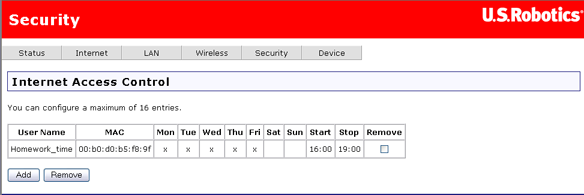
After configuring the Internet access filter, click Save to save it. Here's what it might look like if you wanted to keep children off the Internet during after-school study hours:
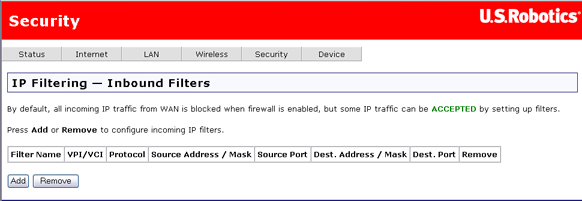
The gateway's firewall can block internal users or applications from accessing the Internet. There are two ways to accomplish this:
For a tutorial on how to use the outbound filter page to keep a computer from accessing the Internet, please click here.
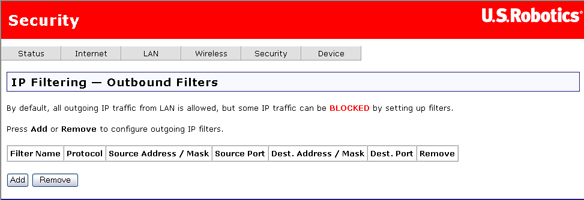
This is the outbound filtering page before adding a filter:
To remove an existing filter definition from the outbound filter table (the first screen shown above), check the Remove checkbox for the filter and click the Remove button.
The following page appears after you click Add.
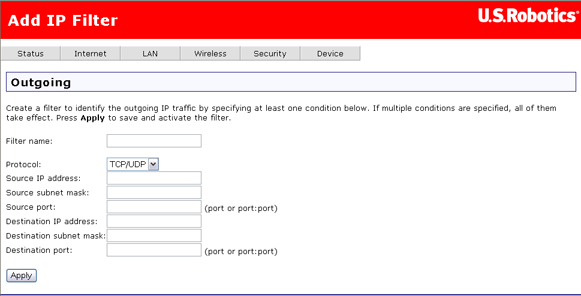
When you are done entering values for your filter, click Apply to save the filter.
These are the fields on the second page above (the page labeled Add IP Filter and Outgoing), where you define a filter that specifies a set of conditions for which to block access for one or more local machines.
Item |
Description |
Filter name |
Enter a name for the filter here. |
Protocol |
Select TCP, UDP, a combination of TPC & UDP, or ICMP. |
Source IP address |
Enter the IP address that you do not want to let access the Internet or the destination address. |
Source subnet mask |
Enter the subnet mask for the source IP address. |
Source port |
Enter the source port number, or range of ports, for which you want to block access. |
Destination IP address |
Enter the IP address you do not want the source IP address to have access to. |
Destination subnet mask |
Enter the subnet mask for the destination IP address. |
Destination port |
Enter the destination port number, or range of port numbers, you want to block access. |
This page allows incoming packets to reach their intended destinations by specifying rules for unblocking certain incoming packets. You could use it any time you want to allow restricted access to a machine, or you could configure unlimited access to a particular system (for example if one of your local machines is a Web server).
Click on Add to create a new inbound filter.
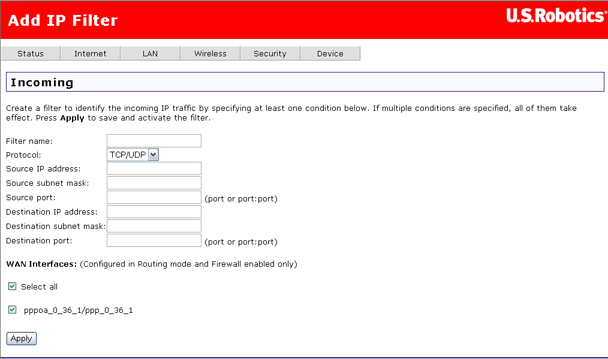
This table describes the fields in this Add IP Filter page:
Field |
Description |
Filter name |
Enter a name for your inbound filter here. |
Protocol |
Selects TCP, UDP, or a combination of TCP/UDP. |
Source IP address |
Enter the external IP address you want to allow access to your internal address that appears in the Destination IP address field. |
Source subnet mask |
Enter a subnet mask for the source IP address. |
Source port |
Enter a source port number, or a range of port numbers. |
Destination IP address |
Enter the internal IP address you want to provide access to. |
Destination subnet mask |
Enter a subnet mask for the destination IP address. |
Destination port |
Enter the destination port number, or range of port numbers, you want to allow access (for the destination IP). |
After setting up your filter, click Apply to save it.
A virtual server allows you to direct incoming traffic from the Internet (identified by protocol and external port) to an internal server with a private IP address on the LAN. If you need to convert an external port you need to enter an internal port.

Click here to go to a tutorial showing you how to set up a virtual server. If you want to delete a virtual server, check the Remove checkbox for the appropriate line in the table and click Remove.
Note: If you set up a DMZ host, all packets for addresses other than those specified in this page go to a designated DMZ machine.
Port triggering is similar to a virtual server, except that it creates a dynamic or temporary hole in the firewall. You can configure it so that when one of the local systems uses a specified outgoing port to create a TCP/UPD connection to an outside system, that system is granted access to your network through the specified incoming ports. Port triggering is more secure than a virtual server, but it does not support simultaneous use of the same ports by multiple systems.
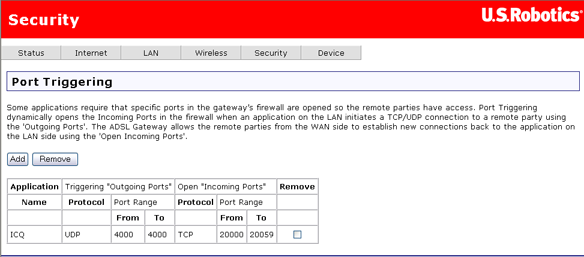
Click Add to set up port triggering for an Internet application. In the next page (shown below), select the application name, which fills in the settings in the table below. If the application you want is not in the list, select Custom application and fill in the table parameters below. (See the application's documentation to find out what the settings should be.) Click Apply to save the port trigger.
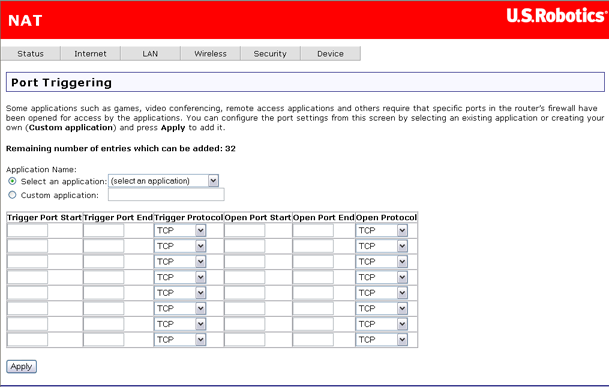
Note: A port trigger is available to a single active session. It cannot simultaneously support same-port triggers to multiple clients.
The de-militarised zone (DMZ) option is for forwarding IP packets from the Internet that are not meant for any of the applications configured in the virtual server table. These packets are forwarded to a designated DMZ host computer. While a virtual server can only forward (redirect) a limited number of services (ports), DMZ hosting allows all the services (ports) running on the DMZ host to be accessible externally.
This is the DMZ Host page.
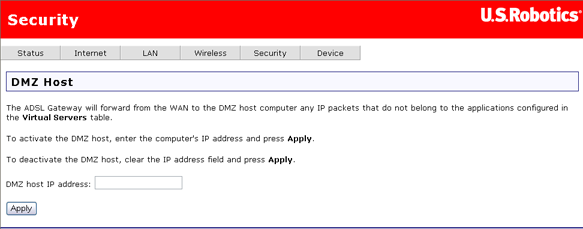
To configure the DMZ, simply enter the IP address of the computer that will function as the DMZ host. Click Apply to save the DMZ address. To deactivate the DMZ feature, clear DMZ host IP address and click Apply.