Connecting to the USR5453 Professional Access Point using the built in Radius server.
The intention of this document is to understand how to connect to the USR5453 using the built in radius server and 802.1x. It will cover how to configure the server on the access point, how to establish a connection using the MAXg client, Windows XP Sp 2 Wireless and the Intel PROSet Wireless client.
Why use a radius server (Remote authentication dial-in user service)?
The use of a radius server enhances security on a wireless network by the use of a shared secret. This offers increased security over WEP as the secret is never broadcast over the air so if anybody is ‘snooping’ your network, no security parameters can be retrieved. In this instance, the client supplies the authentication details and does rely on the access point. The USR5453 has a Radius Server built in, but it can also allow the client to connect to the Microsoft Windows ISA Radius server. This will enable the access point to form a secure tunnel for data transmission.
Configuring the USR5453 Professional Access Point.

Log into the management console of the 5453 and locate the ‘User Management Tab’.
Here you will need to enter the users ‘Active Directory’ or ‘Windows Log On’ details. If the client is not on a domain, enter the local user name and password which is supplied when you log onto Windows. Again, if you log into Windows without using a user name and password, please create an account in control panel\users and put these details into the 5453. Click ‘Add Account’ when you have entered all of the details.
Now expand the Advanced tab and click Security.

In the Security Mode section, select ‘IEEE 802.1x’ and ‘Authentication Server’ ‘Built In’ from the drop down box. Finally, click the ‘Update’ button.
We are now ready to configure the Wireless Client (US Robotics MAXg and Intel Centrino)
If you wish to connect with Windows XP built in wireless client or Intel PROSet Wireless client, please skip this next section.
Configuring the US Robotics MAXg wireless client.
After you have installed the MAXg client (should this be the client of your choice, if not please skip to the appropriate section), open the MAXg utility.

Locate the USR5453 by identifying the SSID that you have assigned which in this instance is ‘USR5453 Professional AP’, highlight it and click configure.
On the configuration screen, select ‘802.1X’ from the drop down menu.
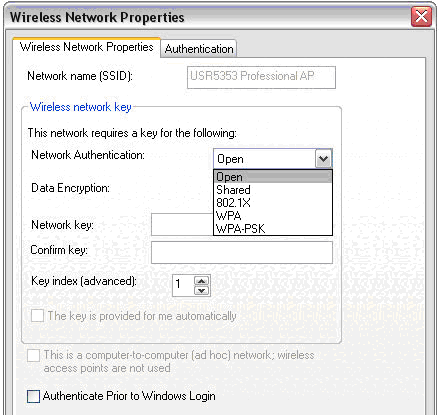
Should you wish to ‘Authenticate Prior to Windows Login’, put a check in the box. This will allow windows to connect to the radius server at the log in prompt and connect to a domain controller. This is useful when connecting to a windows ISA radius server.
When done, select the ‘Authentication’ tab at the top.
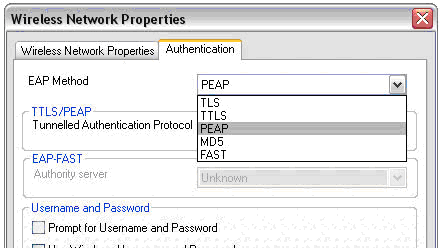
Select PEAP from the EAP Method drop down box and put a check in the ‘Prompt for Username and Password’ box if you wish or a check in ‘Use Windows Username and Password’ should you wish for an automatic connection.
We have now performed all of the necessary steps to connect to the inbuilt Radius server on the USR5453.
When you have selected OK, the MAXg client will authenticate with the AP and you will be presented with this dialogue box:
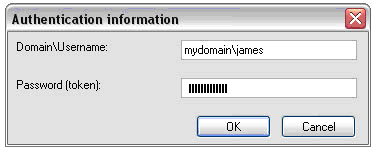
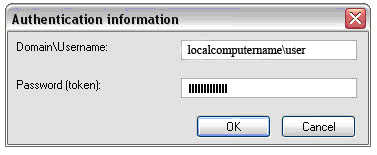
Enter the active directory details as described above. If you are not on a domain, you will need to enter the local computer name in the domain section as follows:
Configuring the Windows XP client.
Locate the USR5453 with the Windows XP wireless client.
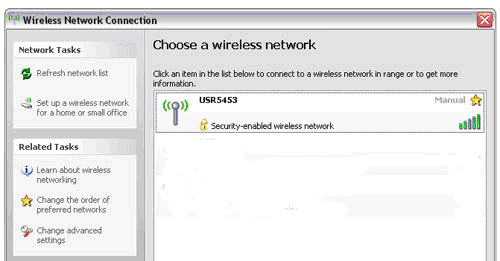
Select ‘Change the order of preferred networks’ from the left hand menu
.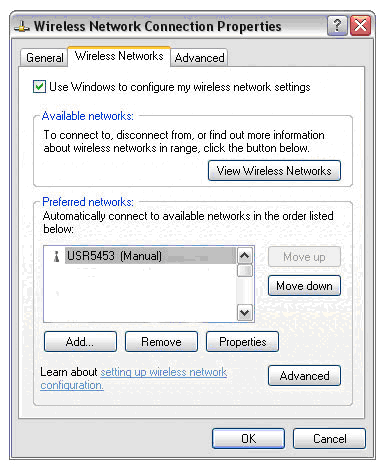
Select ‘Properties’
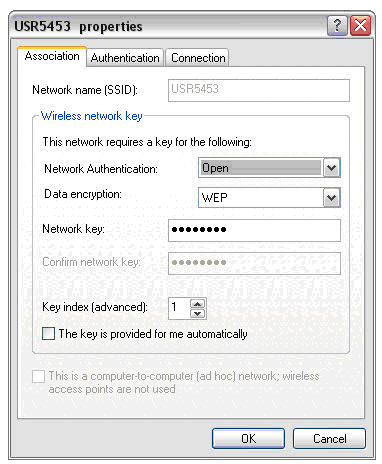
From the ‘Association’ tab, leave the ‘Network Authentication’ as ‘Open and the ‘Data Encryption’ as ‘WEP’.
The ‘Network Key’ must be filled in, even though it will not be used. Simply enter any 10 character key, but make sure you enter it the key when asked to confirm.
Select the ‘Authentication’ tab.
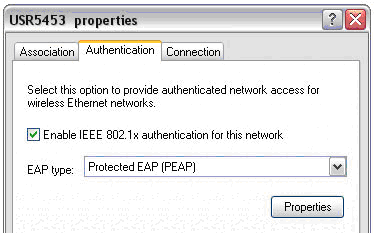
Enable IEEE 802.1x and select the ‘Properties’ button.
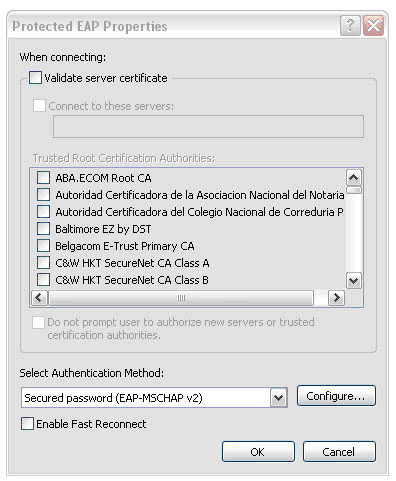
No check is needed or ‘Validate server certificate’.
Select the ‘Configure’ box.
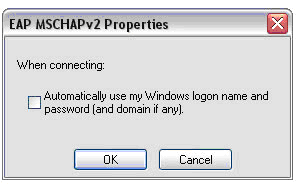
Remove the check in ‘Automatically use my Windows logon name and password (and domain if any)’.
You are ready to connect.
When Windows attempts to authenticate with the USR5453, you will be presented with the following window:
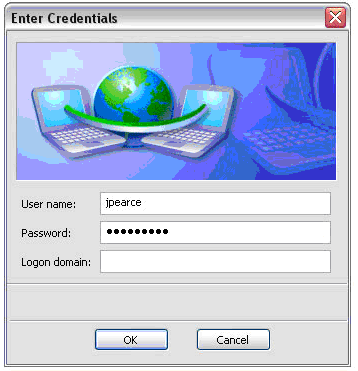
Fill in the user name and password exactly as entered into the USR5453 (User Management\ User Accounts). There is no requirement for a domain account to be entered.
Configuring the Intel PROSet/Wireless client.
Install and open the Intel PROSet Wireless client. Locate the USR5453 and select profiles. Follow the on screen prompts or click the properties button.
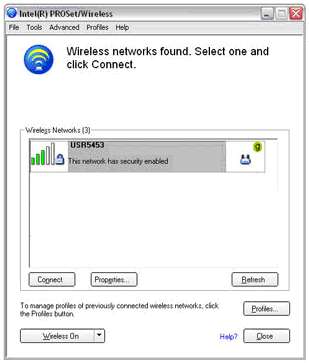
Click next and this moves you onto the ‘Security Settings’ screen and ‘PEAP User’.
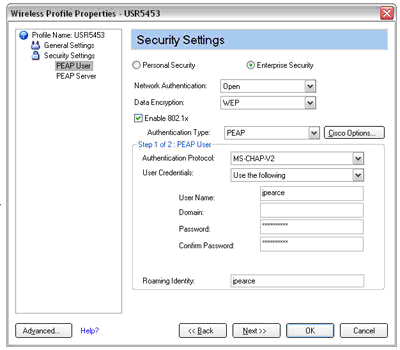
Put a check in ‘Enable 802.1x’ and the authentication type is ‘PEAP’
PEAP settings are –
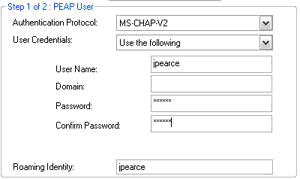
The Authentication Protocol is ‘MS-CHAP-V2’ and the User Credentials are the same as added to the USR5453 above. Leave the domain box blank.
For the ‘Roaming Identity’ – This must also be the same as the user name entered into the USR5453 as above.
On this occasion the user name entered into the USR5453 was jpearce and a password of 12344321JP.
Repeat this for the user credentials and use jpearce for the roaming identity.
REPLACE WITH THE NAME AND PASSWORD YOU ENTERED INTO THE USR5453.
In ‘Step 2 of 2’ensure that there is no check in ‘Validate Server Certificate’ or in ‘Specify Server or Certificate’
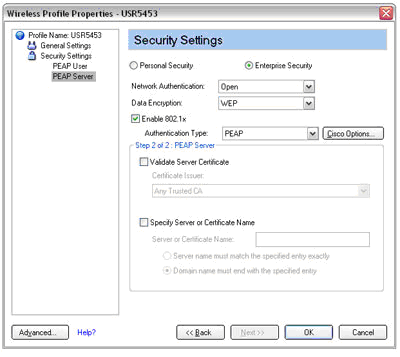
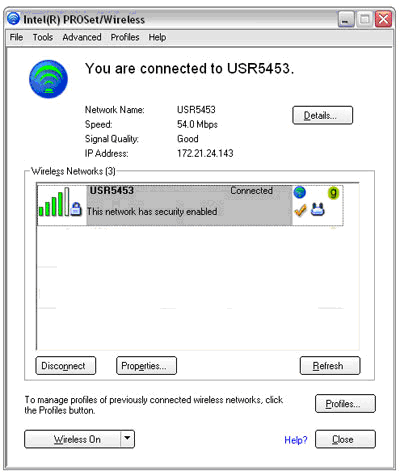
Click OK and you are ready to connect!!
This document was written using:
- USR 805421 Wireless USB MAXg stick connecting with US Robotics MAXg wireless client.
- Intel Centrino Pro /Wireless 2200BG connecting with Windows XP Service Pack 2 wireless client.
- Intel Centrino Pro/Wireless 2200 BG connecting with Intel PROSet/Wireless Client version 10.1.1.3