
Contents:
Network Configuration and Planning
Adapter Installation and Configuration for Windows 98 SE/2000/Me/XP
22 Mbps Wireless Configuration Utilities
Product Specifications for 22 Mbps Wireless PC Card and PCI Adapter
Product Specifications for 22 Mbps Wireless Access Point
22 Mbps Wireless PC Card, PCI Adapter, PCI Adapter (with detachable antenna), and Access Point User Guide
22 Mbps Wireless Configuration Utilities
22 Mbps Wireless PC/PCI Network Configuration Utility
22 Mbps Wireless Access Point Configuration Utility
22 Mbps Wireless Access Point Web Configurator
22 Mbps Wireless PC/PCI Network Configuration Utility
The following section describes the various functions of the Network Configuration Utility. This utility provides quick access to all adapter settings. The configuration settings will be set by default to the correct values. Only advanced users should change any of the following settings.
After installation is complete, a Utility Tool icon will appear in the taskbar on the right side near the clock. Double-clicking the icon in the Quick Launch bar will open the Utility Tool main menu, providing quick access to all adapter settings. The Configuration Utility icon will be colored to indicate the status of your wireless network: red for disconnected, yellow for connected with poor quality, and green for connected with good quality.
![]()
![]()
![]()
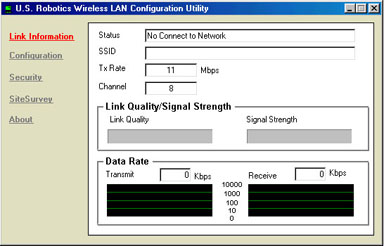
There are five sections to the LAN Configuration Utility: Link Information, Configuration, Security, SiteSurvey, and About.
Link Information:
The Link Information section provides information about the current wireless network connection. You will see the status of the network, the SSID, the Tx Rate, and the Channel. There are two graph bars that represent the Link Quality and the Signal Strength. There are also two graphs that represent the Transmit and Receive Data Rates.
Configuration:
In the Configuration section you can change the network configuration information for the 22 Mbps Wireless PC Card or PCI Adapter.
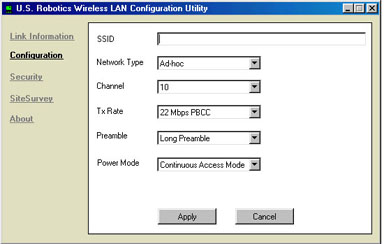
Description of Settings
The following are explanations of each adapter setting in the Configuration section.
SSID: SSID (Service Set Identifier) is the unique name that is shared among all 22 Mbps Wireless PC Cards or PCI Adapters and 22 Mbps Wireless Access Points in a wireless network. The SSID must be identical for all 22 Mbps Wireless PC Card or PCI Adapters and 22 Mbps Wireless Access Points participating in the same network. The SSID is case sensitive and must not exceed 30 characters.
Network Type:
- AdHoc: This mode is used for a simple peer-to-peer network. This type of network only allows the sharing of local resources between wireless clients without a Wireless Access Point.
- Infrastructure: This mode allows a wireless LAN to be integrated into an existing wired network through a Wireless Access Point. Infrastructure type networks also permit roaming between Wireless Access Points while maintaining the connection to all network resources. Infrastructure mode provides additional features, such as WEP security, power saving, and extended range.
- Auto-Detect: This mode allows the 22 Mbps Wireless PC Card or PCI Adapter to scan for and connect to an existing wireless network or other wireless networking products in the area.
Channel: This setting specifies the default 802.11b channel used by the Wireless LAN to communicate. In an Infrastructure type network without an Access Point active on the default channel, clients will scan through all available channels searching for a network with a matching SSID.
- Changing the Channel: Changing the channel is only effective in AdHoc networks. Networks that are operating in Infrastructure mode automatically scan for a channel. The following table contains the operational channel frequency for several countries.
|
Regulatory Channel Frequency
|
||||||
|
Channel
|
Frequency (MHz)
|
FCC
|
Canada
|
ETSI
|
France
|
Japan
|
|
1
|
2412
|
X
|
X
|
X
|
|
X
|
|
2
|
2417
|
X
|
X
|
X
|
|
X
|
|
3
|
2422
|
X
|
X
|
X
|
|
X
|
|
4
|
2427
|
X
|
X
|
X
|
|
X
|
|
5
|
2432
|
X
|
X
|
X
|
|
X
|
|
6
|
2437
|
X
|
X
|
X
|
|
X
|
|
7
|
2442
|
X
|
X
|
X
|
|
X
|
|
8
|
2447
|
X
|
X
|
X
|
|
X
|
|
9
|
2452
|
X
|
X
|
X
|
|
X
|
|
10
|
2457
|
X
|
X
|
X
|
X
|
X
|
|
11
|
2465
|
X
|
X
|
X
|
X
|
X
|
|
12
|
2467
|
|
|
X
|
X
|
X
|
|
13
|
2472
|
|
|
X
|
X
|
X
|
|
14
|
2484
|
|
|
|
|
X
|
Tx Rate: TX Rate (transmit rate) selects the allowable transfer rates of the 22 Mbps Wireless PC Cards or PCI Adapters. To optimize performance and range, the TX Rate should be set to Fully Automatic. This will automatically adjust the transfer speed for the best performance and longest range.
Note: The Wireless Access Point must support the TX rate setting. If the Wireless Access Point does not support the TX rate, undesired results may occur.
Preamble: The preamble can be set to either Long Preamble or Short Preamble. This setting only applies to Infrastructure mode and must match the preamble setting of the Wireless Access Point you are connecting to.
Power Mode: Power Mode enables or disables the power saving features of your wireless adapter. When enabled on a laptop, the power saving mode can reduce power consumption by the wireless PC card and extend the battery life of your laptop. This setting is only implemented in a network that is operating in Infrastructure mode.
- Changing the Power Mode: The Power Mode is set by default to Continuous Access Mode. To change the setting, select either Maximum Power Save or Fast Power Save from the drop-down list and click Apply.
Security:
Within this section, you can change the security settings of your 22 Mbps Wireless PC Card or PCI Adapter.
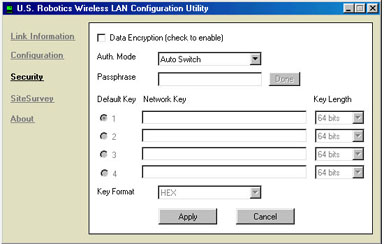
You can change the authentication mode by selecting the drop-down menu next to Auth. Mode. You can select from Auto Switch, Open Authentication, or Shared Authentication.
You can enable Data Encryption by selecting the checkbox at the top of the screen. If you select this, you will then need to enter a Passphrase. You will need to select either Hex or ASCII in the Key Format dropdown menu.
If you enable encryption, you will need to select and enter the WEP Network Keys from one to four, and you will need to select the Key Length from 64 bits, 128 bits, or 256 bits.
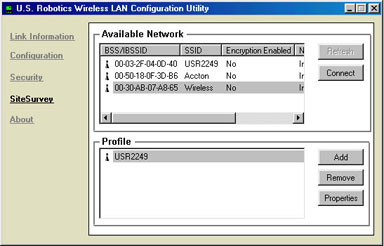
SiteSurvey:
Within this section, you can view the other networking products that you can connect to. There are two ways to connect with a wireless networking product in the list: either select a wireless networking product and click Connect or double-click a wireless networking product to automatically connect to it. Click Refresh to update the information that is shown.
About:
Within this section you can view the version information for your 22 Mbps Wireless PC Card or PCI Adapter.

22 Mbps Wireless Access Point Configuration Utility
The Configuration Utility for the 22 Mbps Wireless Access Point has six sections: Link Information, AP Settings, IP Settings, WEP Settings, 802.1X Settings, and Tools. If you make any changes to the configuration information within any of the six sections, you must click Apply in order for the changes to take effect. You will be prompted for your user name and password each time you change and apply a setting. If the changes do not appear or if the information shown is not correct, click Refresh to update the information that is shown.
Link Information
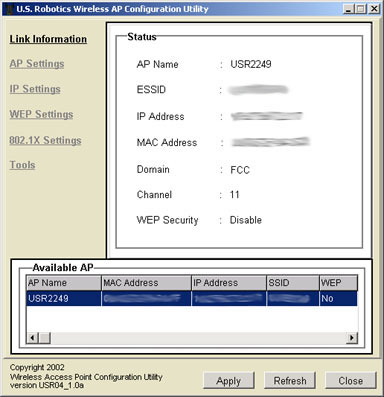
Within the Status area, you can view information about the AP Name, the ESSID, the IP Address, the Mac Address, the Domain, the Channel, and the WEP Security.
In the Available AP area, you can see a list of all the 22 Mbps Wireless Access Points that are detected.
Note: On any screen, you can click the listing for a device in the Available AP area and the Web Configuration Utility will launch in a new Web browser window.
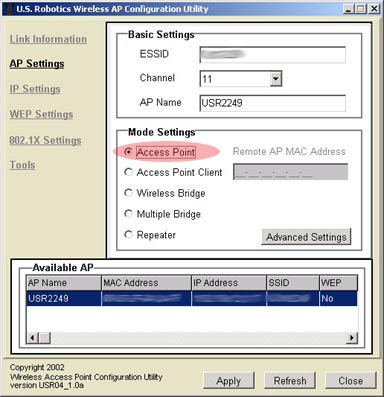
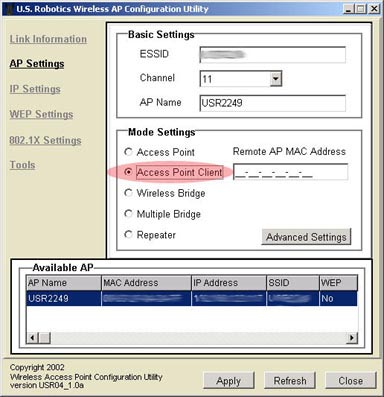
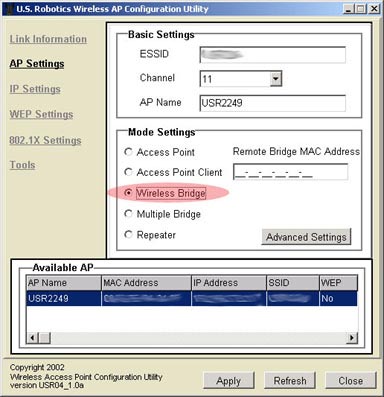
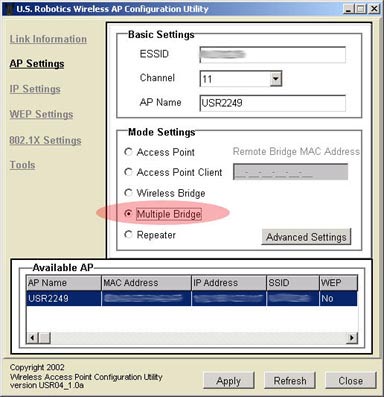
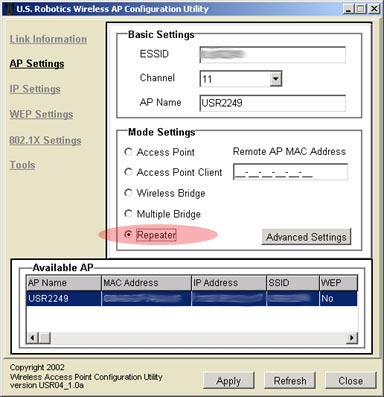
AP Settings
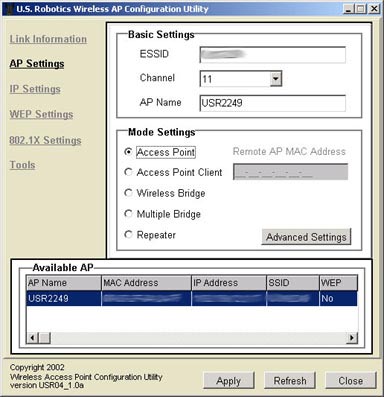
Within the AP Settings section, there are three areas: Basic Settings, Mode Setting, and Available AP.
In the Basic Settings area, you can enter an ESSID, select a channel, and assign a name to the 22 Mbps Wireless Access Point.
For Mode Setting, you can choose from the following:
- Access Point mode
- Access Point Client mode
- Wireless Bridge mode
- Multiple Bridge mode
- Repeater mode
Note: If you select either Access Point Client mode or Repeater mode, you will need to enter the Remote AP MAC Address. If you set the Remote AP MAC Address to all zeros, which is a generic setting, the 22 Mbps Wireless Access Point will associate with any available client.
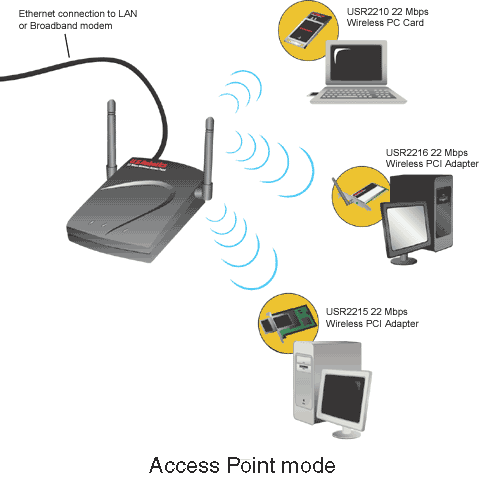
Access Point mode
Access Point mode is used to connect up to 20 wireless clients. If you have up to 20 computers, each equipped with a wireless adapter, you can use Access Point mode to create a wireless network among the computers. This is the simplest configuration mode for the Wireless Access Point.
Note: 4X mode is only enabled in Access Point mode.
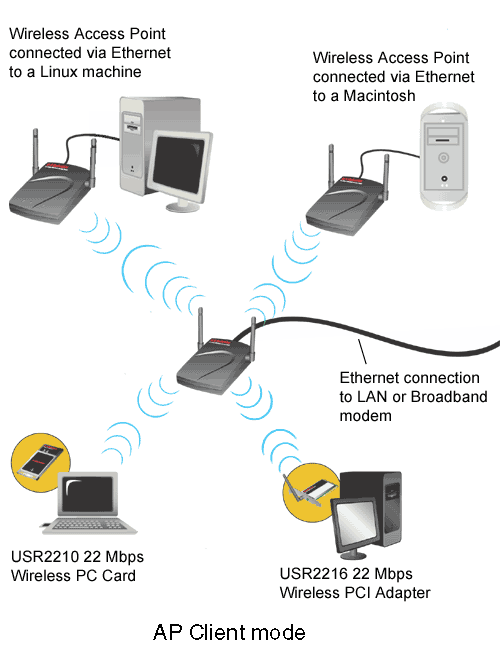
Access Point Client mode
Access Point Client mode is used to connect any computers that don't support wireless adapters. By connecting a Wireless Access Point to each of these machines via Ethernet, the Wireless Access Point can be used as a wireless adapter. An example of this would be if you had four computers not all using the same operating platform: two of them running Windows 2000 with wireless adapters installed, one running Mac OS9, and one running Linux. If you connect a Wireless Access Point to the Macintosh computer, one to the Linux computer, and one for both Windows computers, and then set each Wireless Access Point to Access Point Client mode, you could wirelessly network each of these computers together.
Note: If your Ethernet device or network adapter does not support auto-switching, you will need to use an Ethernet crossover cable to connect the Wireless Access Point in Access Point Client mode. Refer to the documentation for your Ethernet device or network adapter to see if it supports auto-switching.
Note: If you select Access Point Client mode, you will need to enter the MAC address for the remote Access Point.
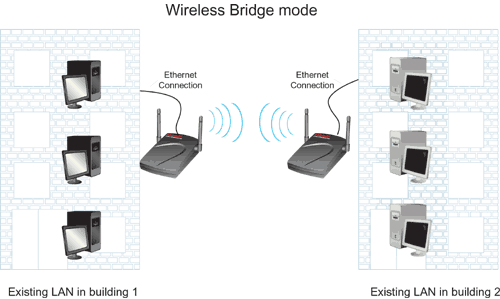
Wireless Bridge mode
Wireless Bridge mode is used to wirelessly connect two existing wired Local Area Networks (LANs). By connecting a Wireless Access Point to each LAN and selecting Wireless Bridge mode, the two Wireless Access Points will talk only with each other, creating a secure connection between the different networks.
Note: If you select Wireless Bridge mode, you will need to enter the MAC address for the remote Wireless Bridge.
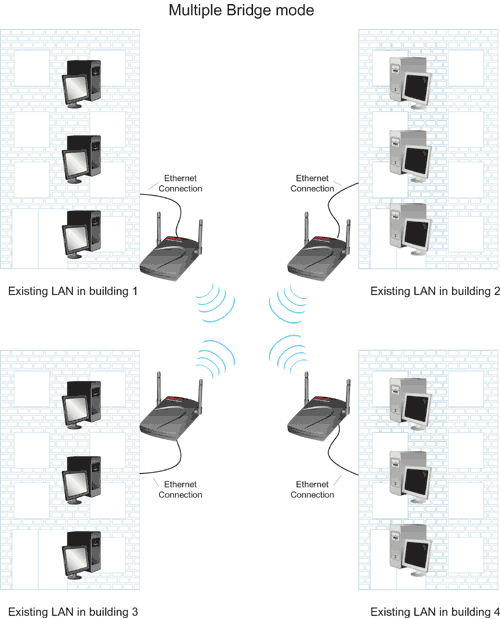
Multiple Bridge mode
Multiple Bridge mode is similar to Wireless Bridge mode, but it is used when you want to wirelessly connect more than two wired LANs. By connecting a Wireless Access Point to each LAN and selecting Multiple Bridge mode, the multiple Wireless Access Points will talk only with each other, creating a secure connection between the different networks.
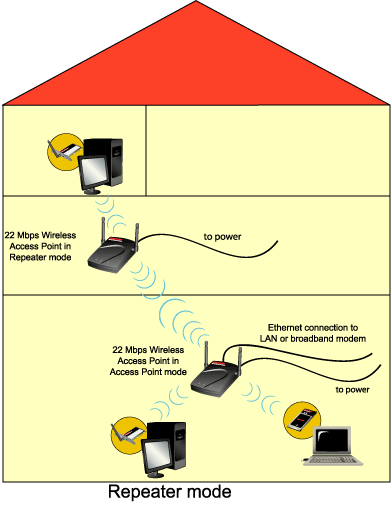
Repeater mode
If you have a wireless client that is positioned in your home or office and the transmission signals are weakened, you can use a 22 Mbps Wireless Access Point to boost the signal to and from the wireless clients. By placing the 22 Mbps Wireless Access Point between the two clients and selecting Repeater mode, the 22 Mbps Wireless Access Point will then fill in the gap in the transmission capabilities and pass any network information between the wireless clients.
To use a 22 Mbps Wireless Access Point in Repeater mode, you must first configure the Access Point using an Ethernet connection. After the Access Point has been configured for Repeater mode, remove the Ethernet connection, position the Access Point in the proper location, and plug in the power supply.
Note: Do not have any Ethernet cables connected after you have configured the 22 Mbps Wireless Access Point and are using it in Repeater mode.
In the Mode Setting area there is also the Advanced Setting button. Here you will have eight options for which you can enter information: Transmission Rates, Preamble Type, SSID Broadcast, Beacon Interval, RTS Threshold, Fragmentation Threshold, DTIM Interval, and Antenna Selection.
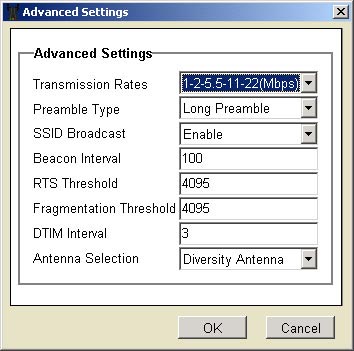
- For Transmission Rates, you can select 1-2 (Mbps), 1-2-5.5-11 (Mbps), or 1-2-5.5-11-22 (Mbps).
- In Preamble Type, you can select either Short Preamble or Long Preamble.
- In SSID Broadcast, you can select either Enable or Disable.
It is recommended that you select Disable to increase the security
of your network and that you change the SSID from the default. The SSID
is case-sensitive.
Note: If you disable SSID Broadcast, the correct information must be manually entered for each wireless client that needs to be connected to your wireless network. With SSID Broadcast disabled, wireless clients will not be able to scan and connect automatically to your wireless network.
- For Beacon Interval, RTS Threshold, Fragmentation Threshold, and DTIM Interval, you will need to supply the appropriate information.
- In Antenna Selection, you can select either Left Antenna, Right Antenna, or Diversity Antenna.
When you are done selecting or entering any information, click OK to return to the main screen.
In the Available AP area, you can see a list of all the 22 Mbps Wireless Access Points that are detected.
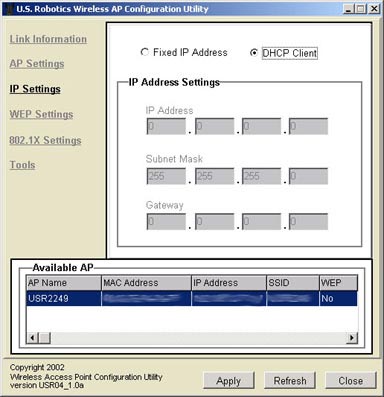
IP Settings
In the IP Settings section, you can select either Fixed IP Address or DHCP Client.
If you select DHCP Client, this information will be retrieved automatically. The Configuration Utility is set to DHCP Client by default.
Note: If you are not connected to an adapter or device that supports DHCP, the 22 Mbps Wireless Access Point will not obtain an IP Address. Without an IP Address, the 22 Mbps Wireless Access Point will still pass wireless network traffic between clients, but you will not be able to configure any of the settings.
If you select Fixed IP Address, you will then need to enter the following information: an IP Address, a Subnet Mask, and a Gateway.
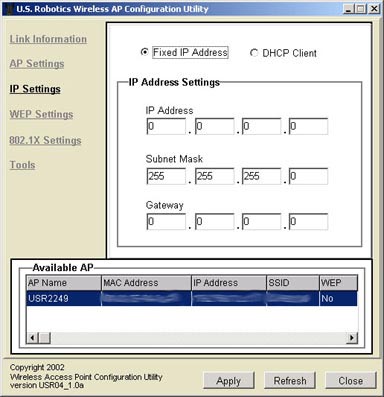
In the Available AP area, you can see a list of all the 22 Mbps Wireless Access Points that are detected.
WEP Settings

You can change the authentication mode by selecting the drop-down menu next to Auth. Mode. You can select from Auto Switch, Open Authentication, or Shared Authentication.
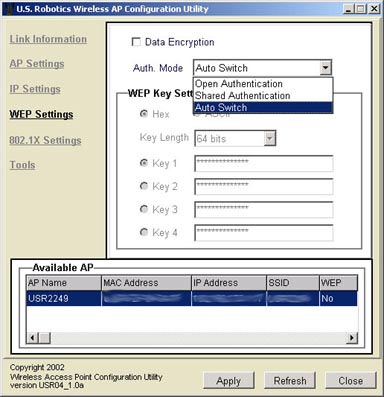
In the WEP Settings section, you can enable Data Encryption by selecting the checkbox at the top of the screen. If you select this, you will then need to enter a Passphrase. You will also need to select either Hex or ASCII in the WEP Key Setting window.
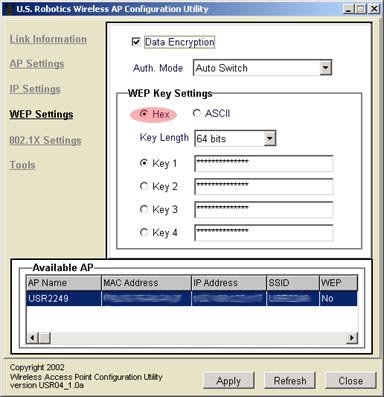
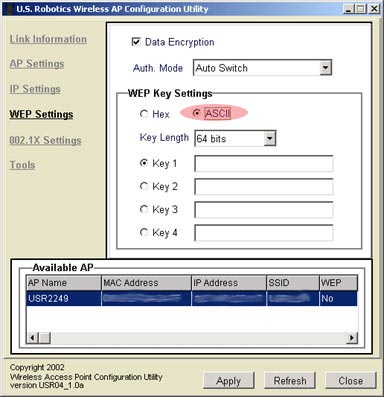
You will also need to select and enter the WEP Keys from one to four, and you will need to select the Key Length from 64 bits, 128 bits, or 256 bits.
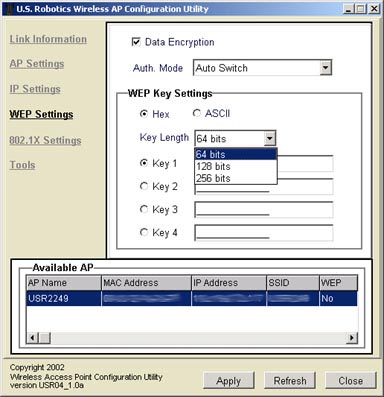
In the Available AP area, you can see a list of all the 22 Mbps Wireless Access Points that are detected.
Note: When 802.1X is enabled on your Access Point, you should select a maximum of 128 bit WEP encryption. Windows clients that have 802.1X enabled may not be able to take advantage of the 256 bit WEP encryption.
802.1X Settings
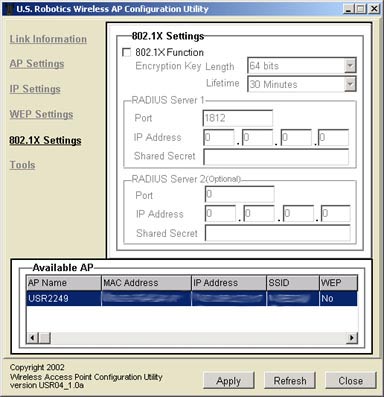
In the 802.1X Settings area, you can configure the 802.1X functions.
Note: If the Configuration Utility detects an Access Point that is not enabled for 802.1X, it is required that the firmware on that Access Point be updated. For the latest version of the firmware, please visit www.usr.com/support
Note: If your wireless clients are on a Microsoft network, WEP must be enabled.
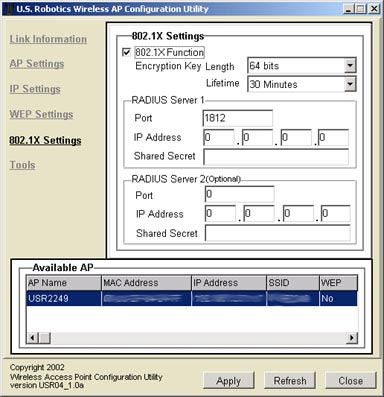
To enable 802.1X, select the box next to 802.1X Function.
You will then need to provide the information for RADIUS Server 1. This is the computer to which the 22 Mbps Wireless Access Point creates a secure connection. You will need to supply the IP Address of the Radius Server. You also need to supply a Port number for the Radius Server or use the default 1812. You will then need to provide the IP Address for the computer to which you are connecting. Next, you will need to provide the Shared Secret. This can be a word or a set of numbers and will be used as an additional form of security. Each 802.1X wireless client that will connect to the 22 Mbps Wireless Access Point must have the correct Shared Secret or the Access Point will be denied.
The use of RADIUS Server 2 is optional. These fields are used to enter the information for a backup server. If the server computer identified in RADIUS Server 1 is not working or does not respond, RADIUS Server 2 can be used so that you still have WLAN access.
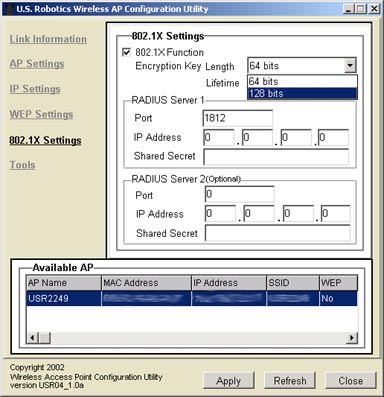
If you enable 802.1X, you will need to select an Encryption Key Length. You can choose either 64 bits or 128 bits. This will determine the level of encryption between the 22 Mbps Wireless Access Point and the Radius Server. This does not set the level of encryption for the WLAN.
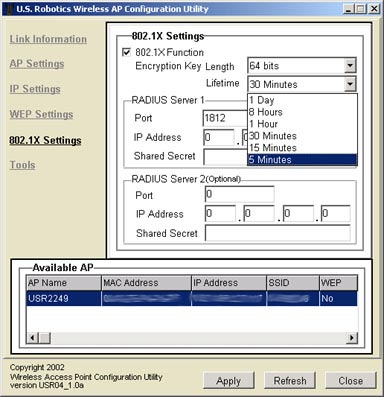
You will then need to select the Lifetime of the encryption. You can choose 5 Minutes, 15 Minutes, 30 Minutes, 1 Hour, 8 Hours, or 1 Day. This will determine how long the encryption will remain in effect.
Tools
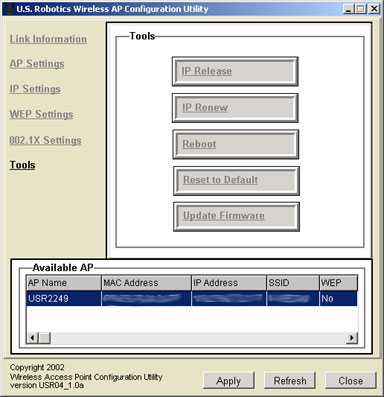
Within the Tools area, there are five options: IP Release, IP Renew, Reboot, Reset to Default, and Update Firmware.
If you need to release the IP Address of the 22 Mbps Wireless Access Point, click IP Release.
If you need renew the IP Address of the 22 Mbps Wireless Access Point, click IP Renew.
If the 22 Mbps Wireless Access Point stops responding, click Reboot and the 22 Mbps Wireless Access Point will restart.
If you need to restore the original settings of the 22 Mbps Wireless Access Point, click Reset to Default.
If you download any new firmware upgrades, click Update Firmware to implement the update.
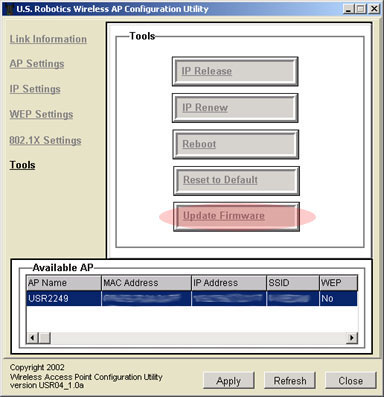
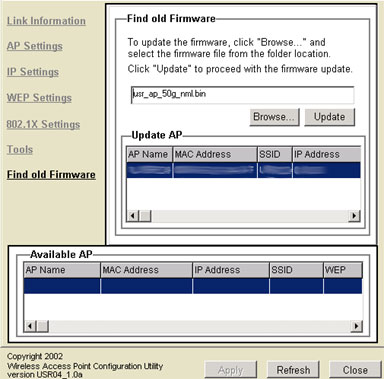
Click Browse to locate the new firmware file that you downloaded. When you locate the file, click Update.
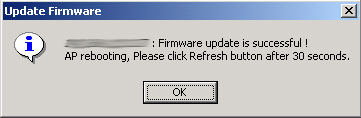
After the firmware is updated, click OK.
22 Mbps Wireless Access Point Web Configurator
After launching the 22 Mbps Wireless Access Point Configuration Utility, note the IP address of the 22 Mbps Wireless Access Point. Launch a Web browser and enter that IP address. This will launch the Web Configurator of the 22 Mbps Wireless Access Point.
There are seven sections to the Web Configurator: Status, Basic Setting, IP Setting, Advanced Setting, Security, 802.1x, and Tools. Every time you make a change to the configuration settings of the 22 Mbps Wireless Access Point, you must click Apply for the changes to take effect.
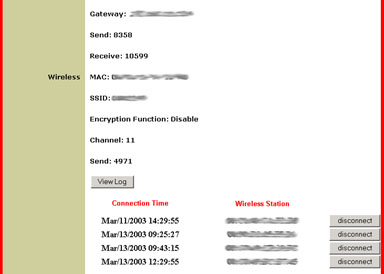
Status
Within Status, you can view the current network information for the 22 Mbps Wireless Access Point.
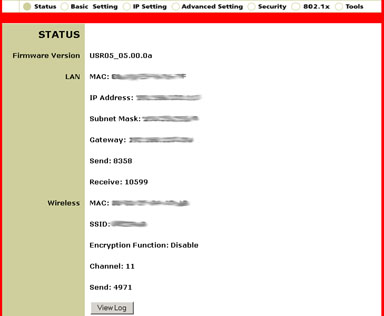
At the bottom of the Status screen you can see the wireless clients that are connected to the 22 Mbps Wireless Access Point. Next to each client listing will be a disconnect button. If you click disconnect, you will be prompted to enable the MAC filter option. Go to the Security screen, click Enable for the MAC Filter, and then select Only deny PCs with MAC listed below to access device. If you then return to the Status page and click disconnect for a client, that client's MAC Address will be added to the MAC Filter list on the Security page and that client will not be allowed to access your wireless network.
Basic Setting
In this section you can assign a name to the 22 Mbps Wireless Access Point, enter an SSID, and select a channel. You can choose a setting for the WEP key: Disable, 64bits, 128bits, or 256bits. You will need to select either Hex or ASCII in the Mode drop-down menu and enter the WEP Keys.
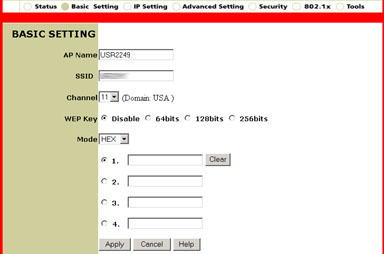
Note: It is recommended that you change
the SSID from the default. The SSID is case-sensitive. If you disable
SSID Broadcast, the correct information must be manually entered for each
wireless client that needs to be connected to your wireless network. With
SSID Broadcast disabled, wireless clients will not be able to scan and
connect automatically to your wireless network.
Note: When 802.1X is enabled on your Access Point, you should select a maximum of 128 bit WEP encryption. Windows clients that have 802.1X enabled may not be able to take advantage of the 256 bit WEP encryption.
IP Setting
In the IP Setting section you can select either Obtain Automatically or Fixed IP for the LAN IP. If you select Fixed IP, you will need to enter the Address, the Subnet Mask, and the Gateway. You can turn on or off the DHCP Server in this area. If you turn DHCP Server on, you will need to enter an IP Range and a DNS Server.
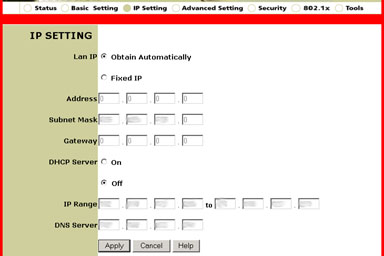
Note: If you are not connected to an adapter or device that supports DHCP, the 22 Mbps Wireless Access Point will not obtain an IP Address. Without an IP Address, the 22 Mbps Wireless Access Point will still pass wireless network traffic between clients, but you will not be able to configure any of the settings.
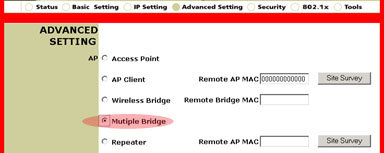
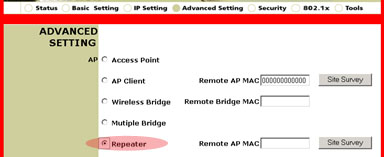
Advanced Setting
Only advanced users should change any of the configuration settings in this section.
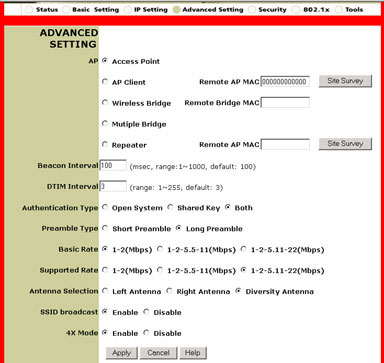
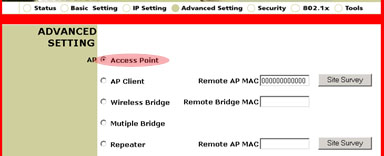
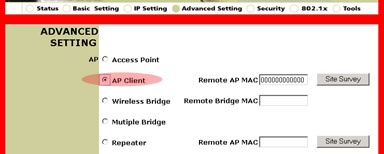
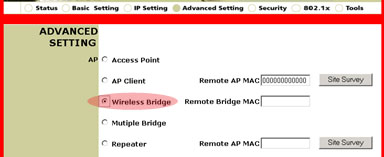
For AP mode, you can choose from the following:
- Access Point mode
- Access Point Client mode
- Wireless Bridge mode
- Multiple Bridge mode
- Repeater mode
Access Point mode
Access Point mode is used to connect up to 20 wireless clients. If you have up to 20 computers, each equipped with a wireless adapter, you can use Access Point mode to create a wireless network among the computers. This is the simplest configuration mode for the Wireless Access Point.
Note: 4X mode is only enabled in Access Point mode.
Access Point Client mode
Access Point Client mode is used to connect any computers that don't support wireless adapters. By connecting a Wireless Access Point to each of these computer via Ethernet, the Wireless Access Point can be used as a wireless adapter. An example of this would be if you had four computers not all using the same operating platform: two of them running Windows 2000 with wireless adapters installed, one running Mac OS9, and one running Linux. If you connect a Wireless Access Point to the Macintosh computer, one to the Linux computer, and one for both Windows computers, and then set each Wireless Access Point to Access Point Client mode, you could wirelessly network each of these computers together.
Note: If your Ethernet device or network adapter does not support auto-switching, you will need to use an Ethernet crossover cable to connect the Wireless Access Point in Access Point Client mode. Refer to the documentation for your Ethernet device or network adapter to see if it supports auto-switching.
Note: If you select Access Point Client mode, you will need to enter a MAC Address for the Access Point.
Wireless Bridge mode
Wireless Bridge mode is used to wirelessly connect two existing wired Local Area Networks (LANs). By connecting a Wireless Access Point to each LAN and selecting Wireless Bridge mode, the two Wireless Access Points will talk only with each other, creating a secure connection between the different networks.
Note: If you select Wireless Bridge mode, you will need to enter a MAC Address for the Wireless Bridge.
Multiple Bridge mode
Multiple Bridge mode is similar to Wireless Bridge mode, but is used when you want to wirelessly connect more than two wired LANs. By connecting a Wireless Access Point to each LAN and selecting Multiple Bridge mode, the multiple Wireless Access Points will talk only with each other, creating a secure connection among the different networks.
Repeater mode
If you have a wireless client that is positioned in your home or office and the transmission signals are weakened, you can use a 22 Mbps Wireless Access Point to boost the signal to and from the wireless clients. By placing the 22 Mbps Wireless Access Point between the two clients and selecting Repeater mode, the 22 Mbps Wireless Access Point will then fill in the gap in the transmission capabilities and pass any network information between the wireless clients.
To use a 22 Mbps Wireless Access Point in Repeater mode, you must first configure the Access Point using an Ethernet connection. After the Access Point has been configured for Repeater mode, remove the Ethernet connection, position the Access Point in the proper location, and plug in the power supply.
Note: Do not have any Ethernet cables connected after you have configured the 22 Mbps Wireless Access Point and are using it in Repeater mode.
For Beacon Interval, RTS Threshold, Fragmentation Threshold, and DTIM Interval, you will need to supply the appropriate information.
For Transmission Rates, you can select 1-2 (Mbps), 1-2-5.5-11 (Mbps), or 1-2-5.5-11-22 (Mbps).
In Authentication Type, you can select Open System, Shared Key, or Both.
In Preamble Type, you can select Short Preamble or Long Preamble.
In Basic Rate, you can select 1-2 (Mbps), 1-2-5.5-11 (Mbps), or 1-2-5.5-11-22 (Mbps).
In Antenna Selection, you can select Left Antenna, Right Antenna, or Diversity Antenna.
In SSID Broadcast, you can select either Enable or Disable.
It is recommended that you select Disable to increase the security
of your network and that you change the SSID from the default. The SSID
is case-sensitive.
Note: If you disable SSID Broadcast,
the correct information must be manually entered for each wireless client
that needs to be connected to your wireless network. With SSID Broadcast
disabled, wireless clients will not be able to scan and connect automatically
to your wireless network.
Security
Within the Security section, you can change the security information for the 22 Mbps Wireless Access Point.
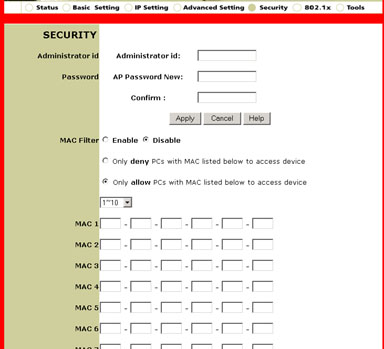
You can enter an Administrator ID and a Password. If you create these, you must click Apply for the settings to take effect.
You can select either Enable or Disable for the MAC filter. If you enable the MAC filter, you can enter the MAC addresses of computers that you do not want to connect with the 22 Mbps Wireless Access Point.
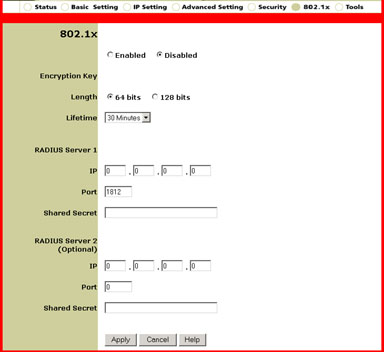
802.1x
In the 802.1x Settings area, you can configure the 802.1x functions.
Note: If the Configuration Utility detects an Access Point that is not enabled for 802.1X, it is required that the firmware on that Access Point be updated. For the latest version of the firmware, please visit www.usr.com/support
Note: If your wireless clients are on a Microsoft network, WEP must be enabled.
Select Enabled to activate the 802.1x features. Select Disabled to turn them off.
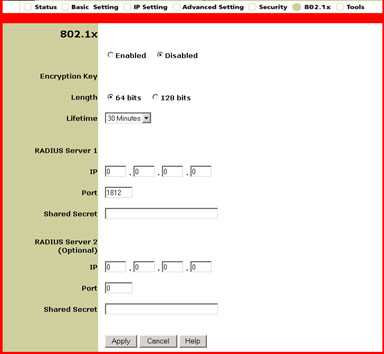
If you enable 802.1X, you will need to select an Encryption Key Length. You can choose either 64 bits or 128 bits. This will determine the level of encryption between the 22 Mbps Wireless Access Point and the Radius Server. This does not set the level of encryption for the WLAN.
You will then need to select the Lifetime of the encryption. You can choose 5 Minutes, 15 Minutes, 30 Minutes, 1 Hour, 8 Hours, or 1 Day. This will determine how long the encryption will remain in effect.
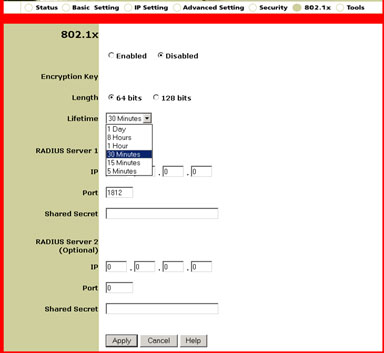
You will then need to provide the information for RADIUS Server 1. This is the computer to which the 22 Mbps Wireless Access Point creates a secure connection. You will need to supply the IP Address of the Radius Server. You also need to supply a Port number for the Radius Server or use the default 1812. You will then need to provide the IP Address for the computer to which you are connecting. Next, you will need to provide the Shared Secret. This can be a word or a set of numbers and will be used as an additional form of security. Each 802.1X wireless client that will connect to the 22 Mbps Wireless Access Point must have the correct Shared Secret or the Access Point will be denied.
The use of RADIUS Server 2 is optional. These fields are used to enter the information for a backup server. If the server computer identified in RADIUS Server 1 is not working or does not respond, RADIUS Server 2 can be used so that you still have WLAN access.
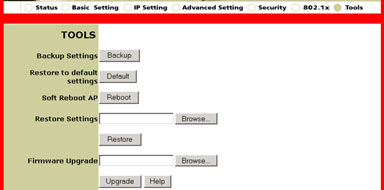
Tools
Within the Tools section, you can save the settings of your 22 Mbps Wireless Access Point by clicking Backup.
If you want to restore the default settings of the 22 Mbps Wireless Access Point, click Default.
If the 22 Mbps Wireless Access Point stops responding, click Reboot and the 22 Mbps Wireless Access Point will restart.
If you change your settings and want to retrieve your saved settings, you can click Browse to locate the saved file. Once you locate the saved file, click Restore.
If a new firmware version is made available and you have downloaded it, click Browse next to Firmware Upgrade to locate the correct version file. When you have located it, click Upgrade to implement the new firmware.
![]()