Installing JUST the Wireless MAXg USB Adapter
During the Installation procedure, you may be prompted for your Windows Operating
system CD-ROM. Make sure you have it available in case you need it.
For the most updated information, visit: http://www.usr.com/support
Be sure to find out what letter your CD-ROM drive uses before you begin installing
your new product. You will need to know this to properly install your software.
Step One: Install the Wireless MAXg USB Adapter and drivers
- Insert the USB Adapter Installation CD-ROM into the CD-ROM drive of the
computer you are installing the USB Adapter in. The Installation CD Graphical
User Interface (GUI) will appear on your screen. If prompted, select your
preferred language.
Note: If your CD-ROM does not automatically launch, click Windows Start,
Run, type D:\setup (if your CD-ROM drive uses a different letter,
type that letter in place of “D”), and click OK.
- Click Installation.
- Follow the on-screen instructions.
Note: You will need to install this Installation CD-ROM on all the
PCs on which you plan to install Wireless MAXg USB Adapters.
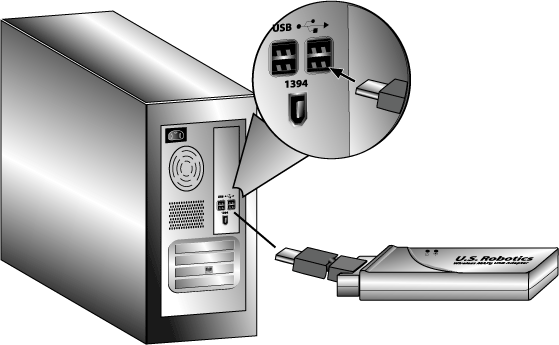
- When prompted, locate an available USB port and fully insert the Wireless
MAXg USB Adapter.

Note: You may receive a “Digital Signature Not Found” or
“Windows Logo testing” screen. Click Yes or Continue Anyway.
U.S. Robotics has thoroughly tested this driver in conjunction with the supported
hardware and has verified compatibility with Windows 2000 and XP. Because
U.S. Robotics wants its customers to take full advantage of the network card’s
functionality, it has made the drivers available.
- When prompted, click Restart to restart your computer.
Step Two: Connect to a Wireless Network
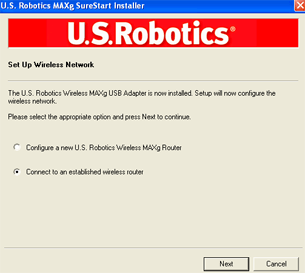
- After your computer restarts and you are prompted, select Connect to
an established wireless router and click Next. You will need to
wait while the Wireless MAXg USB Adapter looks for available wireless
networks.

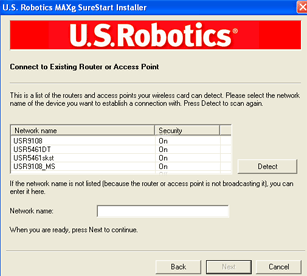
- A list of available wireless networks will appear on the “Connect to
Existing Router or Access Point” screen.

- Select the appropriate wireless network and click Next.
Note: If the wireless network device does not appear in the list,
you can enter the name of the network under Network name. One reason
the wireless network device may not appear is if Broadcast Network name
is disabled in your wireless router or access point. You can also click
Detect and your Wireless MAXg USB Adapter will search the
area again for available wireless networking devices.
- Configuration information for that network will appear. If the network specified
is not secure, the “Installation Complete” screen will appear. Click
Finish. If you have specific security settings enabled on the wireless
network to which you will be connecting, such as WEP or WPA2, you will need
to select your security type and click Next. Enter the appropriate
security information on the next screen and click Next.
- Click Finish. If prompted when the setup is complete, restart your
computer.
Congratulations!
You have finished installing your product! The Wireless MAXg USB Adapter
should be connected to the wireless network that you selected.
If you experience any problems connecting to a wireless network, refer to the
Troubleshooting section in
this guide for more information.
Configuration Utility
For more information regarding the Configuration Utility, go to the Configuration
Utility section of this user guide.
Register your product
Register your product online at http://www.usr.com/productreg


