Start the router configuration pages by opening a Web browser and typing 192.168.2.1
Do one of the following:
-
Assign a static IP address to the computer, in the same subnet as your gateway's management IP address. This must be done on the computer within the network connection settings. The router uses DHCP to assign IP addresses, and depending on your network the computer may get a different IP address and the rules you have created will not apply to the new IP address. It is also recommended to use Static IP addresses which are outside the DHCP Pool of the router.
(For this example, the Default Management IP address for your gateway is 192.168.2.1. The Subnet mask should be 255.255.255.0, and Gateway IP address is 192.168.2.1.)
-
Determine the IP address of the client you want to block from having Internet access by locating the appropriate device listed under Clients in the client list on the Status page (for example, 192.168.2.10).

-
If you want to set the rule up to apply to multiple computers or devices that are within a select range of IP addresses, you can use that range (for example, 192.168.2.10 to 192.168.2.20).
Set the time on your router.
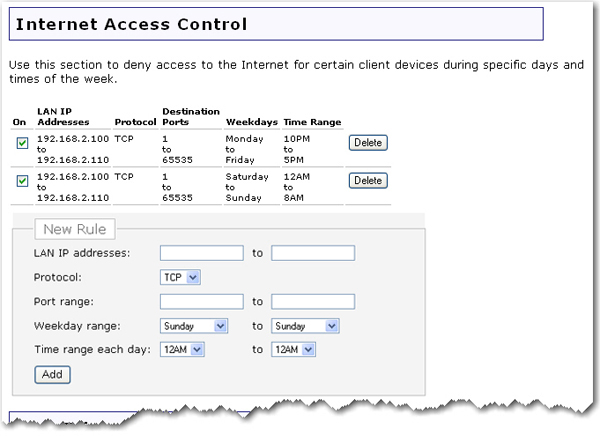
Click the Firewall tab and scroll down to the Internet Access Control area.

Do one of the following:
If you are creating the rule for a single IP address, enter the IP address of the device in both of the LAN IP addresses fields. Example: 192.168.2.10 and 192.168.2.10.
If you are creating the rule for a range of IP addresses, enter the range of IP address of the devices in the LAN IP addresses field. Example: 192.168.2.10 and 192.168.2.20.
Select TCP as the appropriate Protocol for the client.
The specific port range of 1-65535 will block all Internet access for the client. Enter 1 in the first Port range field and 65535 in the second port range field.
To apply the rule for all weekdays: For Weekday range, select Monday in the first field and Friday in the second field. If you want a different range, you can select different days. If you want the control to be effective for one day, you would select the same day in each field.
To apply the rule for weekdays or weekends: You can set up the rules to apply to any range of days, for example Sunday through Thursday night for when your children have school the next morning, and Friday through Saturday for weekend nights when they may be allowed to stay up later. In this case you would need to select Saturday and Sunday for Weekday range, and continue to set up the rule.
For Time range each day, select 9PM in the first field and 6AM in the second field. If you want a different time range, you can make different selections in each field.
When you are finished, click Add.
If you want to restrict the access for any additional clients, repeat steps 1 through 10 for each additional client.
Click Save at the bottom of the page when you are finished. The changes you just made are now in effect.