
Contents:
About the 802.11g Wireless Turbo PC Card and PCI Adapter
Network Configuration and Planning
Adapter Installation and Configuration for Windows 98 SE/2000/Me/XP
802.11g Wireless Turbo Configuration Utility
Product Specifications for 802.11g Wireless Turbo PC Card and PCI Adapter
802.11g Wireless Turbo PC Card and PCI Adapter User Guide
Adapter Installation and Configuration for Windows 98 SE/2000/Me/XP
Select your product above or scroll down for the appropriate instructions.
SYSTEM REQUIREMENTS
In order to install and use the 802.11g Wireless Turbo PC Card or PCI Adapter, your PC system must meet the following requirements:
- PC with Pentium processor or equivalent,100 MHz or faster
- 64 MB RAM (or greater as recommended by your operating system)
- 500K available hard disk space for utility and driver installation
- Available PC Card CardBus Type II slot (for Wireless Turbo PC Card)
- Available PCI 2.1/2.2 slot (for Wireless PCI Adapter)
- Windows 98SE/Me/2000/XP operating system
- CD-ROM drive

802.11g Wireless Turbo PCI Adapter Installation
Prepare for installation
Note: Your product number is USR5416. It is very important that you have your serial number written down before you install the 802.11g Wireless Turbo PCI Adapter. You can find your serial number on the label of the 802.11g Wireless Turbo PCI Adapter and on the side of the package. If you ever need to contact our Technical Support department, you will need this number to receive assistance.
Note: Be sure to find out what letter your CD-ROM drive uses before you begin installing your new product. You will need to know this to properly install your software.
Note: During the Installation procedure, you may be prompted for your Windows Operating system CD-ROM. Make sure you have it available in case you need it.
1. Install your software and drivers*
Turn on your computer. Insert the Installation CD into your CD-ROM drive.
Note: If your CD-ROM does not automatically launch, click Windows Start, Run, type D:\setup (if your CD-ROM drive uses a different letter, type that letter in place of "D"), and click OK.
The Installation CD Graphic User Interface (GUI) will appear on your screen. If prompted, select your preferred language.
Some files will be copied to your system, and then you will be asked to read the license agreement. Read the agreement and click Yes. Select your product and then click Software.
Note: You will need to install the drivers and utilities on each computer on which you plan to install hardware.
Click Wireless Card Utility and Drivers. Follow the on-screen instructions. When you are prompted to restart your computer, select No, I will restart my computer later and click Finish. Close the Installation CD-ROM Graphic User Interface (GUI). When your desktop returns, shut down your computer.
2. Install the 802.11g Wireless Turbo PCI Adapter*
Make sure your computer is turned off and unplugged. Remove the computer’s
cover. With the computer turned off, locate an available PCI slot and
remove the slot cover screw or clip. Remove the slot cover and insert
the 802.11g Wireless Turbo PCI Adapter. PCI slots are typically white
plastic lined with metal and are 3.5 inches long. Secure the 802.11g Wireless
Turbo PCI Adapter with the previously removed screw or clip. Replace the
computer’s cover and turn on your computer.
Note: It can be tricky getting the 802.11g Wireless Turbo PCI Adapter into the PCI slot. You may need to remove the antenna in order to place the 802.11g Wireless Turbo PCI Adapter into the PCI slot. Use firm pressure to seat the 802.11g Wireless Turbo PCI Adapter properly. If you experience any problems inserting the 802.11g Wireless Turbo PCI Adapter, try inserting it in a different PCI slot.
When Windows detects the new hardware, click Next. Follow the on-screen instructions to complete the installation procedure. If you are prompted, restart your computer.
Note: If you are prompted at any time for your Windows Operating System CD-ROM, remove the USRobotics Installation CD-ROM and insert your Windows CD-ROM into the CD-ROM drive. When all of the files are copied, remove the Windows CD-ROM, and reinsert the USRobotics Installation CD-ROM.
*A “Digital Signature Not Found” screen may appear. Click Yes or Continue Anyway. USRobotics has thoroughly tested in conjunction with the supported hardware and has verified compatibility with Windows 2000/XP.
3. Configure the basic connection settings
Congratulations! You have finished installing your hardware and your drivers! The 802.11g Wireless Turbo PCI Adapter will connect to an existing wireless network or other wireless networking products in the area.
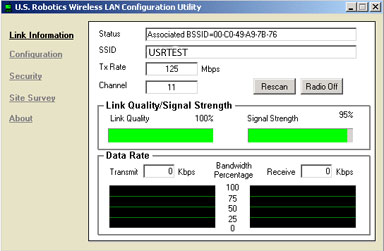
You should now see a small icon for the Configuration Utility in the system tray by your clock on your computer desktop. The Configuration Utility is used to change or verify the configuration information that relates to your 802.11g Wireless Turbo PCI Adapter. The Configuration Utility icon will be colored to indicate the status of your wireless network: red for disconnected, yellow for connected with poor quality, and green for connected with good quality.
![]()
![]()
![]()
You must now configure each computer that has a 802.11g Wireless Turbo PCI Adapter in order to share Internet connectivity, files, and a printer. Refer to the User Guide on the Installation CD-ROM for this information.
802.11g Adhoc mode is used for peer-to-peer network configurations. Infrastructure mode is used to connect to a Wireless Access Point. Each 802.11g Wireless Turbo PCI Adapter in the wireless network must have the correct mode selected within the Configuration Utility.
For troubleshooting and technical support information, refer to the Troubleshooting section of this User Guide.
 Register your
product
Register your
product
- At the Installation CD-ROM interface, click the Support link.
Click Product Registration and then click http://www.usr.com/productreg
If the Installation CD-ROM interface does not run automatically, click
Windows Start and then click Run. In the “Run”
dialog box, type D:\setup.exe. If your CD-ROM drive uses a different
letter, type that letter in place of “D.”
- Or register your product online at http://www.usr.com/productreg
![]()
802.11g Wireless Turbo PC Card Installation
Prepare for software installation
Turn on your laptop computer. Type your password if you are prompted to do so.
Note: Your product number is USR5410. It is very important that you have your serial number written down before you install the 802.11g Wireless Turbo PC Card. You can find your serial number on the back label of the 802.11g Wireless Turbo PC Card and on the side of the package. If you ever need to call our Technical Support department, you will need this number to receive assistance.
Note: Be sure to find out what letter your CD-ROM drive uses before you begin installing your new product. You will need to know this to properly install your software.
Note: During the Installation procedure, you may be prompted for your Windows Operating system CD-ROM. Make sure you have it available in case you need it.
1. Install your software and drivers
Note: You will need to install the drivers and utilities on each computer on which you plan to install hardware.
Insert your USRobotics Installation CD-ROM into your CD-ROM drive.
Note: If your CD-ROM does not automatically launch, click Windows Start, Run, and type D:\setup (if your CD-ROM drive uses a different letter, type that letter in place of "D") and click OK.
The Installation CD Graphic User Interface (GUI) will appear on your screen. If prompted, select your preferred language.
Some files will be copied to your system, and then you will be asked to read the license agreement. Read the agreement and click Yes. Select your product and then click Software.
Click Wireless Card Utility and Drivers. Follow the on-screen instructions and wait for some files to be copied to your hard drive. A window will appear showing you the files that are being loaded onto your system. If you are prompted to restart your computer, close all open applications, select Yes, I want to restart my computer now, and then click Finish.
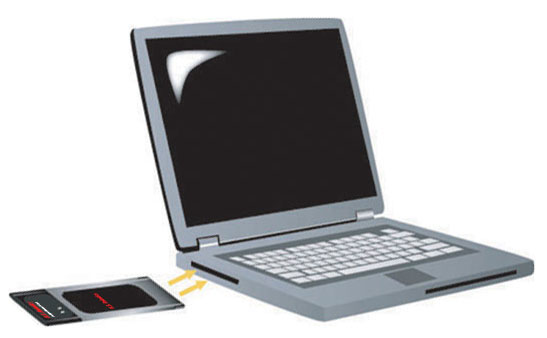
2. Insert the 802.11g Wireless Turbo PC Card into your computer*
Locate an available PC Card slot and fully insert the 802.11g Wireless Turbo PC Card. PC Card slots are typically on the side of laptops. You should hear a beep when the 802.11g Wireless Turbo PC Card is fully inserted and detected.
When Windows detects the new hardware, click Next. Follow the on-screen
instructions to complete the installation procedure. If you are prompted,
restart your computer.
Note: If you are prompted at any time for your Windows Operating System CD-ROM, remove the USRobotics Installation CD-ROM and insert your Windows CD-ROM into the CD-ROM drive. When all of the files are copied, remove the Windows CD-ROM, and reinsert the USRobotics Installation CD-ROM.
*A “Digital Signature Not Found” screen may appear. Click Yes or Continue Anyway. USRobotics has thoroughly tested in conjunction with the supported hardware and has verified compatibility with Windows 2000/XP.
Congratulations! You have finished installing your hardware and your drivers! The 802.11g Wireless Turbo PC Card will connect to an existing wireless network or other wireless networking products in the area.
You should now see a small icon for the Configuration Utility in the system tray by your clock on your computer desktop. The Configuration Utility is used to change or verify the configuration information that relates to your 802.11g Wireless Turbo PC Card. The Configuration Utility icon will be colored to indicate the status of your wireless network: red for disconnected, yellow for connected with poor quality, and green for connected with good quality.
![]()
![]()
![]()
You must now configure each computer that has a 802.11g Wireless Turbo PC Card in order to share Internet connectivity, files, and a printer. Refer to the User Guide on the Installation CD-ROM for this information.
802.11g Adhoc mode is used for peer-to-peer network configurations. Infrastructure mode is used to connect to a Wireless Access Point. Each 802.11g Wireless Turbo PC Card in the wireless network must have the correct mode selected within the Configuration Utility.
For troubleshooting and technical support information, refer to the Troubleshooting section of this User Guide.
Register your
product
- At the Installation CD-ROM interface, click the Support link.
Click Product Registration and then click http://www.usr.com/productreg
If the Installation CD-ROM interface does not run automatically, click
Windows Start and then click Run. In the “Run”
dialog box, type D:\setup.exe. If your CD-ROM drive uses a different
letter, type that letter in place of “D.”
- Or register your product online at http://www.usr.com/productreg
![]()