
Contents:
About the 802.11g Wireless Gaming Adapter and Ethernet Bridge
Accessing the Web User Interface and Site Survey
Web User Interface and Security Configuration
Troubleshooting and Support >
802.11g Wireless Gaming Adapter and Ethernet Bridge User Guide
Troubleshooting and Support
If at any time you are asked to access your Web User Interface in any of the Troubleshooting solutions, follow the steps below to do so:
- Attach the antenna to the back of the 5430.
- Plug the AC power adapter into the 12VDC jack on the back of the 5430.
- Insert a pin or paperclip to press the reset button momentarily (less than 2 seconds). The reset button is located on the back of the 5430.
- Connect one end of the included Ethernet cable to the port on the
back of the 5430. Connect the other end to the Ethernet port on your
computer. Open an Internet browser and enter http://192.168.1.201
Note: If your search for the device times-out or you did not get a dialog box for the username and password, you may need to refresh the IP settings on your computer. Follow the steps below for your operating system to refresh the IP settings on your computer. Once complete, access the 5430 using your browser. - Enter your user name and password. The default username is admin. The default password is admin. Press Enter on your keyboard.
- The Web User Interface will appear. Select Client Mode or Ad Hoc Mode and click Next. Type your wireless network SSID in the SSID field, select the corresponding Data Encryption, Authentication, and Network Key, if applicable. Click Save. A Your 5430 is configured message will appear. Click Continue.
- Once you have configured your 5430, remove the Ethernet cable from your computer and connect to the Ethernet port on your gaming console or your Ethernet-ready device.
Windows 95, 98, or Me Users:
Click Windows Start and then Run. Type winipcfg
and click OK. Check the IP address (default is 192.168.1.202),
Subnet Mask (default is 255.255.255.0), and Default Gateway (default
is 192.168.1.201) to make sure they are correct. If the information
is not correct, click Release All and then click Renew All.
Open an Internet browser and enter http://192.168.1.201
Windows NT, 2000, or XP Users:
Click Windows Start and then Run. Type cmd and
click OK. At the DOS prompt, type ipconfig /all. Check
the IP address (default is 192.168.1.202), Subnet Mask (default is 255.255.255.0),
and Default Gateway (default is 192.168.1.201), to make sure they are
correct. If the information is not correct, type ipconfig /release
and press Enter. Then, type ipconfig /renew and press
Enter. Open an Internet browser and enter http://192.168.1.201
I am experiencing poor link quality in some areas of my home or office.
Possible Solution:
For Client Mode users:
Try changing channels on your wireless router. For more information regarding
the use of channels, refer to your wireless router or access points documentation.
For Ad Hoc users:
To change and select the channel of your choice, access the Web User Interface
by opening an Internet browser and entering http://192.168.1.201
in the address field. Select the Wireless tab. Select the corresponding
channel from the Channel pull-down menu and click Apply. Be sure the channel
selected on your 5430 matches the channel on your other ad hoc device.
I am unable to access the 5430's Web User Interface pages.
Possible Solution:
Verify your Power LED and Ethernet LED are illuminated. If the power light
is not illuminated, verify your AC power adapter is properly connected
and that your Ethernet cable is properly connected as well.
Possible Solution:
To access the Web User Interface pages, you must put the 5430 in Configuration
Mode. To do so, insert a pin or paperclip to press the reset button momentarily
(less than 2 seconds). The reset button is located on the back of the
5430. Open an Internet browser and enter http://192.168.1.201 If
you are not able to access the Web User Interface pages, release and renew
your IP address in your computer. Refer to the Ping Procedure located
in the Troubleshooting section of this User Guide.
Possible Solution:
Set up a Static IP address on your computer in the 192.168.1.x network
(e.g. 192.168.1.202).
How can I tell what network I'm associated to?
Possible Solution:
To determine what network youre associated to, follow the steps below:
- Access the Web User Interface. Select Client Mode and click Next. The settings of the network you are associated to will appear. These settings must match the settings of your wireless router or access point. Refer to the wireless router or access points documentation to check your network settings.
- Once you have checked your 5430 settings, remove the Ethernet cable from your computer and connect to the Ethernet port on your gaming console or your Ethernet-ready device.
Possible Solution:
To further determine what network youre associated to and which network
you can use, access the Web User Interface. Select the Status tab.
The following screen will appear:
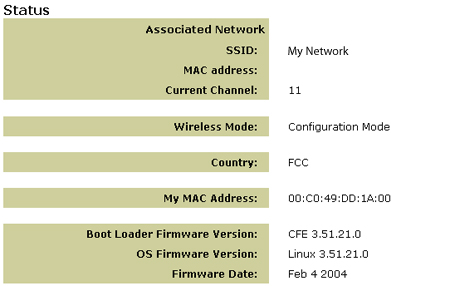
The network you are associated to will display its SSID name. The MAC address will display the MAC address of the wireless router or access point. If you cannot associate with your wireless router or access point, you will receive a Device is not associated message.
How do I change my network association?
Possible Solution:
To change your network association, follow the steps below:
- Access the Web User Interface.
- Select Client mode and click Next. The settings of the network you are associated to will appear. These settings must match the settings of your wireless router. Enter the SSID of the wireless router or access point you would like to associate with. Refer to the wireless routers documentation to check your network settings.
- Once you have changed your 5430 settings, remove the Ethernet cable from your computer and connect to the Ethernet port on your gaming console or your Ethernet-ready device.
Possible Solution:
Access the Web User Interface. Select the Setup tab. Follow the
on-screen instructions to configure your 5430. Or, select the Tools
tab and click Site Survey. A separate window will appear displaying
the SSID (the network names) of each wireless router and access point
within range. Select your wireless network SSID and click Select.
Wait about 15 seconds in order for the device to reboot and click Continue.
The Status page will appear. Your 5430 should now be associated to your
wireless network.
I have configured my 5430 but I still cannot game online using the Internet.
Possible Solution:
Be sure that the Ethernet cable to your 5430 is connected into the Ethernet
port on your gaming console.
Possible Solution:
You may need to have an online gaming kit for your gaming console. Be
sure to check your gaming console documentation for the necessary hardware
and network set up. Or, you may need to register with an online gaming
provider.
Possible Solution:
Once you have configured your 5430, you still need to configure your gaming
console. Refer to your gaming consoles documentation for specific configuration
instructions.
The wireless LED is not on.
Possible Solution:
If the wireless LED is not illuminated you obviously do not have a wireless
signal. Verify your AC power adapter is properly connected. Access the
Web User Interface pages by opening an Internet browser and entering http://192.168.1.201
in the address field. Select the Advanced tab. Verify that the
Radio field is Enabled. If it is not, select Enabled and click
Apply.
Possible Solution:
Access the Web User Interface. Select the Tools tab and click Site
Survey. A separate window will appear displaying the SSID (the network
names) of each wireless router and access point within range. Select your
wireless network SSID and click Select. Wait about 15 seconds in
order for the device to reboot and click Continue. The Status page
will appear. Your 5430 should now be associated to your wireless network.
My wireless router does not appear in the site survey window when I perform a site survey.
Possible Solution:
You may be on a computer that is physically too far away from your wireless
router or access point. Try moving closer to the wireless router or access
point and repeating the scan procedure.
Possible Solution:
Your wireless router or access point may have its SSID broadcast disabled.
You need to enable the SSID broadcast on your wireless router or access
point. Refer to your wireless router or access points documentation for
specific information regarding your network SSID. Once you have enabled
your SSID to broadcast, access the Web User Interface pages by opening
an Internet browser and entering http://192.168.1.201 in the address
field. Select the Tools tab. Select Site Survey. The SSID
of your network should appear.
Troubleshooting Ping Procedure.
Try performing the ping procedure to make sure you can connect with different areas of the wireless network and the internet. If at any time during the ping procedure you do not receive a return message for a successful ping, this means that you cannot connect to that IP address. After you have made the corrections, continue with the ping procedure.
- Click Windows Start and then click Run. In the Run dialog box, Windows 98 and Me users should type command and click OK. Windows 2000 and XP users should type cmd and click OK.
- At the command prompt, type Ping 127.0.0.1. This is your local host address and this will ensure that the TCP/IP protocol is installed and functioning properly. If you cannot complete this ping, reinstall the TCP/IP protocol on your computer. Refer to your operating systems documentation for instructions.
- Type Ping followed by your IP address. This will ensure that your computer is responding to requests.
- Type Ping followed by your gateway address to check the communication with your wireless router or access point. This will ensure that you can connect to the wireless network. If you cannot complete this ping, make sure your wireless settings are correct.
- Type Ping followed by the outside Internet address that is provided by your ISP. This procedure will ensure that your wireless network can connect to the Internet. If you cannot complete this ping, verify your internet connection between your modem and your wireless router or access point.
- Type Ping followed by your known DNS server address. This will allow you to resolve valid Internet host names to IP addresses and to verify that you can access the Internet.
Register your product
Register your product online at http://www.usr.com/productreg
| Country | Telephone | Online | Support Hours |
| Austria | 07110 900116 | http://www.usr.com/emailsupport/de | 7:45 - 16:45, Monday - Friday |
| Belgium (Flemish) (French) |
+32 (0) 7 023 3545(Flemish)
+32 (0) 7 023 3546(French) |
emea_modemsupport@usr.com | 9:00 - 18:00, Monday - Friday |
| Denmark | +45 70 10 4030 | emea_modemsupport@usr.com | 9:00 - 17:00, Monday - Friday |
| Finland | +358 981710015 | emea_modemsupport@usr.com | 10:00 - 18:00, Monday - Friday |
| France | +33 082 507 0693 | http://www.usr.com/emailsupport/fr | 8:00 - 17:00, Monday - Friday |
| Germany | 0180 567 1548 | http://www.usr.com/emailsupport/de | 7:45 - 16:45, Monday - Friday |
|
Hungary |
emea_modemsupport@usr.com | 8:00 - 18:00, Monday - Friday | |
| Ireland | +44 870 844 4546 | emea_modemsupport@usr.com | 8:45 - 17:45, Monday - Friday |
| Italy | +848 80 9903 | http://www.usr.com/emailsupport/it | 8:00 - 17:00, Monday - Friday |
| Luxembourg | +352 342 080 8318 | emea_modemsupport@usr.com | 9:00 - 18:00, Monday - Friday |
| Middle East/Africa | +971 4 807 4555 | me_modemsupport@usr.com | 9:00 - 18:00, Monday - Friday |
| Netherlands | 0900 202 5857 | emea_modemsupport@usr.com | 9:00 - 18:00, Monday - Friday |
| Norway | +47 23 50 0097 | emea_modemsupport@usr.com | 9:00 - 17:00, Monday - Friday |
| Poland | usrsupport@usrobotics.ru | 8:00 - 18:00, Monday - Friday | |
| Portugal | +35 11 415 4034 | http://www.usr.com/emailsupport/pt | 8:00 - 17:00, Monday - Friday |
| Russia | 8-800-200- 200-1 |
usrsupport@usrobotics.ru | 9:00 - 19:00, Monday - Friday |
| Spain | 902 11 7964 | http://www.usr.com/emailsupport/es | 8:00 - 17:00, Monday - Friday |
| Switzerland | 0848 840 200 | emea_modemsupport@usr.com | 7:45 - 16:45, Monday - Friday |
| Sweden | +46 (0) 77 128 1020 | emea_modemsupport@usr.com | 8:45 - 17:45, Monday - Friday |
| United Kingdom | 0870 8444 546 | http://www.usr.com/emailsupport/uk | 8:45 - 17:45, Monday - Friday |
For current support contact information, go to the following Web site:
http://www.usr.com/emailsupport
![]()