The Wireless USB Print Server supports a number of printing methods:
Peer-to-peer Printingmeans that the print jobs are stored (queued) on your computer, and sent directly to the Wireless USB Print Server when it is available.
Windows SMB Printing is a Microsoft standard for using a Network Printer. No additional software needs to be installed on your Windows computer, and printing from MS-DOS programs is supported. However, because the Wireless USB Print Server cannot store files, large print jobs may cause problems.
Server-based Print Queue means that all print jobs are stored (queued) on the Network Server (e.g. Windows NT/2000) and then sent to the Wireless USB Print Server. This allows the Network Administrator to modify the Print Queue. For example, an important job can be moved to the head of the queue.
AppleTalk is also supported, and normally no configuration of the Wireless USB Print Server is required. Refer to the section for Macintosh installation information.
Which printing method should I use?
If using Windows 95, 98, NT, Me, 2000, or XP, the easiest method to use is Peer-to-peer Printing.
If using Windows and you need to print from MS-DOS programs, or you don't wish to install additional software, use SMB. However, SMB is not suitable for large, complex documents, so if you need this as well as MS-DOS printing, you should install BOTH Peer-to-peer Printing and SMB printing. MS-DOS programs can use the SMB printer, while the Windows programs should use Peer-to-peer Printing.
If your LAN has Network Servers (e.g. Windows NT, Windows 2000 Server), use the method advised by your Network Administrator. The Wireless USB Print Server can print via a queue located on a Network server, if desired.
Your computer must have either the TCP/IP or NetBEUI protocols installed. (All versions of Windows after Windows 95 have TCP/IP installed by default.)
If you are using the Peer-to-peer Printing, the installation program will check this for you. If you are using other methods, you must perform a manual check of these settings. Perform the following steps:
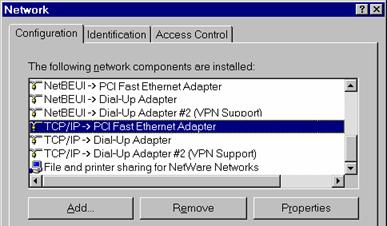
Click Windows Settings,Control Panel, and then Network. You should see a screen similar to the following:
The top line in the list (NetBEUI -> PCI Fast Ethernet Adapter) indicates that the NetBEUI protocol is installed on this computer. Your computer will show the name of the your Network card rather than PCI Fast Ethernet Adapter.
The highlighted line (TCP/IP -> PCI Fast Ethernet Adapter) indicates that TCP/IP is installed. Your computer will show the name of your Network card instead of PCI Fast Ethernet Adapter.
If neither line is present, you will need to install the NetBEUI protocol. Click Add, Protocol, and then Microsoft. Click NetBEUI and then OK. You may be prompted for your Windows CD-ROM. This protocol requires no configuration.
If required, you can also install TCP/IP. However, depending on your LAN environment, TCP/IP may require further configuration.
If either protocol is already installed, proceed with installation.
Windows Peer-to-peer Printing
With this printing method, print jobs are stored (queued) on your computer and then sent to the Wireless USB Print Server when it is available.
Windows 2000 and XP require no additional software.
For other versions of Windows, the supplied PTP (Peer-to-Peer) Printer Port software must be installed on each computer.
Windows 2000/XP Setup
The recommended printing method is to use LPR, as follows:
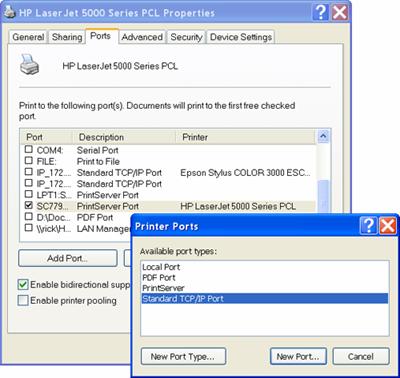
Open your Printersfolder, right-click the desired printer, and select Properties.
Select the Portstab and click AddPort.
Select StandardTCP/IP Port and then click NewPort.
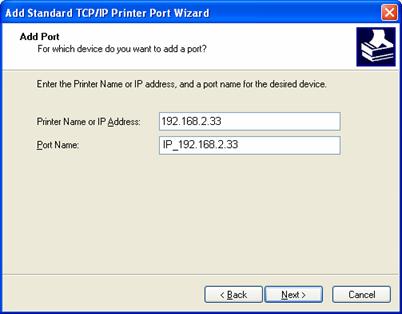
On the Add Standard TCP/IP Printer Portscreen above, enter the IPAddressof the Print Server in the Printer Name or IP Address field and then click Next.
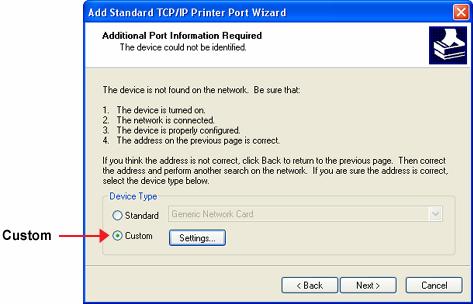
On this screen, select Custom and click Settings.
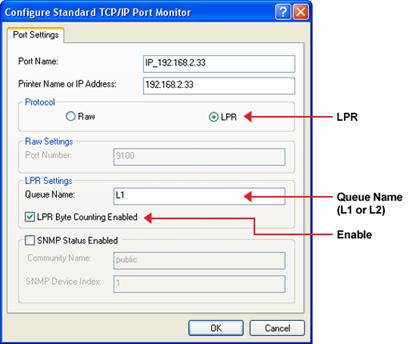
On the Port Settings screen, select LPRin the Protocol section. Enter a Queue name (L1 for the USB Port). Ensure the LPR Byte Counting Enabledsetting is Enabled. Click OK to confirm your changes and close this screen.
Follow the prompts to complete the Wizard.
Windows 9x/ME Setup
Before performing the following procedure, the Wireless USB Print Server must be installed on your LAN, and configured as described in Installation. Both the Wireless USB Print Server and the attached printer should be powered ON.
Insert the U.S. Robotics Installation CD-ROM into your CD-ROM drive.
Click Additional Installs and then select the User.
Follow the prompts to complete the installation of the Peer-to-peer Printer Port Driver.
The Print Driver Setup will then launch.
In future, you can click Windows Start > Programs > U.S. Robotics Print Server > Printer Driver Setup to run the program again.
PTP (Peer-to-Peer) Printer Port Setup
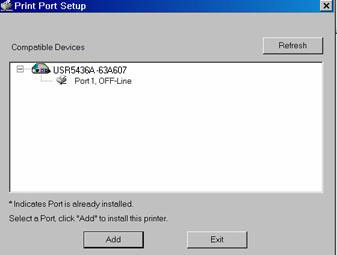
The program will search for Printer Servers on the network, and a screen like the following will be displayed. If desired, click Refresh to update the list. The name of the attached printer will be displayed if possible. If No printer is displayed, make sure that the printer is properly connected and powered on.
If your Wireless USB Print Server is not listed, perform the following:
Click the Refresh button.
Check that both the Wireless USB Print Server and the printer are properly connected, and powered on.
Check that the Wireless USB Print Server has been configured. (Use the Setup Wizard on the CD-ROM.)
Select the desired port on a Wireless USB Print Server and then click Next. A message will inform you if the port has been created successfully.
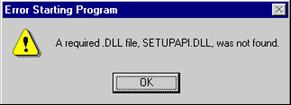
If you see the following error message, either install Internet Explorer 4 or later or go to Troubleshooting.
The printer port will be created, then a screen similar to the one below will be displayed.
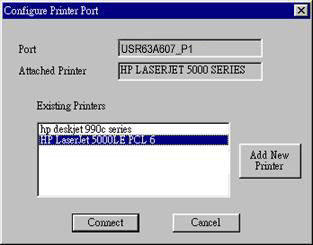
Select the correct Windows printer in the Existing Printers list and click Connect.
If the correct printer type is not listed, click Add New Printer to run the Windows Add Printer wizard. Perform the following steps of the Wizard and install the required printer:
Select the correct Printer Manufacturer and Model or click Have Disk if you have the printer manufacturer's Installation CD-ROM.
It is recommended that you change the Printer name to indicate the device to which it is connected. (e.g. HP2100 on SCA43600_P1)
If prompted about Sharing the printer, do not enable Sharing.
When the Printer installation is finished, it will be listed in the Configure Printer Port screen. Select the printer and click Connect.
Installation is complete and you can now print using this printer.
To install additional Printers, repeat steps 1-4.
To run this program in the future, click Windows Start and then Programs (this may be slightly different depending on your version of Windows). Click Print Server Utility and then Print Driver Setup.
Note: If using the Epson Spooler Manager, this program must be disabled, as follows:
1.
Run the Epson Spooler Manager.
2.
Select Queue Setup from the menu.
3.
Click Use Print Manager for this port.
4.
Click OK to exit.
PTP (Peer-to-Peer) Printer Port Management
Print jobs can be managed like any Windows printer. Open the Printers folder by click Windows Start, Settings, and then Printers(this may be slightly different depending on your version of Windows). Double-click any printer to see the current print jobs.
If the printer attached to the Wireless USB Print Server is changed, run this program again and select the correct printer.
To delete a port created by this setup program, use the Windows Delete Port option:
Right-click any printer in the Printers folder and select Properties.
Locate the and click DeletePort. This button is on the Details or Ports tab, depending on your version of Windows.
If the Wireless USB Print Server's IP Address is changed and you can no longer print, delete the port (see procedure above) and re-install it.
PTP (Peer-to-Peer) Printer Port Advanced Options
Perform the following steps to access the Peer-to-peer Printing options.
Click Windows Start, Settings, and then Printers(this may be slightly different depending on your version of Windows) to open the Printers folder. Right-click the printer and select Properties. The Port Settings button is on the Details or Ports tab, depending on your version of Windows. Click Port Settings.
An example screen is shown below:
Items shown on this screen are as follows:
Port: If desired, click Browse to select a different Wireless USB Print Server. If the selected device has multiple ports, the Select Device Port button can be used to select the port. The Port Name can not be changed after installation. This name is shown in the Printer's Properties.
Banner: Check this option to print a banner page before each print job.
If using a PostScript Printer, select the PostScript checkbox.
The User Name will be printed on the banner page.
Retry Interval: Sets how often Windows will poll the Wireless USB Print Server to establish a connection when the printer is busy. Increase this value if you get too many warning messages.
This method requires no additional software to be installed, but the NetBEUI or TCP/IP protocol must be installed on your computer. Use the following procedure to install the Wireless USB Print Server's printer as a Windows SMB network printer:
Double-click the Network Neighborhood icon on the desktop.
On the View menu, click Details.
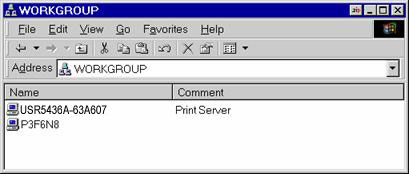
Locate the desired Wireless USB Print Server, as shown below:
If it is the same Workgroup as your computer, it will be listed on screen.
If it is in a different workgroup, double-click Entire Network, then double-click the appropriate Workgroup to open it.
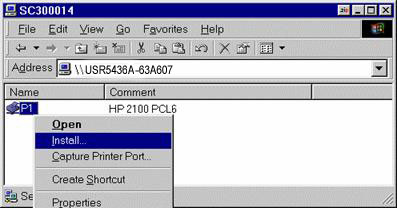
Double-click the Wireless USB Print Server icon to view a Printer icon for each printer port. The Comment field may indicate what type of printer is connected to the port.
To install a printer, right-click the desired printer icon and select Install. This will start the Add Printer wizard.
Follow the on-screen prompts to complete the installation.
Select the Printer Manufacturer and Model to match the printer connected to this port on the Wireless USB Print Server and complete the Wizard.
This printer will now appear in your Printers folder and can be used like any other printer. However, SMB printing is not suitable for large complex print jobs; you should use the Peer-to-peer Printing instead.
With a Server-based Print Queue, the Print Server is installed on an existing Network Server (Windows, Unix, or NetWare), rather than on your computer. If your Network Administrator uses this system, each Windows client must be set up in the following manner:
Click Windows Start, Settings, and then Printers(this may be slightly different depending on your version of Windows) to open the Printers folder.
When prompted, select Network Printer.
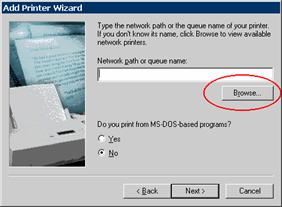
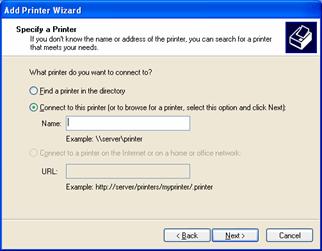
When prompted for Network Path or Queue Name, Windows 98 and Me users should click Browse. Windows 2000/XP users should leave the field blank and click Next.
Windows 98/ME:
Windows XP:
Browse the network, and locate the Server and Printer (or Print Queue) which your Network Administrator advised you to use.
Click OK and then Next.
Select the correct printer Manufacturer and Model, as advised by your Network Administrator, and click Next.
Follow the prompts to complete the Wizard.
The new printer will be listed with any other installed printers, and may be selected when printing from any Windows application.