
The is a Windows application that gives you access to basic configuration functions and lets you monitor the activity of network devices. With this utility, you can discover the , assign its IP address, change its password, and upgrade its firmware. You can also monitor the log and view the trap events of the switch.
For installation instructions, see Install the on the Installation page of this guide.
To uninstall the , click Windows Start > Programs > USRobotics > Uninstall as shown below:

To start the , click Windows Start > Programs > USRobotics > as shown below:

The window appears:
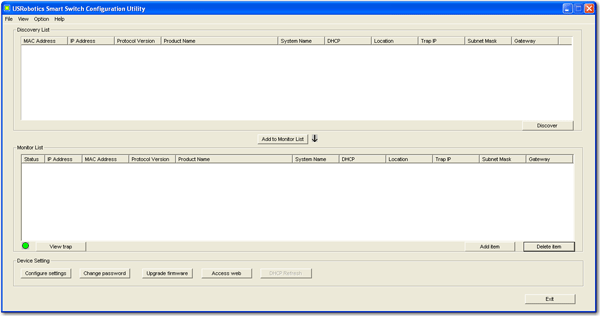
The File menu lets you back up and restore your monitor list and provides the following options:
Monitor save saves the current monitor list settings in the folder where the resides. The default location is C:\Program Files\USRobotics\Smart Switch Configuration Utility\cfg. This option also saves the current monitor list as the default: when you exit and restart the , you will see the last saved monitor list.
Monitor save as saves the current configuration in the folder that you specify after you select this option.
Monitor load restores the settings from the file that you specify.
The View menu lets you view and clear the system log. The options are View log and Clear log.
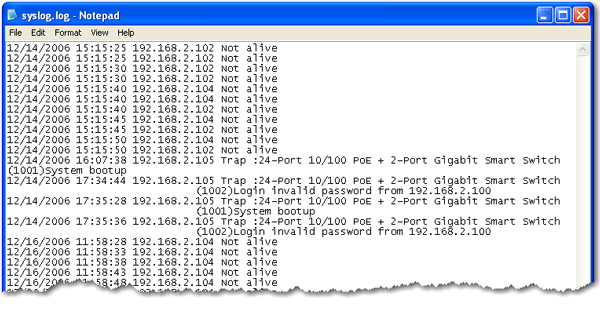
The log displays events for all switches in the monitor list. For a switch's trap events to be sent to the log, the switch must appear in the monitor list and be configured to send trap events to the computer that is running the . The time stamp for log entries is based on that computer's clock. If a switch appears in the monitor list but is not reachable, an entry is generated in the log. A sample log is shown below:
The Option menu lets you set the refresh rate for device monitoring.
The Help menu lets you display the version number of the .
The Discovery List shows each smart switch detected by the . Once a smart switch is discovered, you can add it to the Monitor list and you can maintain its configuration by using the device setting functions.
To populate the discovery list, press the Discovery button.
To move a smart switch entry to the monitor list, select the entry and click Add to Monitor List or double-click the entry.
The Monitor List shows all the devices that you chose to monitor.
To add a smart switch entry in the monitor list,
Double-click an entry in the discovery list.
OR
Select an entry in the discovery list and click Add to Monitor List
OR
Use Add item to display the following window:
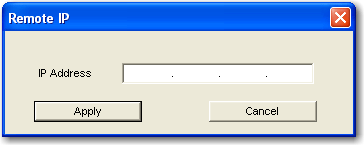
Enter the IP address of the device to be monitored and click Apply.
The monitor list has the following controls:
View trap displays trap events for the selected device. A red icon indicates that an event occurred but has not yet been viewed:

A green icon indicates that all trap events have been viewed.
Add item lets you specify an IP address to be added to the monitor list.
Delete item removes a device from the monitor list.
The Device Setting buttons affect the configuration of the selected device.
Configure settings lets you configure IP addressing for the smart switch and lets you specify descriptive information, such as the device location.
Change password lets you change the password.
Upgrade firmware lets you apply firmware updates.
Access web gives you access to the Web User Interface of the smart switch.
DHCP Refresh obtains a new IP address if the switch is configured to obtain its address from a DHCP server.
This feature lets you set basic configuration parameters for the switch, including IP addressing, trap destination, and descriptive information. To set basic configuration settings:
Select an entry from either the discovery list or the monitor list and press Configure settings.
The following window appears:
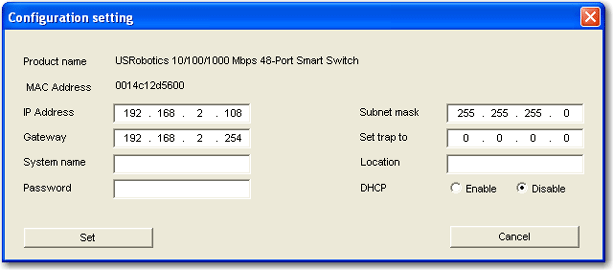
Enter any parameter that you want to change.
IP addressing—By default, the switch is configured to use a static IP address. You can change the static addressing information, or you can configure the switch to get its IP address dynamically from a DHCP server.
To use static IP addressing, make sure that DHCP Disable is selected; then enter the IP Address, Gateway, and Subnet mask for the switch.
To configure the switch to get its IP address from a DHCP server, make sure that DHCP Enable is selected. With DHCP enabled, the IP address, gateway, and subnet mask fields are unavailable.
Trap destination—To specify the location that is to receive trap events from the switch, enter the IP address of the destination in Set trap to.
Enter the password of the smart switch. The default password is .
Click Set.
To use this feature, see Secure the Switch in the Installation section of this guide.
To use this feature, you need a firmware upgrade file either stored on your computer or stored on the network and accessible to the computer. The computer must be in the same subnet as the switch.
Caution: A configuration backup file cannot be used to restore settings on a firmware version other than the one on which the backup file was created. If you intend to upgrade the firmware of the switch, first record your configuration settings. After the firmware upgrade, apply the configuration settings manually.
To apply the upgrade:
Select an entry from either the discovery list or the monitor list and press Upgrade firmware.
The following window appears:
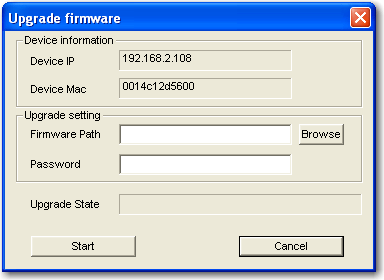
Enter the password of the smart switch. The default password is .
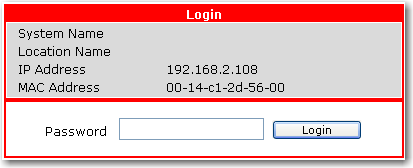
To access the Web User Interface of the smart switch:
Double-click an entry in the monitor list.
OR
The login page of the Web User Interface appears:
DHCP Refresh obtains a new IP address if the switch is configured to obtain its address from a DHCP server. You can configure the switch to use a DHCP server in one of the following ways:
Enable DHCP in the Configuration Setting window.
OR
Change the IP setting on the system page in the Web User Interface.