
Contents:
Configuring the Wireless Cable/DSL Router >
Wireless Cable/DSL Router User Guide (Windows 95,
98, 2000, NT, Me, XP, and Macintosh)
Configuring the Wireless Cable/DSL Router
The Web-based configuration utility can be used to change the settings
of the Wireless Cable/DSL Router.
A brief description of these settings is provided below.
Start up and Log in
Open an Internet browser and enter the Wireless Cable/DSL Router's IP address.
The following is the
default IP address of the Wireless Cable/DSL Router:
After the connection is established, you will see the Web User Interface
for the Configuration
Utility. There is no default password for the Wireless Cable/DSL Router, so just click Login.
There are nine main menus for the Wireless Cable/DSL Router: Status, Toolbox, Primary Setup, DHCP Server, Virtual Server, Special Applications, Access Control, Miscellaneous Items, and Wireless.
Note: After making any changes to the configuration options or security settings of the Wireless Cable/DSL Router, you must click Enter in order for your changes to be saved and implemented.
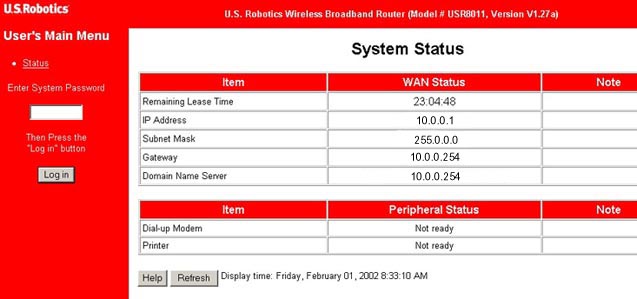
Status
This menu is used to view the current status information of the Wireless Cable/DSL Router. The following is the information you can view:
- Remaining Lease Time
- IP Address
- Subnet Mask
- Gateway
- Domain Name Server
- Dial-up Modem
- Printer
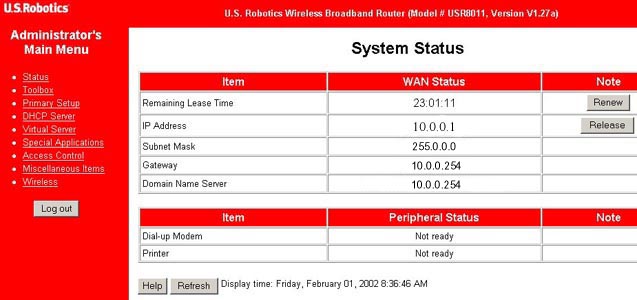
WAN Port Status
Any current information for the items above will appear in this column.
If the WAN port is assigned a dynamic IP, there will be a Renew
button and a Release button on the Sidenote column. You can click
these buttons to either renew or release the IP manually.
Peripheral Status
This will appear when a dial-up connection is selected or a printer is
attached to the network. The modem status is displayed and the Manual
Dial-up button will appear. After the modem achieves a connection,
the Hang-up button will appear. If a printer is attached, a status
message will appear. Some examples of printer status messages include
"Ready," "Not ready," "Printing…",
and "Device error." When a job is printing, a Kill Job
button may appear on the side column. Click this button to manually end
the current printing job.
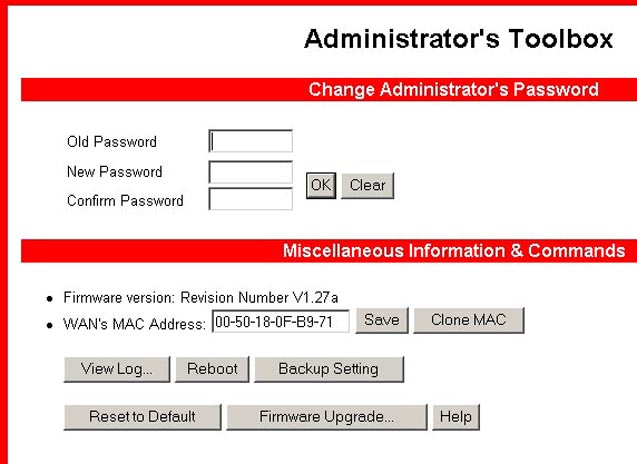
Toolbox
In this option you can change the administrator password. There is no
default password for the Wireless Cable/DSL Router. It is recommended
that you create a password after you successfully log in. If you choose
not to set a password at this time, you can set one or change your current
one at any time by clicking Toolbox on the side menu. The password
restricts who can access the configuration options of this utility.
Note: If at any time you forget your password, press in and hold the RESET button. While holding the RESET button, unplug then plug back in the power supply. When the Wireless Cable/DSL Router has power again, continue to hold the RESET button for about five seconds to reset the Wireless Cable/DSL Router to the factory default settings.
You can click Reset to Default and then restart your Wireless Cable/DSL Router to restore the default settings of the Wireless Cable/DSL Router.
You can also obtain information about the firmware version and the WAN's MAC Address in this area. Go to http://www.usr.com to look for any firmware updates for your Wireless Cable/DSL Router.
The Clone MAC button is useful when your ISP binds (or locks)
your connection to a specific MAC address. Cloning the MAC address allows
you to reassign the MAC address without registering it with your ISP.
Some ISPs require that you register the MAC address.
Primary Setup
This option displays the connection method of the WAN port. When you are using a dial-up connection, the username and password dialog boxes will be shown here.
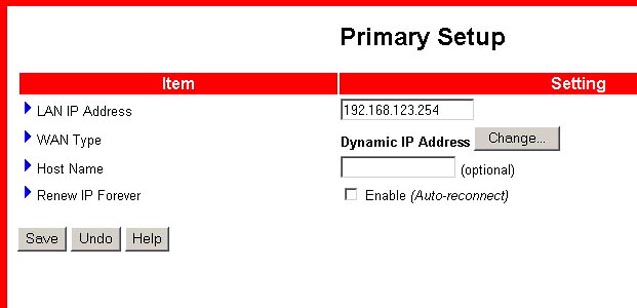
- LAN IP Address: The default IP address is 192.168.123.254. It is not recommended, but you can change it to fit your needs. If you change the LAN IP address, you should write down the new address. If you forget the new address, you will have to reset the Wireless Cable/DSL Router and you will lose all your configuration settings.
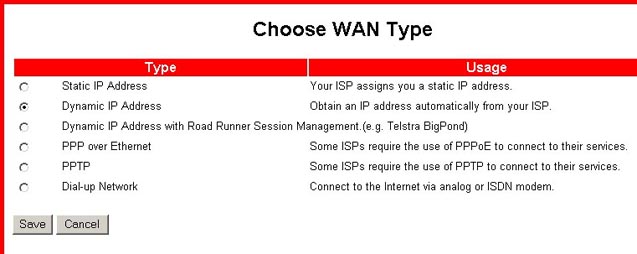
- WAN Type: This option allows you to select the WAN connection type of your ISP. Click Change to choose one of the following five options:
- Static IP Address: This option is used if your ISP has assigned you a static IP address.
- Dynamic IP Address: This is used to obtain an IP address from your ISP automatically.
- Dynamic IP Address with Road Runner Session Management: This is a specialised WAN type setting.
- PPP over Ethernet: Some ISPs require the use of PPPoE to connect to their services. This is generally used for DSL connections. Contact your ISP for more information.
- PPTP: If you use Dial-Up Networking and a VPN adapter, you are most likely using a PPTP connection.
- Dial-up Network: This option is used if you want to connect to the Internet through an analogue modem or through an ISDN TA.
A more detailed description of each WAN type option follows.
Static IP Address
WAN IP Address, Subnet Mask, Gateway, Primary and Secondary DNS: Enter the proper setting value provided by your ISP.Dynamic IP Address
Host Name: This entry is optional, but it is required by some ISPs.
Renew IP Forever: This feature enables the Wireless Cable/DSL Router to renew the IP address automatically when the lease time is half, even if the system is in an idle state. This allows for always-on connectivity.Dynamic IP Address with Road Runner Session Management
Account and Password: This is assigned by your ISP. Leave the password field empty if you do not want to change it.
Login Server: This entry is optional and may be required by your ISP.
Renew IP Forever: This feature enables the Wireless Cable/DSL Router to renew the IP address automatically when the lease time is half, even if the system is in an idle state. This allows for always-on connectivity.PPP over Ethernet
PPPoE Account and Password: This is the account and password that your ISP assigned to you. If you do not want to change the password, you may leave this field empty.
PPPoE Service Name: This entry is optional, but your ISP may require this field to be filled in.
Maximum Idle Time: This is the elapsed time of no activity before your PPPoE session is disconnected. Set this feature to 0 to disable it.PPTP
My IP Address: This is your personal IP address and is assigned by your ISP.
My Subnet Mask This is your personal Subnet Mask value and is assigned by your ISP.
Server IP Address: This is the IP address of your ISP.
PPTP Account: This is the name of your personal account.
PPTP Password: This is the password for your personal account.
Connection ID: This entry is optional and may be required by your ISP.
Maximum Idle Time: This is the elapsed time of no activity before your PPTP session is disconnected. Set this feature to 0 to disable it.
Dial-up Network
Dial-up Telephone, Account and Password: This is assigned by your ISP. Leave the password field empty if you do not want to change it.
Primary and Secondary DNS: These fields are automatically assigned if they are configured as 0.0.0.0.
Maximum Idle Time: This is the elapsed time of no activity before your dial-up session is disconnected. Set this feature to 0 to disable it.
Baud Rate: This is the communication speed between the Wireless Cable/DSL Router and your modem or an ISDN TA.
Extra Setting: This is needed to customise the communication quality between the ISP and your modem. This is required for an ISDN TA.
DHCP Server
The DHCP server of the Wireless Cable/DSL Router is set to Enable by default. The settings of the TCP/IP environment include IP address, Subnet Mask, Gateway, and DNS configurations. If the DHCP server of the Wireless Cable/DSL Router is enabled and you configure your computers to obtain an IP address automatically, your computer will automatically load the proper TCP/IP information provided by the Wireless Cable/DSL Router. The settings of DHCP server include the following items:
DHCP Server: You are given two options: Disable and Enable.
Range of IP Address Pool: Whenever there is a request, the DHCP
server will automatically allocate an unused IP address from the IP address
pool to the requesting computer. You can specify the starting and ending address
of the IP address pool.
Domain Name: This information is optional and will be provided
to the client by the ISP. Some ISPs require that this information is entered.
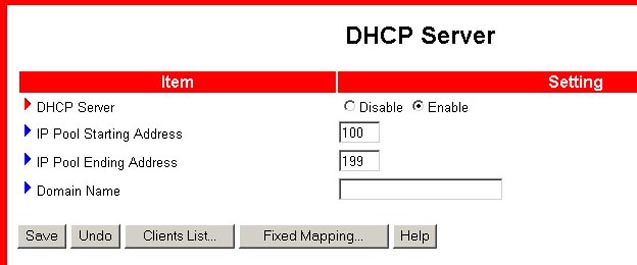
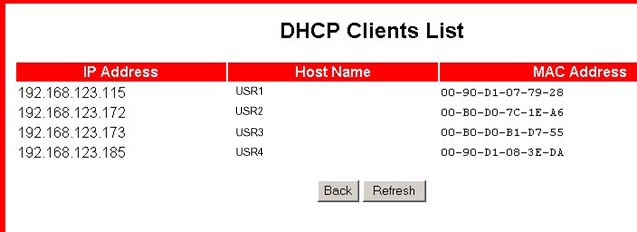
The Clients List... button will display a list of the computers that are currently attached to the network.
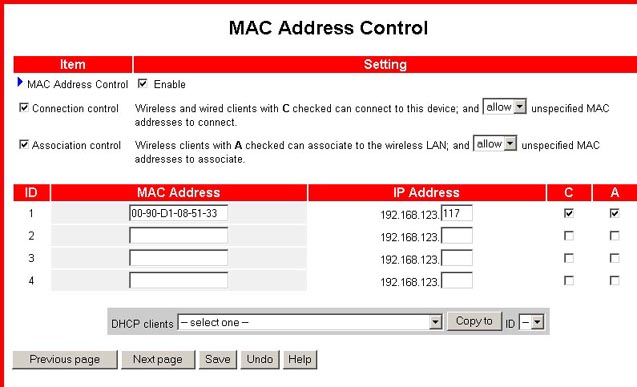
The Fixed Mapping... button will launch the MAC Address Control screen. This allows you to control the mapping of the MAC addresses and IP addresses. You can also control which MAC address is allowed to connect to this device. Within this screen, you can enable or disable MAC Address Control, select Connection Control or Association Control, and assign the MAC address of a specific DHCP client to a particular ID number. The ID range is from 1 to 32.
Virtual Server
The Wireless Cable/DSL Router's NAT (Network Address Translation) firewall filters out unrecognised packets to protect your home network. All hosts behind this firewall are invisible externally. Enabling the Virtual Server Mapping will make some of the host's ports accessible.
A virtual server is defined as a Service Port. All requests to this port will be redirected to the computer that is specified by the Server IP.
Port forwarding sets up public services on your network. When Internet users make requests on your network, the Wireless Cable/DSL Router will forward those requests to the appropriate computer. The computer must be configured to a static IP address to use port forwarding. Port forwarding is generally used to set up a Web server, ftp server, or e-mail server on your network. Some well-known services are included in a pre-defined list.
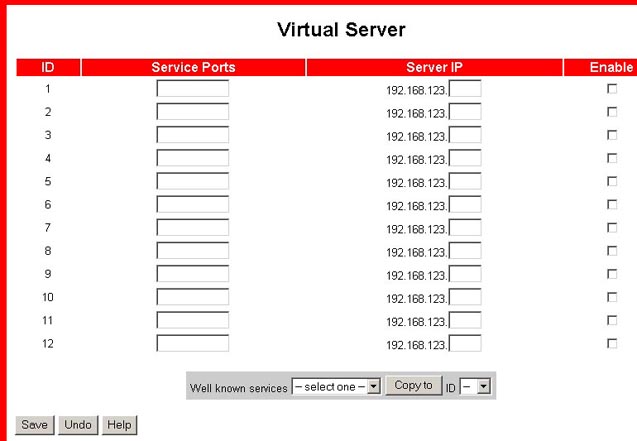
To add a server using Forwarding, perform the following steps:
- Enter the port number and the IP Address of the server that you want to allow Internet users to access.
- Configure as many entries as you want until all the entries are filled in.
- Click Apply in order to save the settings.
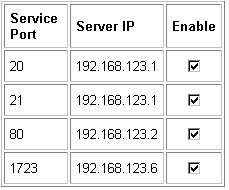
For example, if you have an FTP server (port 21) at 192.168.123.1, a Web server (port 80) at 192.168.123.2, and a PPTP VPN server at 192.168.123.6, you need to specify the following virtual server mapping table:
Special Applications
Some applications require open service ports, such as Internet games, video conferencing, Internet telephony, and others. When a request is made to the ISP's given address for a specific port, it is forwarded to the computer that is hosting that particular service. These applications cannot work with a pure NAT Wireless Cable/DSL Router since all the ports are blocked by default. This is a result of the Wireless Cable/DSL Router's NAT firewall function. Special Applications will allow some of these applications to work with a NAT Wireless Cable/DSL Router. If the Special Applications still do not allow an application to function correctly, refer to the DMZ host option in the "Miscellaneous Items" section of this User Guide.
Trigger: This is the outbound port number that the application
assigned first.
Incoming Ports: When the trigger packet is detected, the inbound
packets to the specified port number are allowed to pass through the firewall.
Enable: This must be selected in order for a special application
port to be activated.
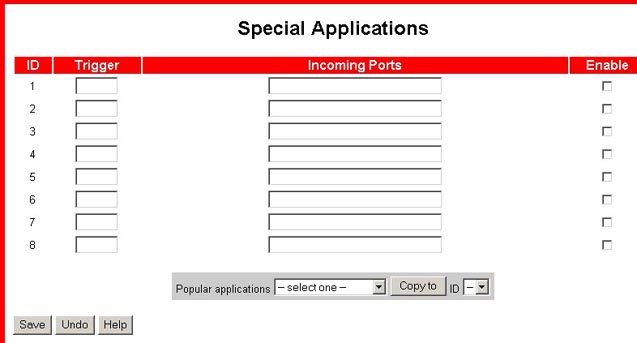
This product provides some predefined settings in the drop-down menu on the bottom of the Web Page Interface. Select from the Popular applications drop-down menu, select an ID, and click Copy to copy a predefined setting.
Note: Only one computer can be use a specific port number at a time.
Access Control
Access Control allows you to assign the access rights for each user. First, you must divide users into different groups, as identified by their IP addresses. You can assign the members of Group 1, 2, and 3. The others are all members of the Default Group. Second, you must assign the access rights of each group. The access rights can either allow or block users to access specified TCP and UDP ports. For example:
Group Members Access Right Comments:
Default - Allow () No access right (allow nothing)
Group 1 100-199 Allow (25,53,80,110) Can browse(80), receive(110) and
send(25) e-mail only
Group 2 50-99 Block (21,119) Cannot read net news(119) and FTP(21) only
Group 3 1-9,20 Block () Fully access (block nothing)
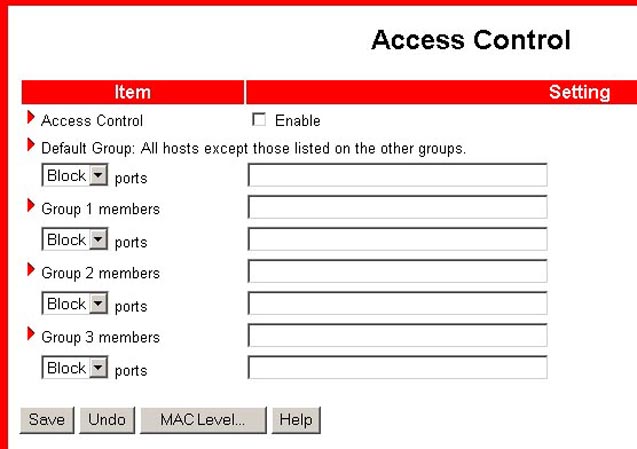
The MAC Level... button will launch the MAC Address Control screen. This allows you to control the mapping of the MAC addresses and IP addresses. You can also control which MAC address is allowed to connect to this device. Within this screen, you can enable or disable MAC Address Control, select Connection Control or Association Control, and assign the MAC address of a specific DHCP client to a particular ID number. The ID range is from 1 to 32.
Miscellaneous Items
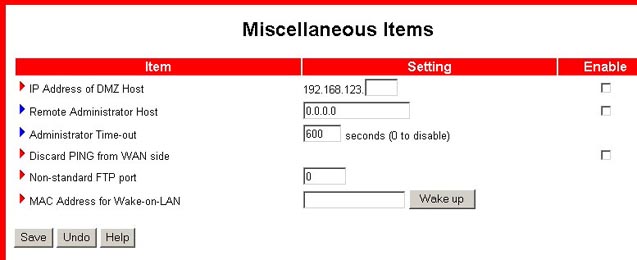
IP Address of DMZ Host: The DMZ (Demilitarised Zone) Host is a computer that has all external Internet traffic forwarded to it. This allows a computer to be exposed to unrestricted two-way communication. This feature should be used only when necessary, since it removes the security of the NAT firewall.
Remote Administrator Host: In general, only intranet users can
browse the built-in Web pages to perform administration tasks. This feature
enables you to perform administrative tasks from a remote host. When this
feature is enabled, only the specified IP address can perform remote administration.
If the specified IP address is 0.0.0.0, any host can connect to the Wireless Cable/DSL Router to perform administration tasks. When this
feature is enabled, the Web port will be shifted to 88.
Administrator Time-out: This allows you to set a time period of inactivity before an administrator will be automatically logged out.
Discard PING from the WAN side: When enabled, this will cause the Wireless Cable/DSL Router to automatically drop any ping requests from outside the LAN without replying.
Wireless
Within this screen, you can configure the Access Point function of the Wireless Cable/DSL Router. There are three options within this screen: Network ID (SSID), Channel, and WEP Security.
Note: Each Wireless PC Card or PCI Adapter that is connecting to the network must be set to Infrastructure mode. Refer to your Wireless Card manual to determine how to change this setting.
Note: 802.11b AdHoc mode is used for peer-to-peer network configurations. Infrastructure mode is used to add an Access Point to the network configuration for extended range and increased number of computers that can join the network.
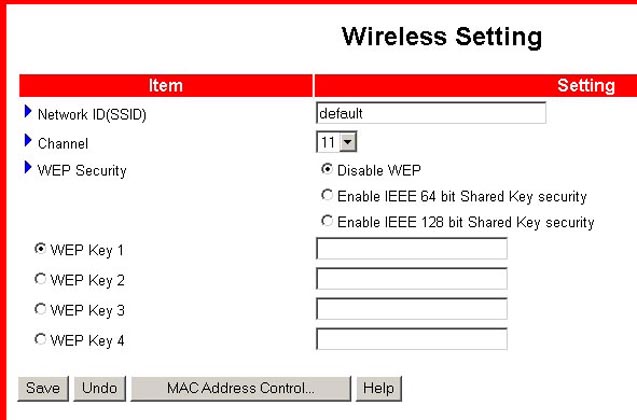
Network ID (SSID): Network ID (SSID) is the unique name that is shared among all clients and the associated Access Point in a wireless network. The SSID must be identical for all clients or Access Points participating in the same network. The SSID is case-sensitive and must not exceed 30 characters. The factory default setting is WLAN.
Note: If the SSID of each wireless card is set to "ANY", the wireless cards will associate with any Wireless Access Point that is available. If the SSID is changed from "ANY", each wireless card and Wireless Access Point on the wireless network must also be changed to the new SSID.
Channel: This setting specifies the default 802.11b channel used by the Wireless LAN to communicate.
WEP Security: WEP (Wired Equivalent Privacy) is an encryption scheme that is used to protect your wireless data communications. WEP uses a combination of 64-bit keys or 128-bit keys to provide access control to your network and encryption security for every data transmission. To decode a data transmission, each wireless client on the network must use an identical 64-bit or 128-bit key. When you enable the 64or 128 bit WEP key security, select one WEP key to be used and input 10 or 26 hex-decimal digits.
The MAC Address Control button will launch the MAC Address Control
screen, which was described earlier in this user guide. This will set
up the MAC addresses to control which wireless clients can associate to
the wireless LAN.
Note: A passphrase is an easy way to generate HEX keys. Enter any word, up to 30 characters, and click Generate. If your wireless cards support passphrase, you can enter the same passphrase on all the wireless cards. If your wireless cards do not support passphrase, you will need to use the manual entry function.
Logout
The Logout option is a secure means of logging out of the Configuration Utility.
