
Contents:
About the Wireless USB Print Server
Wireless USB Print Server Installation
Client PC Printer Setup (Additional Installs)
Non-Windows Operating Systems >
Navigating the Web User Interface
IPP (Internet Printing Protocol)
Product Specifications for Wireless USB Print Server
Wireless USB Print Server
User Guide
Non-Windows Operating Systems
Macintosh (AppleTalk)
The Wireless USB Print Server supports AppleTalk (EtherTalk), PAP, ATP, NBP, ZIP and DDP protocols, enabling Macintosh computers on the network to view and use the Wireless USB Print Server as a regular AppleTalk printer. Normally, no special configuration is required.
Software Requirements
System 9.x OS or newer.
AppleTalk Setup
- Click the apple icon and choose Control Panel and then AppleTalk.
- Ensure that Ethernet is selected under AppleTalk Connection.
- Click Chooser. The Chooser panel will open.
- Click on either the LaserWriter 8 icon (recommended) or the LaserWriter 7 icon. LaserWriter 8 makes use of the fonts installed in the printer itself, so the printing response time is quicker. LaserWriter 7 uses the fonts installed in the computer, which increases network traffic and takes more printing time.
- Choose a PostScript printer from the list.
- Click Create and it will search PPD automatically.
- Select a printer description from the list.
- Click Select.
- Configuration is now complete.
Printing
Printing with the Wireless USB Print Server installed in an AppleTalk network is identical to normal printing. Select File and then Print and choose the desired printer.
Advanced Setup and Management
In a mixed Windows PC/Macintosh environment, you can use BiAdmin to configure the Wireless USB Print Server. Refer to Navigating the Bi-Admin Navigating Utility for more information about the Bi-Admin Utility.
Macintosh OS X
If using LPR printing, you need to ensure the Wireless USB Print Server has a valid IP address before configuring your Mac as follows.
LPR printing Setup
- Select the Printer List icon.
- Click Add Printer.
- Select LPR Printers Using IP.
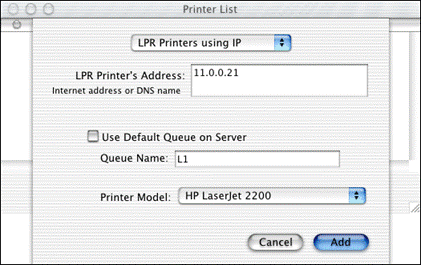
- Enter the IP address of the Print Server in the LPR Printer's Address field, and enter the Queue Name (L1 for port 1, L2 for port 2 if the Wireless USB Print Server has 2 printer ports.).
- Select the Printer Model from the drop-down list.
- Click Add.
- Configuration is now complete.
![]()
Unix
Overview
Your Wireless USB Print Server supports the LPD Unix printing method, which is supported by all common Unix systems.
You must configure both the Wireless USB Print Server and your Unix system, as described in the following sections.
Wireless USB Print Server IP Address Configuration
Because it supports dynamic IP Address allocation using DHCP or BOOTP, the Wireless USB Print Server ships with an IP Address of 0.0.0.0. This is NOT a valid IP Address. Therefore, you must do ONE of the following:
- Check your DHCP server (if you have one), and determine the IP Address allocated to the Wireless USB Print Server.
- Configure your BOOTP Server (if you have one), to provide an IP address to the Wireless USB Print Server, then restart the Wireless USB Print Server.
- Use a Windows platform and run the Setup Wizard or BiAdmin utility to allocate a valid IP Address to the Wireless USB Print Server.
- Add an entry to the arp
table to associate the hardware address of the Wireless USB Print Server
with the desired IP address, as follows:
arp -s IP_Address 00:c0:02:xx:xx:xx
Where:
IP_Address is the IP Address you wish to assign to the Wireless USB Print Server.
00:c0:02:xx:xx:xx is the hardware address of the Wireless USB Print Server.Example
arp -s 192.168.0.21 00:c0:02:12:34:56
You should then assign this IP address to the Wireless USB Print Server using your Web Browser. Launch the Web Condifuration Utility and go to the TCP/IP section. Select Fixed IP Address and then enter the appropriate information.
Note: The hardware address of the Wireless USB Print Server is shown on a sticker on the base of the device.
Other Wireless USB Print Server Configuration
The recommended method to configure the Wireless USB Print Server is to use the Web User Interface.
- Ensure that the TCP/IP settings are correct for your network.
- The logical printers (e.g. L1) must be configured correctly to match your system.
LPD Configuration
Configuration for the most common platforms is described below.
LPD on IBM AIX 4.15
Before proceeding, ensure that the Wireless USB Print Server has been assigned an IP Address. To setup your AIX system for LPD printing, perform the following steps.
- Add the Wireless USB Print Server to /etc/hosts.lpd, using the name you assigned to the Wireless USB Print Server.
- Start the LPD daemon if it is not running, using the following command:
start src -s qdaemon
- Start the system administration tool smit and select Print Spooling.
- Create the required number of queues (one for each logical printer)
by selecting:
Add a Print Queue
Remote (Printer attached to Remote Host)
Standard Processing
- Use the following information:
Field
Entry
Name of queue to add
Use a single-word queue name, which indicates which printer is attached.
Hostname for remote server
Wireless USB Print Server name as used in /etc/hosts.lpd.
Name of queue on remote server
Logical printer number (e.g. L1) to service this queue.
Type of print spooler on remote server
Use default value. (AIX Version xxx)
-
Ensure that the logical printers are configured in the Wireless USB Print Server.
-
Print using the following command:
lp -d printer_queue file_name
Where
printer_queue is one of the entries used in Name of queue to add.
file_name is the file you wish to print.
LPD on System V
Before beginning LPD Setup, ensure that an IP Address has been assigned to the Wireless USB Print Server. Keep the following points in mind:
- The remote host name is the name of the Wireless USB Print Server.
- The remote printer name is the print queue name for the Logical Printer.
- Logical printers also need to be configured on the Wireless USB Print Server itself.
- If your UNIX asks for the LPD type, be sure to identify the service type as BSD.
- The Wireless USB Print Servers LPD protocol meets BSD system standards.
In the sample commands shown, printer_name is the name of the Print Queue serviced by the Wireless USB Print Server, and Spooler_directory is the name of the directory, which is used to spool the print jobs.
Procedure
|
Action |
Sample Command |
|
Stop Print Services |
/usr/lib/lpshut |
|
Add a System Printer |
/usr/lib/lpadmin -p printer_name -v /dev/null |
|
Restart the Print Services |
/usr/lib/lpsched |
|
Enable printing to the new printer device |
enable printer_name |
|
Start accepting jobs for the new printer device |
accept printer_name |
|
Create a spooling directory |
mkdir /usr/spool/Spooler_directory |
|
Make spooling daemon the owner of this directory |
chown daemon /usr/spool/Spooler_directory |
|
Create read/write permissions |
chmod 775 /usr/spool/Spooler_directory |
|
Give permissions to LPD processes. |
chgrp daemon /usr/spool/Spooler_directory |
|
Add remote printer(s) |
See following section |
Adding Remote Printers
A remote printer is added by inserting the following line in the /etc/printcap file.
Note: The entry is really one line, but can be entered as shown. Use a TAB character where shown.
|
Printer_name|Remote_Printer_Alias:\ |
Example:
|
Marketing|RP1_PS123456:\ |
Repeat this process for each Logical Printer/Print Queue combination that you wish to create.
LPD on Linux
If using the command line, the procedure is the same as for System V. (above)
On recent Linux distributions, you can use the graphical X-windows interface instead of the command line. The procedure is described below, but may vary according to your version of Linux.
- Start your X-windows shell.
- Select Control Panel and then Printer Configuration.
- Select Add. For the printer type, select Remote Unix (lpd) Queue.
- Use the following data to complete the resulting dialog.
Field
Data
Name
Enter a name for this printer
Spool Directory
/var/spool/lpd/name_of_printer
File Limit
0 (no limit)
Remote Host
Name or IP Address of Wireless USB Print Server
e.g. SC3000014Note: host file entry is required to use the name instead of IP Address
Remote Queue
Ln
Where n is the Logical Printer number
By default, L1 is port 1, and L2 is port 2 if the Print Server has 2 ports.
-
Save this data and exit the Printer Configuration. Configuration is now completed and the printer is now available for use.
LPD on BSD
Before continuing, ensure that an IP Address has been assigned to the Wireless USB Print Server. Remember the following:
- The remote host name is the name of the Wireless USB Print Server.
- The remote printer name is the logical printer (e.g. L1) on the Wireless USB Print Server.
- If asked for the LPD type, enter the service type as BSD.
In the sample commands shown, printer_name is the Print Queue serviced by the logical printer on the Wireless USB Print Server, and Spooler_dir is the name of the directory, which is used to spool the print jobs.
Procedure
|
Action |
Sample Command |
|
Create a spooling directory |
mkdir /usr/spool/Spooler_dir |
|
Set spooling daemon as owner of this directory |
chown daemon /usr/spool/Spooler_dir |
|
Create read/write permissions |
chmod 775 /usr/spool/Spooler_dir |
|
Give permissions to LPD processes |
chgrp daemon /usr/spool/Spooler_dir |
|
Add remote printer(s) |
See below |
|
Start lpc print mechanism |
lpc start printer_name |
Adding Remote Printers
A remote printer is added by inserting the following line in the /etc/printcap file.
Note: The entry is really one line, but can be entered as shown. Use a TAB character where shown.
|
Printer_name|Remote_Printer_Alias:\ |
Where:
Printer_name is the Print Queue name used to
store jobs for the corresponding logical printer.
PS_NAME is the Wireless USB Print Server name defined in /etc/hosts.
Logical_Printer_name is the logical printer name on the Wireless
USB Print Server. (e.g. L1)
Spooler_directory is the directory you created in Step 6.
Example:
|
Marketing|RP1_PS123456:\ |
Repeat this process for each Logical Printer/Print Queue combination that you wish to create.
Printing using LPD
For LPD printing instructions, refer to your UNIX manual. The following example is for a BSD system:
lpr -P printer_name filename
Where:
printer_name is the name of the Print Queue defined on the Unix
host.
filename is the name of the file you wish to print.
Example:
lpr -P Marketing /etc/hosts
In the above example, the /etc/hosts file is sent to the printer queue Marketing. It will then be sent to the logical printer associated with this queue.
![]()
Netware
Overview
The Print Server must be configured as a valid device on your TCP/IP network. This printing method uses LPR over TCP/IP, not the Netware protocol.
To use NDPS (Novell Distributed Printing Services), the Novell server must be running Novell NetWare 5, and the PCs (clients) must be running IntranetWare Client V2.2. or later.
The following procedure is designed to enable Public Access Printing under NDPS. Public Access Printing allows anybody on the network to access the printer.
Creating an NDPS Manager Object
If an NDPS Manager Object already exists, skip this procedure and proceed to Creating an NDPS Printer Agent.
- Login to NetWare 5.0 Server as Admin and start the NetWare Administrator program Nwadmn32.exe.
- Select the container on NetWare Administrator where you want the NDPS Manager object to reside. (e.g. TeSupp)
- Select Create - Object from the menu bar to view the New Object dialog.
- Select NDPS Manager as the object to create. The Create NDPS
Manager Object window shown below will appear.
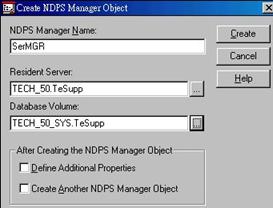
- Type a name in the NDPS Manager Name.(e.g. SerMGR, as shown above)
- Browse the Resident Server and select where you want the NDPS Manager object to be assigned. (e.g. TECH_50.TeSupp, as shown above)
- Browse the Database Volume and select where you want the NDPS Manager database to be assigned. (e.g. TECH_50_SYS.TeSupp, as shown above)
- Click Create. The new NDPS Manager will appear in the
main browser window.
To start the NDPS Manager in future, enter the following command at the console:
LOAD NDPSM
then select the NDPS Manager object.To start the NDPS Manager whenever you bring up the server, add a command like the following to your server's AUTOEXEC.NCF file:
LOAD NDPSM SerMGR.TeSupp
The last item is the name of the NDPS Manager object you wish to load. - After creating an NDPS Manager, you can create NDPS printers by using NetWare Administrator, as explained below.
Creating an NDPS Printer Agent
To create Public Access Printers using the NDPS Manager Object in NetWare Administrator, follow this procedure:
- Start the NDPS Manager object you will be using to control the Printer Agent.
- At the Identification page, click Printer Agent List.
- Click New to see the Create Printer Agent window, as shown
below.
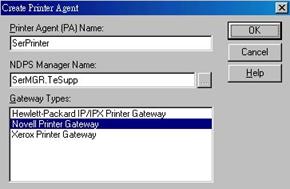
- Enter the desired name for the Printer Agent (PA) Name.
- Normally, the NDPS Manager will be the NDPS Manger object you are using.
- Select Novell Printer Gateway in the Gateway Type.
- Click OK and then select the available printer.
- Select Remote (LPR on IP) in the Connection Type.
- Click Next to see the following Configure Port Handler screen.
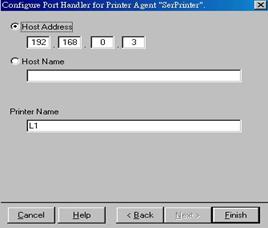
- In the Host address IP field, enter the IP Address previously assigned to the Print Server device.
- In the Printer Name field, enter the
- Click Finish, then select appropriate drivers for Windows 98 etc as required. The new Printer Agent will now appear in the Printer Agent List window.
Repeat this procedure for any other ports on the Print Server or for any other logical printers you wish to use. Client PCs can now be configured.
![]()
Windows Server
Windows NT4.0 Server
If using Windows Windows NT 4.0, Microsoft TCP/IP Printing Support must be installed.
- If it is already installed, add a TCP/IP Remote Printer, as described below.
- If it is not already installed, install TCP/IP printing support, then add a TCP/IP Remote Printer.
Adding TCP/IP Printing Support
- Click Windows Start, Settings, Control Panel, and then Network.
- Click the Service option and ensure that Microsoft TCP/IP Printing is enabled. If it is not enabled, click Add and enable it as usual.
- If you added services in step 2, reboot the computer for the changes to take effect.
Adding a TCP/IP Remote Printer
- Click Windows Start, Settings, Printer, and then launch the Add Printer wizard.
- When prompted with This printer will be managed by, select My Computer and click Next.
-
- In the Name of Address of server providing lpd: dialogue box, enter the Wireless USB Print Server's IP address.
- In the Name of printer or print queue on that server dialogue
box, enter the appropriate logical printer number (e.g. L1) as previously
configured on the Wireless USB Print Server.
By default, L1 is port 1, and L2 is port 2 if the Wireless USB Print Server has 2 printer ports.
- Click OK. When returned to the Printer Ports window, select Close and then install your printer driver as usual.
- When prompted whether or not the printer will be shared, select the Sharing button.
- In the Shared dialog box, enter the shared printer name. (The shared name is how other users will see this printer.) Click OK to save and exit. Client PCs can now be configured..
Windows 2000/2003 Server
- Start the Add Printer Wizard, select Network Printer, then click Next to browse for the Wireless USB Print Server.
- Locate and double-click the Wireless USB Print Server, select the
desired port, and click Next.
A message like the following will be displayed:
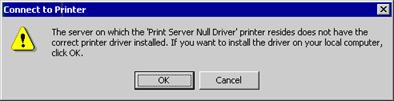
Windows 2000 Message
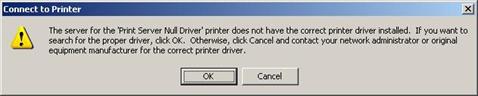
Windows2003 Message
- Click OK and select the correct Manufacturer and Model for this printer.
- Follow the prompts to complete the installation.
- In the Printers folder, right-click the new printer and select Sharing.
Select Shared As: and enter an appropriate name for this printer. Users will see this name when browsing for the printer during installation.
If desired, click Additional Drivers and install printer drivers for other versions of Windows, such as Windows 98. This will assist users during the installation process.
- Click OK to close this Window. Configuration is now complete. Client PCs can now be configured.
![]()