
Contents:
Configuring the Secure Storage Router Pro
File Management >
Managing Partitions
Adding New Partitions
Primary Partition
Extended Partition
Logical Partition
Scanning Partitions
Secure Storage Router Pro User Guide
File Management
The Secure Storage Router Pro can operate as a file server for storage devices that are connected via USB or FireWire. Your home network's LAN devices can share the storage device as a mapped network drive. The web-based management provides disk management utilities such as fdisk for partitioning the drive as a physical disk or logical disk, as well as format utilities for formatting the partitions.
The Secure Storage Router Pro supports up to 30 hard disks, either daisy chained through FireWire hubs, USB 1.1/2.0 hubs, or a combination of both.
Note: Any hard disk connected through a USB 1.1 hub will not be running at full speed. The performance speed will be lowered as you add more hard disks through a USB 1.1 hub.
Note: For storage devices that come
with both a USB 1.1/2.0 connection and a FireWire connection, only one
port of the storage device can be used at a time.
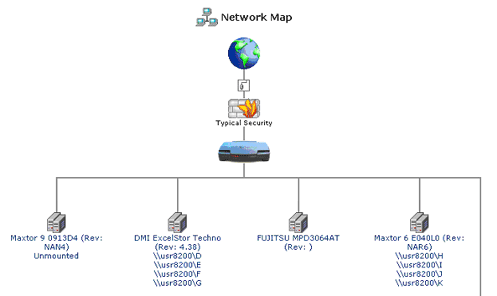
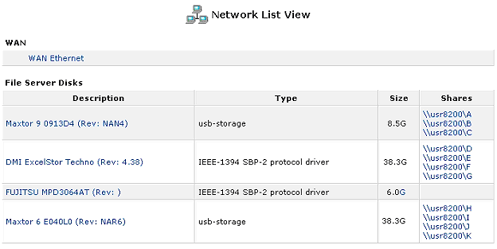
When a hard disk or storage device is connected to the Secure Storage Router Pro via USB1.1/2.0 or FireWire, it will register on the network map. Viewing the network map as a list will display information about each storage device that is connected.
Note: Before disconnecting any hard
disk, it is recommended to unmount the hard disks using the web-based
management.
Each hard disk can have up to 16 partitions with an Extended partition and can have a maximum of four main partitions. Main partitions include primary and extended partitions. The following are some different partition configurations you can have in your hard disk.
- You can have up to three primary partitions and one extended partition
or up to four primary partitions. If you have four primary partitions
for the main partitions, the hard disk is limited to a total of four
partitions.
- If you have three primary partitions and one extended partition, you can add 12 more partitions through the logical partition within the extended partition.
The File Systems that are supported by the Secure Storage Router Pro for formatting a hard disk(s) partitions are Linux (ext2) and Windows (FAT32).
The File Systems that the Secure Storage Router Pro supports in Read/Write form are Linux (ext2), Windows (FAT12), Windows (FAT16), and Windows (FAT32).
If you are not sure if the hard disk you have connected to the Secure Storage Router Pro is pre-formatted, look in the network map. If the hard disk is pre-formatted, below the hard disk name you will see \\usr8200\A, \\usr8200\B, \\usr8200\C, etc.
If the hard disk you are adding to the Secure Storage Router Pro is pre-formatted and you do not wish to create or modify any partitions, proceed to the Setting up User access rights to the storage devices section in this chapter.
If the hard disk is not pre-formatted, or you are unsure, please proceed to the Managing Partitions section in this chapter.

Managing Partitions
The following buttons are the different Action icons in the File Management screens. These will appear in the Action column for each hard disk and partition associated with the Secure Storage Router Pro. Only the icons for the actions that can be performed on a hard disk or partition will appear. For example, the Format a partition icon will not appear if there are no partitions on the hard disk.
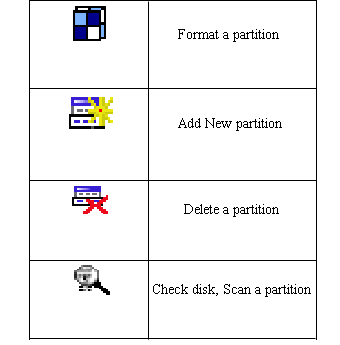
If you wish to perform an action on a hard disk, click the name of the hard disk in the Network Map screen or in the Network List screen.
After clicking the name of the hard disk, you will see an icon on the right for each of the actions that you can perform on that particular hard disk.
Adding New Partitions
When first creating a new partition you will be presented with a wizard to help ensure that nothing important is missed while setting up the hard disk(s).
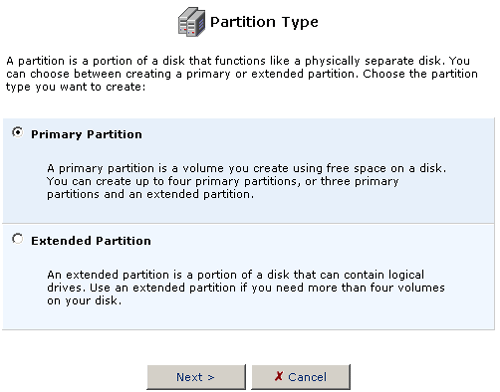
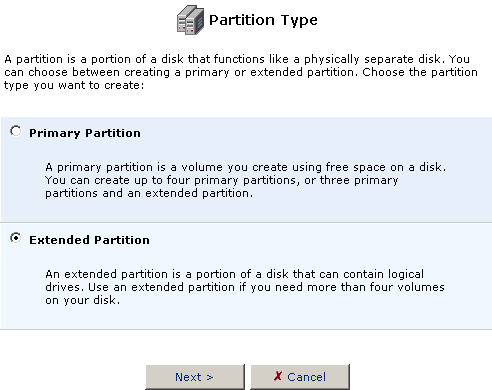
Click the Add New partition icon in the Action column for the hard disk you want to partition. You will then need to select which type of partition you want to create: Primary or Extended.
- Select Primary Partition and then click Next.
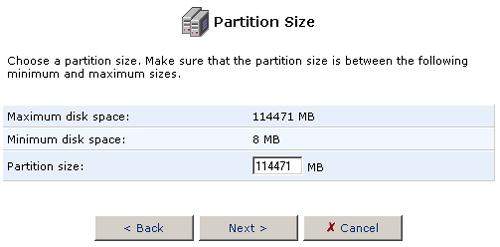
- The Partition size option will automatically fill in with the maximum
amount of free space available for the partition. You can change this
size to accommodate the needs you have for the hard disk. Click Next
when you are finished selecting the Partition size.
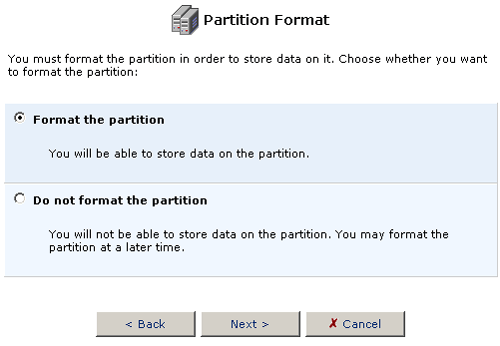
- Select Format the partition and click Next.
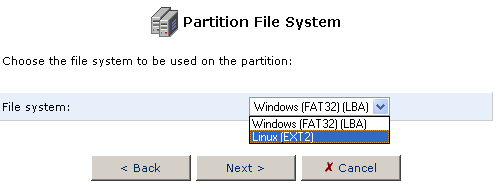
- Choose the type of partition file system for the hard disk that will
best suit your needs.
If the storage device will be connected to a Linux station, you want to choose Linux (EXT2) for the Partition File System. If the storage device will be connected to Windows PCs, then you want to choose Windows (FAT32) for the Partition File System.
After you have selected the Partition File System, click Next.
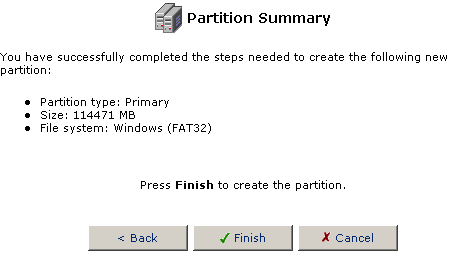
- After selecting all the options for the partition, you will be shown
a summary of these options. If there is a mistake or if you want to
change a selection, click Back to restart the process or click
Cancel to end the process without performing any operations.
If everything is correct, click Finish to create the partition.
- Select Extended Partition and then click Next.
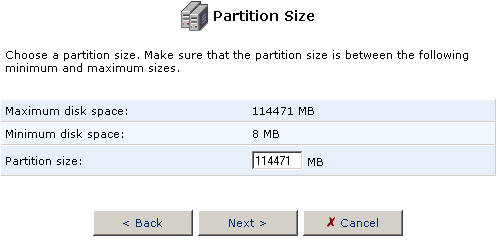
- The Partition size option will automatically fill in with the maximum
amount of free space available for the partition. You can change this
size to accommodate the needs you have for the hard disk.
If you want to use the remainder of the space on the hard disk to create an Extended partition, leave the Partition size amount as it is and click Next.
If you think you might want to create another Primary partition, adjust the Partition size to the amount needed for your Extended partition and click Next.
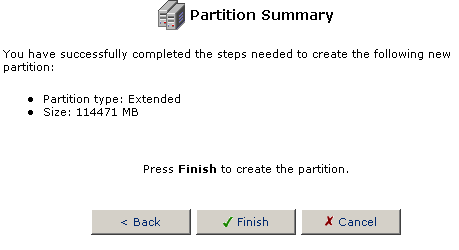
- After selecting all the options for the partition, you will be shown
a summary of these options. If there is a mistake or if you want to
change a selection, click Back to restart the process or click
Cancel to end the process without performing any operations.
If everything is correct, click Finish to create the partition.
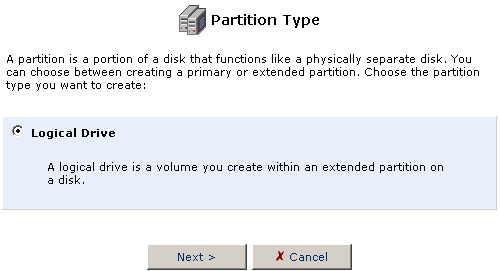
After creating an Extended Partition you will need to create Logical
partitions.
- Click the Add New partition icon in the Action column for the
Extended partition in which you want to create Logical partitions.
- Make sure Logical Drive is selected and click Next.
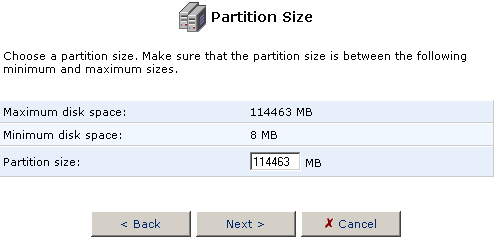
- The Partition size option will automatically fill in with the maximum
amount of free space available for the partition. You can change this
size to accommodate the needs you have for the hard disk. Click Next
when you are finished selecting the Partition size.
- Select Format the partition and click Next.
- Choose the type of partition file system for the Logical partition
that will best suit your needs.
If the storage device will be connected to a Linux station, you want to choose Linux (EXT2) for the Partition File System. If the storage device will be connected to Windows PCs, then you want to choose Windows (FAT32) for the Partition File System.
After you have selected the Partition File System, click Next.
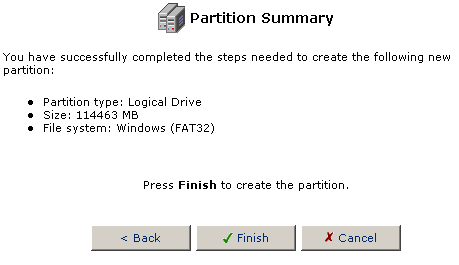
- After selecting all the options for the partition, you will be shown
a summary of these options. If there is a mistake or if you want to
change a selection, click Back to restart the process or click
Cancel to end the process without performing any operations.
If everything is correct, click Finish to create the partition.
Note: If you did not fill the Extended partition because you have a need for more logical partitions, you can continue to create Logical partitions until there is not room for any more in the Extended partition.
Scanning Partitions
Scanning a partition is similar to running a chkdsk or Scandisk in Windows
or fsck in Linux. Scanning a partition will check the hard disk for errors
and attempt to fix them if any are discovered.
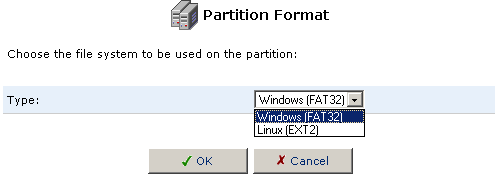
Formatting a Partition
If you need to format a partition for any reason after initial setup, follow the steps below.
- Click the Format a partition icon in the Action column.
- Choose the type of partition format that will best suit your needs.
If the storage device will be connected to a Linux station, you want to choose Linux (EXT2) for the Partition Format. If the storage device will be connected to Windows PCs, then you want to choose Windows (FAT32) for the Partition Format.
After you have selected the Partition File System, click Next.
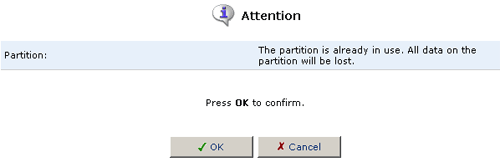
- The following warning will appear because the partition is in use
by the File Server and may contain files on it. If you are sure that
you still want to format the partition, Click OK.
Deleting a Partition
To delete a partition, click the Delete a partition icon in the Action column.
If you are certain that you want to delete the partition, click OK.
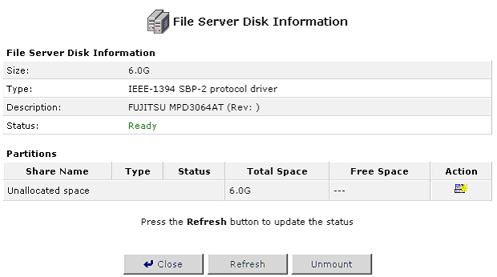
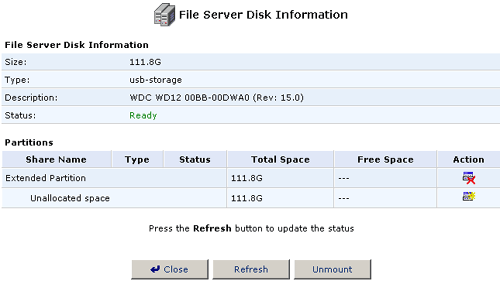
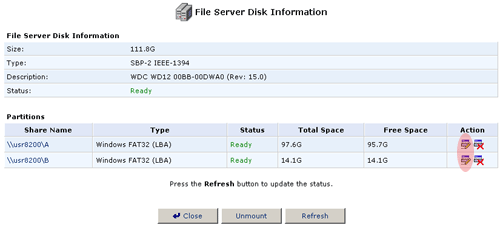
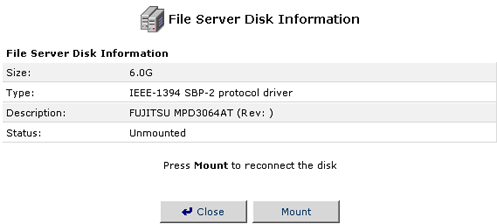
Unmounting a Hard Disk
Even though USB connections and FireWire connections are Plug and Play, any storage devices that you wish to disconnect from the Secure Storage Router Pro need to be unmounted properly. With the Secure Storage Router Pro, this is done in the File Server Disk Information interface of the Web-based management.
- Select the hard disk you want to unmount in the Network List View
screen.
- Click Unmount in the File Server Disk Information screen.
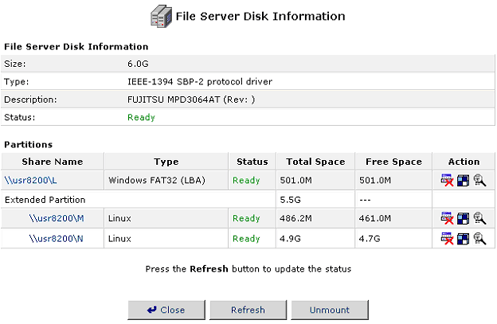
- Once the hard disk has been Unmounted, you can either remount the
drive or unplug it safely from the FireWire or USB connection of the
Secure Storage Router Pro.
Note: If you are unmounting a FireWire hard disk and there are more hard disks daisy chained behind the Secure Storage Router Pro, you will also need to unmount all the devices behind the one you need to disconnect. You can then re-connect the other hard disks in the daisy chain.
Setting up User access rights to the storage devices
To assign User access rights, click Users in the Advanced Menu.
You can create users that have access only to the storage devices by selecting either Read Files from File Server or by selecting both Read Files from File Server and Write Files to File Server.
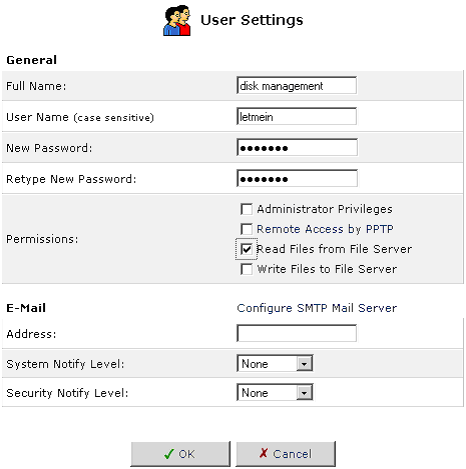
Note: Windows 95, Windows 98, and Windows Me clients that will be connecting to the Secure Storage Router Pro to access the File Server must enter the user name and password in all lowercase letters, not UPPERCASE or Capital Letters. This is because those Window versions pass everything to the server in lowercase.
Note: During any file disk utility
action, none of the hard disks connected to the Secure Storage Router
Pro can be accessed.