
Contents:
Hardware Installation >
Overview of the Web-based Management
USR8200 Firewall/VPN/NAS User Guide
Hardware Installation
Connecting a cable or DSL modem to the USR8200 Firewall/VPN/NAS
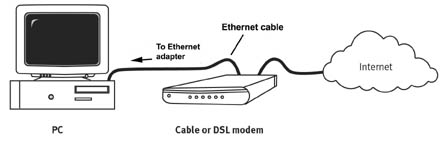
The following graphic is a representation of your system topology before the installation of the USR8200 Firewall/VPN/NAS.
Prepare for installation
Make sure your computer is turned off.
Note: Your model number is 8200. It is very important that you have your serial number written down before you install the USR8200 Firewall/VPN/NAS. You can find your serial number on the bottom label of the USR8200 Firewall/VPN/NAS and on the side of the package. If you ever need to call our Technical Support department, you will need this number to receive assistance.
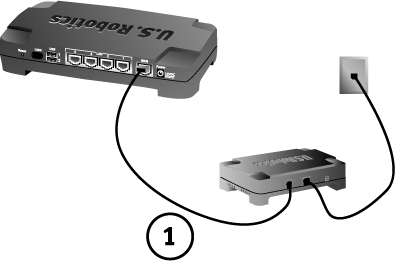
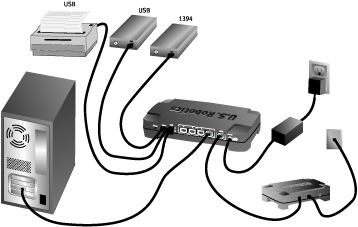
1. Connect your modem to the USR8200 Firewall/VPN/NAS
Turn off your PC and your cable or DSL modem. Locate the Ethernet cable from your cable or DSL modem that is connected to your PC’s Ethernet adapter. Disconnect that Ethernet cable from your PC’s Ethernet adapter, and connect it to the WAN port on the rear of the USR8200 Firewall/VPN/NAS.
Note: If your cable modem is connected to your PC using a USB cable, disconnect the USB cable from both your PC and from your cable or DSL modem.
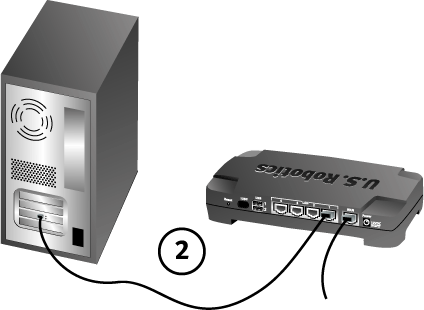
2. Connect your USR8200 Firewall/VPN/NAS to your computer and power supply
Connect one end of the supplied Ethernet cable to your PC’s Ethernet adapter. Connect the other end to one of the LAN ports on the USR8200 Firewall/VPN/NAS.
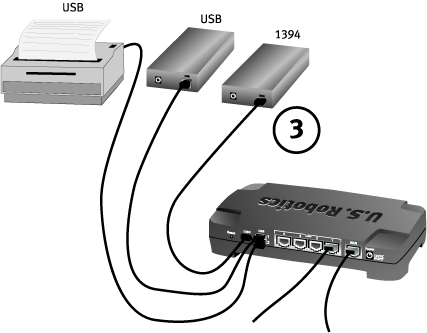
3. Connect any peripheral devices
Connect a USB and/or FireWire hard drive, if available. You can also connect a USB printer, if available.
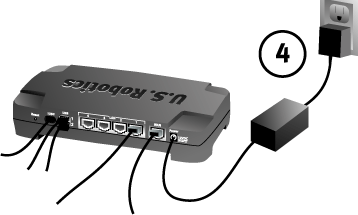
4. Connect the power supply
Turn on your cable or DSL modem. Turn on your printer or hard drive, if applicable. Connect the included power adapter to the USR8200 Firewall/VPN/NAS. Plug the power adapter into a standard power outlet. Turn on your computer.
5. Configure the basic connection settings
Note: Refer to the "Configuring the USR8200 Firewall/VPN/NAS" section in this User Guide for detailed configuration information. Contact your ISP if you have any questions about your WAN type or your connection information.
Congratulations! The hardware installation procedure is now complete.
You should now have secure and shared Internet access. To verify your
connection, launch a Web browser and register your product at www.usr.com/productreg.
If the page loads, you are finished with the installation procedure. If
the page does not load, proceed to the Configuring
the USR8200 Firewall/VPN/NAS section in this User Guide.
Note: It is recommended that you write down the settings for your USR8200 Firewall/VPN/NAS for future reference. You can view the settings in the USR8200 Firewall/VPN/NAS Web-based Management Utility by logging in at http://usr8200.
Quick Setup
Quick Setup enables the speedy, precise, and accurate configuration of your Internet connection.
When subscribing to a broadband service, you should be well aware of the method by which you are connecting to the Internet. Your Internet Service Provider (ISP) should provide technical information regarding the properties of your Internet connection. For example, your ISP should inform you whether you connect to the Internet using a static or dynamic IP address, or what protocols, such as PPTP or PPPoE, you will be using to communicate over the Internet.
The Quick Setup page is launched automatically when you log on to the USR8200 Firewall/VPN/NAS for the first time. To access Quick Setup, click the second item on the sidebar.
Quick SetupYour WAN connection can be configured using one of the following methods:
- Automatic IP address
- Manual IP address
- Point-to-point protocol over Ethernet (PPPoE)
- Point-to-point tunneling protocol (PPTP)
For more information, refer to the section that applies to your WAN connection,
according to the broadband subscription information supplied by your ISP.
Automatic IP Address
1. To configure the USR8200 Firewall/VPN/NAS to act as a DHCP client,
select Automatic IP Address Ethernet Connection from the Connection Type
combo-box.
2. Enter your e-mail address. It will be used for monitoring and alert
purposes.
3. Click OK.
Manual IP Address
1. Select Manual IP Address Ethernet Connection from the Connection Type
combo-box.
2. Your Internet Service Provider (ISP) should provide you with the following information:
- IP address
- Subnet mask
- Default gateway
- Primary DNS server
- Secondary DNS server
3. Click OK.
Point-to-Point Protocol over Ethernet (PPPoE)
1. Select Point-to-Point Protocol over Ethernet (PPPoE) from the Connection
Type combo-box.
2. Your Internet Service Provider (ISP) should provide you with the following information:
- Login user name
- Login password
Point-to-Point Tunneling Protocol (PPTP)
1. Select Point-to-Point Tunneling Protocol (PPTP) from the Connection
Type combo-box.
2. Your Internet Service Provider (ISP) should provide you with the following information:
- Login user name
- Login password
- IP address
- Subnet mask
- Default gateway
Web Filtering
Quick Setup also allows you to enable and subscribe to the Web Filtering service, as well as viewing your subscription status. To access the complete functionality of Web Filtering, click Web Filtering on the sidebar.
The Web Filtering section contains the following:
- The number of days until the subscription expires. (Only displayed if Web Filtering is enabled)
- Link to Web Filtering provider's subscription management site. (Only displayed if Web Filtering is enabled)
- Checkbox to enable Web Filtering.
