
Contents:
Overview of the Web-based Management
Security >
USR8200 Firewall/VPN/NAS User Guide
Security
The USR8200 Firewall/VPN/NAS's Security Suite includes comprehensive, robust security services: Stateful Packet Inspection Firewall, user authentication protocols, and password protection mechanisms. These features taken together allow users to connect their computers to the Internet and simultaneously be protected from the security threats of the Internet.
The firewall is the cornerstone of your USR8200 Firewall/VPN/NAS's security suite. The firrewall has been exclusively tailored to the needs of the residential user and has been pre-configured to provide optimum security. In addition, the firewall has many advanced features which allow you to further customise it to your needs. Using the management screens in the Security section, you can:
- Choose the Security Level for the firewall.
- Set Access Controls to prohibit computers in the home network from accessing services on the Internet.
- Configure the Local Servers available in the home network.
- Designate a local computer as a DMZ Host so that network traffic associated with certain Internet applications can bypass the firewall.
- Configure Remote Access to enable remote configuration from any Internet-accessible computer.
- View and configure the Firewall Log.
Security Level Settings
Use the Security Settings screen to configure the USR8200 Firewall/VPN/NAS's basic security settings. The firewall regulates the flow of data between the home network and the Internet. Both incoming and outgoing data are inspected and then accepted or rejected according to a flexible and configurable set of rules. These rules are designed to prevent unwanted intrusions from the outside while allowing home users access to the Internet services that they require.
The firewall rules specify what types of services available on the Internet may be accessed from the home network and what types of services available in the home network may be accessed from the Internet. Each request for a service that the firewall receives, whether originating in the Internet or from a computer in the home network, must be checked against the set of firewall rules to determine whether the request should be allowed to pass through the firewall. If the request is permitted to pass, then all subsequent data associated with this request (a "session") will also be allowed to pass, regardless of its direction.
For example, when you point your Web browser to a Web page on the Internet, a request is sent out to the Internet for this page. When the request reaches the USR8200 Firewall/VPN/NAS, the firewall will identify the request type and origin-HTTP and a specific computer in your home network, in this case. Unless you have configured access control to block requests of this type from this computer, the firewall will allow this request to pass out onto the Internet. When the Web page is returned from the Web server, the firewall will associate it with this session and allow it to pass, regardless of whether HTTP access from the Internet to the home network is blocked or permitted.
The important thing to note is that it is the origin of the request, not subsequent responses to this request, that determines whether a session can be established or not.
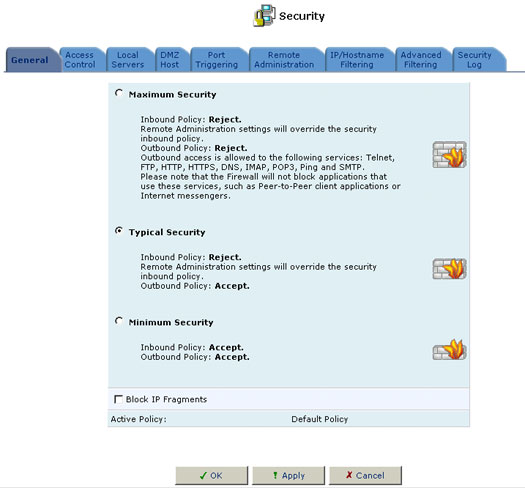
You may choose from among three predefined security levels for the USR8200 Firewall/VPN/NAS : Minimum, Typical (the default setting), and Maximum. The table below summarizes the behavior of USR8200 Firewall/VPN/NAS for each of the three security levels. Note that the Access Control, Local Servers, and Remote Access screens may be used to further customise the gateway's security settings.
- The Access Control screen can be used to further restrict access from the home network to the Internet.
- The Local Servers screen can be used to enable access from the Internet to specified services provided by computers in the home network and special Internet applications.
- The Remote Access screen can be used to enable remote configuration of USR8200 Firewall/VPN/NAS from any Internet-accessible computer.
Adding Access Controls
| Security Level | Requests Originating in the WAN | Requests Originating in the LAN |
| Maximum | Blocked: No access to home network from Internet, except as configured in the Local Servers and Remote Access screens. | Limited: Only commonly-used services, such as Web- browsing and e-mail, are permitted†. |
| Typical (Default) | Blocked: No access to home network from Internet, except as configured in the Local Servers and Remote Access screens. | Unrestricted: All services are permitted, except as configured in the Access Control screen. |
| Minimum | Unrestricted: Permits full access from Internet to home network; all connection attempts permitted. | Unrestricted: All services are permitted, except as configured in the Access Control screen. |
† These services include Telnet, FTP, HTTP, HTTPS, DNS, IMAP, POP3, and SMTP.
To configure the USR8200 Firewall/VPN/NAS's security settings:
- Choose from among the three predefined security levels described in the table above. Typical Security is the default setting.
- Select the Block IP Fragments box in order to protect your home network from a common type of hacker attack that could make use of fragmented data packets to sabotage your home network.
Note: VPN over IPSec and some UDP-based services make legitimate use of IP fragments. You will need to allow IP fragments to pass into the home network in order to make use of these select services.
- Click the OK button to save your changes.
Note: Using the minimum security setting may expose the home network to significant security risks, and thus should only be used, when necessary, for short periods of time.
You may want to block specific computers within the home network (or even the whole network) from accessing certain services on the Internet. For example, you may want to prohibit one computer from surfing the Web, another computer from transferring files using FTP, and the whole network from receiving incoming e-mail.
Access Controls work by placing restrictions on the types of requests that may pass from the home network out to the Internet, and thus may block traffic flowing in both directions. In the e-mail example given above, you may prevent computers in the home network from receiving incoming e-mail by blocking their outgoing requests to POP3 servers on the Internet.
Click the Access Control button to view a list of services that have been restricted.
To add a new service or services to the Access Control table:
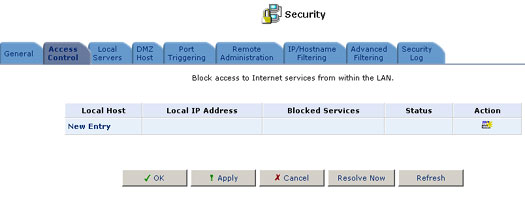
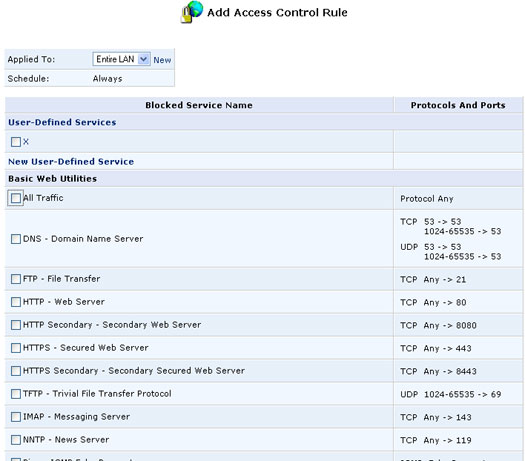
- Click the New Entry button. The Add Access Control Rules screen will appear.
- Select the service or services that you would like to block.
- Enter the local IP address of the computer that you would like to block from accessing the service(s), or select Block Entire LAN to block all LAN computers. Click OK to save your changes and return to the Access Control screen.
You may change the computer (or computers) prohibited from accessing a particular service by modifying the appropriate entry in the Access Control table.
To modify an entry in the Access Control table:
- Click Edit for the service. The Edit Service screen will appear.
- Enter the local IP address of the computer that you would like to block from accessing the service(s), or select Block Entire LAN to block all LAN computers.
- Click OK to save your changes and return to the Access Control screen.
You may disable an access control and make the service available without having to remove the service from the Access Control table. This may be useful if you want to make the service available only temporarily and expect that you will want to reinstate the restriction in the future.
- To temporarily disable an access control, clear the check box next to the service name.
- To reinstate the restriction at a later time, select the check box next to the service name.
- To remove an access restriction from the Access Control table, click Remove for the service. The service will be removed from the Access Control table.
User-defined Services
The tables that appear on the Add Access Control Rules and Add Local Servers screens are pre-configured to include most of the services that users may want to block or activate. Sometimes, however, the need arises to add on a predefined service. The USR8200 Firewall/VPN/NAS provides the User-Defined Services list for this purpose. All of the services in this list also appear at the top of the Add Access Control Rules and Add Local Servers screens. When a service is added to one list, it automatically appears in the others. In this way, user-defined services never need to be entered twice.
To add a new service to the list:
- Click New User-Defined Service.

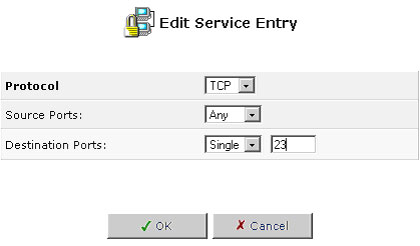
- The Edit Service screen will appear. Enter a name for the service
and then click New Server Ports.
- Select a protocol type and enter any additional information, as appropriate.
Usually this information is available as part of the documentation that
accompanies the program.
- If necessary, specify the Source Ports and the Destination Ports
to enter a port range of another type (UDP or TCP) for the same service.
- Click OK to save your changes and return to the User-Defined Services screen.
You have now completed defining this service and may go to the Add Access Control Rules or Add Local Servers screen to block or activate the service.
To modify a user-defined service already in the list:
- Click Edit for the service. The Edit Service screen will appear.
- Modify the service name or port information as necessary.
- Click OK to save your changes and return to the User-Defined Services screen.
To remove a service from the list, click the Remove button for the service. The service will be removed from the list.

Local Servers
In its default state, the USR8200 Firewall/VPN/NAS blocks all external users from connecting to or communicating with your network. Therefore, the system is safe from hackers who may try to intrude on the network and damage it. However, you may need to expose your network to the Internet in certain limited and controlled ways in order to enable some applications to work from the LAN (game, voice, and chat applications, for example) and to establish servers in the home network. The Local Servers feature supports both of these functionalities.
The Local Servers screen in the Management Console provides a list of the most commonly used applications that require special handling by the USR8200 Firewall/VPN/NAS. All you have to do is identify which of them you want to use and the local IP address of the computer that will be using the service. For example, if you wanted to use the Net2Phone voice application on one of your computers, you would simply select Net2Phone from the list and enter the local IP address of that computer in the right column. All Net2Phone-related data arriving at the USR8200 Firewall/VPN/NAS from the Internet will henceforth be forwarded to the specified computer.
Similarly, if you want to grant Internet users access to servers inside your home network, you must identify each service that you want to provide and the computer that will provide it. For example, if you want to host a Web server inside the home network, you must select HTTP Web Server from the list and enter the local IP address of the computer that will host the Web server in the right column. Then when an Internet user points a browser to the external IP address of the USR8200 Firewall/VPN/NAS, the Gateway will forward the incoming http request to the computer that is hosting the Web server. If an Internet application that you want to use or a service that you want to provide is not already in the list, you can easily add it.
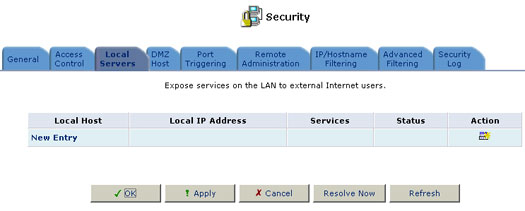
Click the Local Servers button to view the list of special services and local servers that are currently enabled in the home network.
To add a new service to the list of active local servers:
- Click the New Entry button. The Add Local Servers screen will appear.
- Select the service that you would like to provide.
- Enter the local IP address of the computer that will provide the service (the "server"). Note that only one LAN computer can be assigned to provide a specific service or application.
- Click OK to save your changes and return to the Local Servers screen to edit an entry in the Local Servers table so that a service can be provided by a different local computer.
To add a service that is not included in the list, click the User Defined Services button. The Edit Service screen will appear. Define the service, then click OK to save your changes. The service will then be automatically added to the top section of the Add Local Servers screen. You may now select the service, just as you would a predefined service.
- Click the Edit button for the service. The Edit Service screen will appear.
- Enter the IP address of the computer that you would like to provide this service.
- Click OK to save your changes and return to the Local Servers screen. You may disable a service and make the service unavailable without having to remove the service from the Local Servers table. This may be useful if you want to make the service unavailable only temporarily and expect that you will want to make it available again in the future.
- To temporarily disable an access control, clear the check box next to the service name.
- To reinstate the restriction at a later time, select the check box next to the service name.
- To remove an access restriction from the Access Control table, click the Remove button for the service. The service will be removed from the Access Control table.
Designating a Demilitarized (DMZ) Host
The DMZ Host feature allows one local computer to be exposed to the Internet. Designate a DMZ host when:
- You want to use a special-purpose Internet service, such as an online game or video-conferencing program, that is not present in the Local Servers list and for which no port range information is available.
- You are not concerned with security and want to expose one computer to all services without restriction.
Warning: A DMZ host is not protected by the Firewall and may be vulnerable to attack. Designating a DMZ host may also put the other computers in the home network at risk. When designating a DMZ host, you must consider the security implications and protect it if necessary.
An incoming request for access to a service in the home network, such as a Web-server, is fielded by the USR8200 Firewall/VPN/NAS. The USR8200 Firewall/VPN/NAS will forward this request to the DMZ host (if one is designated) unless the service is being provided by another computer in the home network (assigned in Local Servers), in which case that computer will receive the request instead.
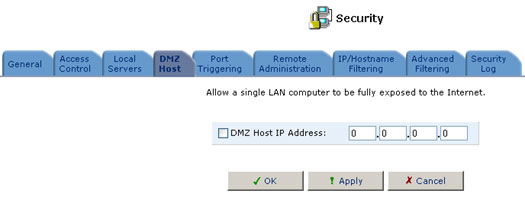
To designate a local computer as a DMZ Host:
- Click the DMZ Host button. The DMZ Host screen will appear.
- Enter the local IP address of the computer that you would like to designate as a DMZ host. Note that only one LAN computer may be a DMZ host at any time.
- Click OK to save your changes and return to the DMZ Host screen. You may disable the DMZ host so that it will not be fully exposed to the Internet, but keep its IP address recorded on the DMZ Host screen. This may be useful if you want to disable the DMZ host but expect that you will want to enable it again in the future.
- To disable the DMZ host so that it will not be fully exposed to the Internet, clear the check box next to the DMZ IP designation.
- To enable the DMZ host, select the check box next to the DMZ IP designation.
Port Triggering
Port triggering can be used for dynamic port forwarding configuration. By setting port triggering rules, you can allow inbound traffic to arrive at a specific LAN host, using ports different than those used for the outbound traffic. This is called port triggering since the outbound traffic triggers that allow inbound traffic to direct back to the LAN host.
For example, if you have a gaming server that you access using the TCP protocol on port 2222. The gaming server then responds by connecting you using TCP on port 3333 in order to start your gaming session. In such a case you must use port forwarding, since this scenario conflicts with the following default Firewall settings:
- The firewall blocks inbound traffic by default.
- The server replies to the USR8200 Firewall/VPN/NAS's IP and the connection is not NATed back to your host.
In order to solve this you need to define a Port Triggering entry, which allows inbound traffic on port 3333 TCP, only after a LAN host generated traffic to port 2222 TCP. This will result in accepting the inbound traffic from the gaming server and sending it back to the LAN Host that originated the outgoing traffic to port 2222.
Defining Port Triggering
This section describes how to define a port triggering entry. The entry values are relevant to the gaming example provided in the previous section.
1. Click the Security icon on the sidebar.
2. Click the Port Triggering tab on the security screen and the Port Triggering screen will appear. This screen will list all of the port triggering entries.
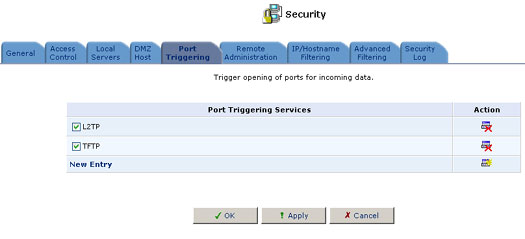
3. Click New Entry to add an entry.
4. Click New User-Defined Service to add an entry.
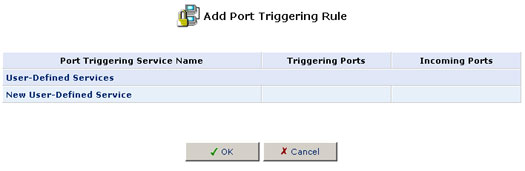
5. Specify the following port triggering entries in the New Triggering Ports and New Incoming Ports, respectively, and click OK:
- Triggering Ports: TCP ANY->2222
- Incoming Ports: TCP ANY->3333
After specifying both entries, click OK. Select the checkbox for the new service in the Add Port Triggering Rule screen and click OK.
6. Make sure the checkbox for the new service is selected in the general Port Triggering screen to enable port redirection.
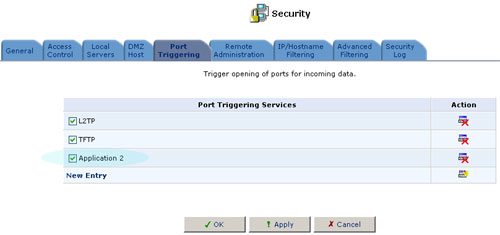
There may be a few default port triggering rules listed when you first access the port triggering screen. Please note that disabling these rules may result in impaired USR8200 Firewall/VPN/NAS functionality.
Controlling Remote Access to the USR8200 Firewall/VPN/NAS
It is possible to access and control the USR8200 Firewall/VPN/NAS not only from within the home network, but also from the Internet. This allows you to view or change settings while traveling. It also enables your ISP to change settings or help you troubleshoot functionality or communication issues from a remote location. Remote access to the USR8200 Firewall/VPN/NAS is blocked by default to ensure the security of your home network. However, remote access is supported by the following services, and you may use the Remote Access Configuration screen to selectively enable these services if they are needed.
- Telnet: Used to obtain a command-line and gain access to all system settings and parameters.
- Web-Management/HTTP: Used to obtain access to the Management Console and gain access to all system settings and parameters.
- Diagnostic Tools: Used for troubleshooting and remote system management by your ISP.
To allow remote access to the USR8200 Firewall/VPN/NAS services:
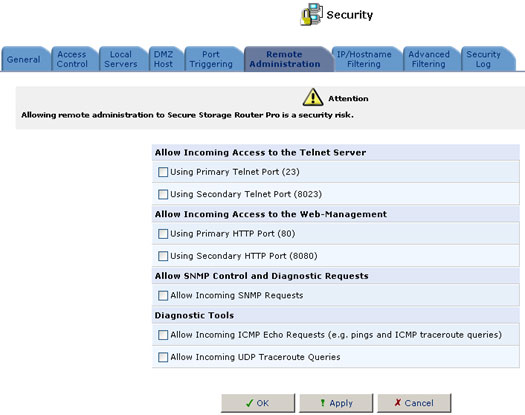
- Click the Remote Administration tab. The Remote Access Configuration screen will appear.
- Select the services that you would like to make available to computers on the Internet. These services include:
- Telnet: Grants command-line access to the USR8200 Firewall/VPN/NAS. While this service is password-protected, it is not considered a secured protocol. If a local server is configured to use port 23, select port 8023 to avoid conflicts.
- Web-based Management: Grants access to password-protected Web-based management. If a local server is configured to use port 80, select port 8080 to avoid conflicts.
- Diagnostic tools: Includes Ping and Traceroute (over UDP). These services may be used for troubleshooting and remote system management by the service provider.
- Click OK to save your changes and return to the Security Settings screen.
IP/Hostname Filtering
You may configure USR8200 Firewall/VPN/NAS to block specific Internet Web sites so that they can't be accessed from computers in the home network. Moreover, restrictions can be applied to a comprehensive automatically updated list of sites to which access is not recommended.
To add a new Web site to the list:
1. Click New Entry.
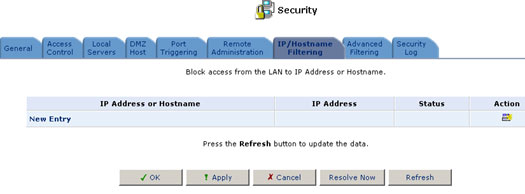
The Restricted IP Address or Hostname screen will appear.
2. Enter the Web site address (IP or URL) that you would like to make inaccessible from your home network (all web pages within the site will also be blocked). If the Web site address has multiple IP addresses, the USR8200 Firewall/VPN/NAS will resolve all additional addresses and automatically add them to the restrictions list. Select if you want this restriction to be applied to the entire Lan or to an individual computer on the network. You can also click New on the Schedule line and enter specific times for the rule to be applied.
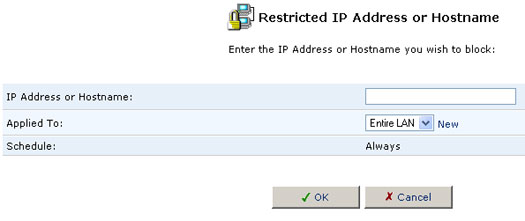
When you are finished creating a restriction, click OK.
3. You will be returned to the previous screen while the USR8200 Firewall/VPN/NAS attempts to find the site. Resolving... will appear in the Status column while the site is being located (the URL is being resolved into one or more IP addresses).
4. If the site is successfully located, then Resolved will appear
in the status bar, otherwise, Error will appear. Click Refresh
to update the status, if necessary. In case the USR8200 Firewall/VPN/NAS
fails to locate the web site, do the following:
- Use a Web browser to verify that the Web site is available. If it is, then you probably entered the Web site address incorrectly. Skip to modify a Web site address currently in the list below.
- If the Web site is not available, return to the IP/Hostname Filtering
screen at a later time and click Resolve Now to verify that the
Web site can be found and blocked by the USR8200 Firewall/VPN/NAS.
To modify a Web site address currently in the list, perform the following:
1. Click Edit in the Action column. The Restricted IP Address or Hostname screen will appear.
2. Modify the Web site address, as necessary. If it is long and/or complicated, you may want to copy the address from the address bar to the management console. Be sure to remove the http:// at the beginning and the / at the end of the address.
3. Click OK to save your changes.
To ensure that all current IP addresses corresponding to Web sites in the list are blocked, click Resolve Now. The USR8200 Firewall/VPN/NAS will check each of the Web site addresses in the list and ensure that all IP addresses at which this Web site can be found are included in the IP addresses column.
You may disable a restriction and make the Web site available again without having to remove the site from the Restrictions List. This may be useful if you wish to make the Web site available only temporarily and expect that you will want to block it again in the future.
- To temporarily disable a restriction, clear the check box next to the restricted URL.
- To reinstate the restriction at a later time, select the check box next to the URL.
- To remove a restriction, click Remove. The restriction will
be removed from the Restrictions List.
Advanced Filtering
Advanced filtering is designed to allow comprehensive control over the Firewall's behavior. You can define specific input and output rules, control the order of logically similar sets of rules, and make a distinction between rules that apply to WAN and LAN network devices. To access the Advanced Filtering screen, click the Security icon on the sidebar to display the security features, and then click the Advanced Filtering button. The Advanced Filtering screen will appear.
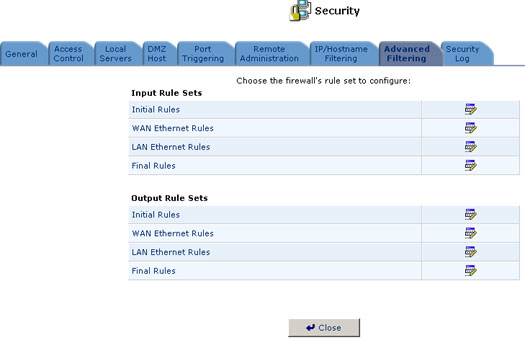
You can configure two sets of rules, input Rules and Output rules. Each set of rules is composed of three subsets: Initial rules, Network devices rules, and Final rules. These subsets determine the sequencing by which the rules will be applied. To configure Advanced Filtering rules, click the Edit button next to the rule title, or click the title directly. The Configure Rules screen will appear, displaying the entries currently constituting the rule subset you selected. Click the Edit button next to an entry, click the entry directly, or click New Entry to go to the Add Advanced Filter screen.
Adding an Advanced Filtering Rule
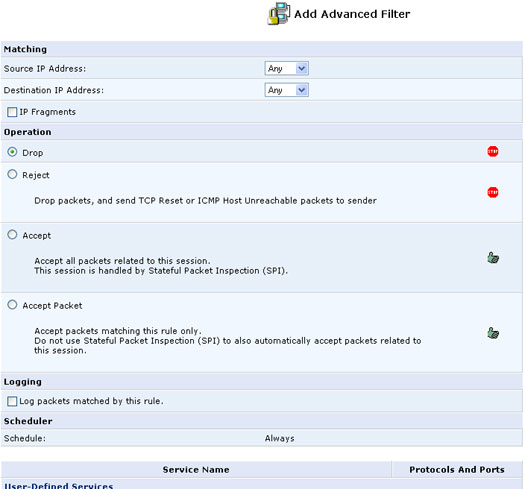
To add an advanced Filtering rule, carefully define the following rule parameters:
Matching
To apply a Firewall rule, a matching must be made between IP addresses
or ranges and ports. Use the Source IP and Destination IP to define the
coupling of source and destination traffic. Port matching will be defined
when selecting services. For example, if you select the FTP service, port
21 will be checked for matching traffic flow between the defined source
and destination IPs.
Operation
This is where you define what action the rule will take, by selecting
one of the following radio buttons:
- Drop: Deny access to packets that match the source and destination IP addresses and service ports defined in Matching.
- Accept: Allow access to packets that match the source and destination IP addresses and service ports defined in Matching. The data transfer session will be handled using Stateful Packet Inspection (SPI).
- Accept Packet: Allow access to packets that match the source and destination IP addresses and service ports defined in Matching. The data transfer session will not be handled using Stateful Packet Inspection (SPI), meaning that other packets that match this rule will not be automatically allowed access. For example, this can useful when creating rules that allow broadcasting.
Logging
Select this check box to add entries relating to this rule to the security
log.
Services
Select the services to which you would like to apply this rule. You can
add user defined services by clicking the New User-Defined Services.
Security Log
The Security log displays a list of Firewall-related events, including attempts to establish inbound and outbound connections, attempts to authenticate at an administrative interface (Web-based Management or Telnet terminal), Firewall configuration, and system startup.
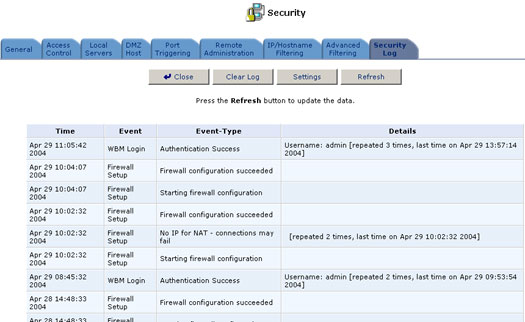
To view the Firewall Log, click the Firewall Log button which appears on the Security Settings screen.
The following are the events and event-types that are automatically recorded in the Firewall log:
Inbound/Outbound Traffic
- Connection accepted: Access request complies with the Firewall's security policy.
- Accepted -Host probed†: This TCP connection request from a WAN host matches the Firewall's security policy, but the WAN host is not recognized as trusted. The WAN host is being challenged to verify that it is a trusted host.
- Accepted -Host trusted†: A reply from a previously challenged WAN host. This client becomes a trusted host.
- Accepted -Internal traffic: All packets are allowed to move freely from one LAN host to another.
- Blocked -Policy violation: This access request violates the Firewall's security policy.
- Blocked -IP Fragment: If the Firewall is configured to block all IP fragments, this message is recorded for every blocked fragmented packet.
- Blocked -IP Source-Routes: This message is recorded whenever a packet is blocked due to a Source Route (either strict or loose) option set in its IP header.
- Blocked -State-table error: The Firewall encountered an error during State-table lookup or manipulation. Packet was blocked.
Firewall Setup
- Aborting configuration
- Configuration completed
WBM Login
- Authentication Success
- Authentication Failure
Telnet Login
- Authentication Success
- Authentication Failure
System Up/Down
- The system is going DOWN for reboot
- The system is UP!
† Appears only with regard to inbound traffic.
You can choose additional activities to be recorded in the Firewall log using the Firewall Log Settings screen. For each activity type, you may choose to view messages associated with successful attempts (Accepted), failed attempts (Blocked), or both.
To view/change the Firewall Log settings:
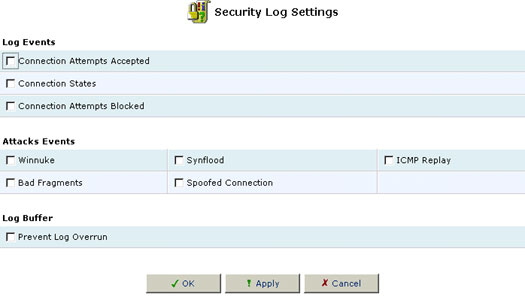
- Click the Settings button that appears at the top of the Firewall Log screen. The Firewall Log Settings screen will appear.
- Select the types of activities for which you would like to have a log message generated:
- Connection Attempts Messages: log a message for each attempt to establish an inbound connection to the home network or vice versa.
- Telnet Connection Attempts Messages: log a message for each attempt to establish an inbound Telnet connection to the home network or vice versa (included in first category).
- WBM Connection Attempts Messages: log a message for each attempt to browse to Web-based Management from a browser outside the home network.
- Select the Prevent Log Overrun checkbox in order to stop logging firewall activities when the memory allocated or the log fills up.
- Click OK to save your changes and return to the Firewall Log screen.
Secure Local Administration
You can connect directly to the USR8200 Firewall/VPN/NAS in order to perform local administration tasks. In order to do this, you must establish a PPP over Serial (PPPoS) connection between the administration host and the USR8200 Firewall/VPN/NAS.
To perform local administration via a PPPoS connection, perform the following steps:
- Connect a serial cable between the administration host and the USR8200
Firewall/VPN/NAS. To obtain a serial cable for the USR8200 Firewall/VPN/NAS,
contact USRobotics Technical Support.
Note: The serial cable connects to a ten pin connector on the circuit board. You must open the case to access this connector. Opening the case will void the warranty.
- Run a PPTP client on the administration host.
- After the PPP connection is established, the USR8200 Firewall/VPN/NAS can be accessed via HTTP/S over this connection.
- Reset the USR8200 Firewall/VPN/NAS when you are finished.
Running PPP Clients on Linux
To run a PPP client on a Linux host, enter the following line:
pppd <SERIAL_DEV_NAME> <BAUD> noauth user <USERNAME> local nobsdcomp nodeflate
In the previous line, the following information should be entered:
SERIAL_DEV_NAME The name of the serial device on the LInux machine,
e.g. /dev/ttyS1
BAUD 115200
USERNAME This is the name of a user with Administrator privileges.
Make sure that a proper secret is defined in either /etc/ppp/chap-secrets
or /etc/ppp/pap-secrets on the Linux machine.
Running PPP Clients on Windows
To run a PPP client on Windows XP, you will need to install a NULL modem driver. Perform the following steps:
- Click the Phone and Modem Options icon on the Control Panel.
- Select the Modems tab and click Add.
- Select the Don't detect my modem; I will select it from a list checkbox and click Next.